crwdns2915892:0crwdne2915892:0
The repair of AirPods has always been a difficulty not only for repair shop owners but also Apple. The after-sales policy of Apple now is replacing AirPods that meet after-sales standards directly with new ones. From a user experience perspective, this approach can ensure user satisfaction, but it also reflects the difficulty of repair. Today our repair course is about replacing the battery of AirPods 1.
crwdns2942213:0crwdne2942213:0
crwdns2936621:0crwdne2936621:0
-
-
Set the temperature of the Hot Air Gun to 100℃ and airflow to 7. Switch to helical wind.
-
Place the AirPods 20mm around the Hot Air Gun and heat the metal cap for 3 minutes. During the heating process, we need to flip the AirPods constantly to heat it evenly.
-
-
crwdns2935267:0crwdne2935267:0Tweezers$4.99
-
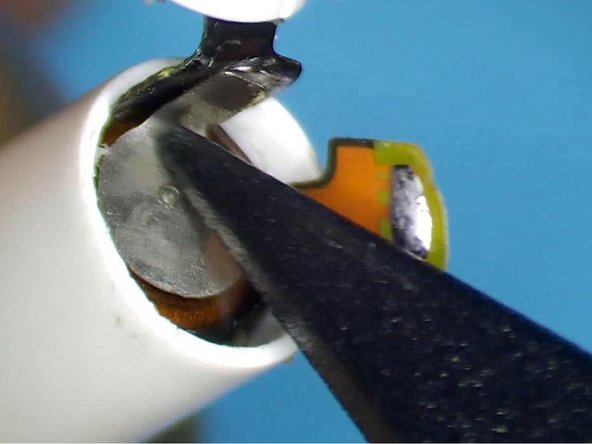
Pry up the metal cap from the side with an L. The back of the L side has a flex cable. Please do not damage the flex cable while prying.
-
Remove adhesive with tweezers. We need to heat the AirPods constantly while removing adhesive.
-
-
-
Please pay attention to the black flex cable while prying the metal cap. Attach the AirPods to the holder and keep removing adhesive with tweezers. To take out the battery, the adhesive must be removed completely.
-
A small amount of alcohol can be added to facilitate adhesive removal.
-
-
-
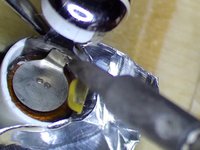
Insulate with aluminum foil after adhesive removal.
-
Set the temperature of the Soldering Iron to 365℃ and apply some Paste Flux to the bonding pad.
-
-
-
-
Heat with Soldering Iron and pry up the cathode of the battery. Please do not touch the aluminum foil while applying heat to avoid damaging the plastic case. Since the anode of the battery is on the other side of the cathode of the flex cable, we need to pry up the flex cable.
-
Keep applying a small amount of Paste Flux. Heat with Soldering Iron to separate the anode of the battery from the flex cable.
-
Remove the anode iron plate of the battery with a Cutting Nipper.
-
-
-
Then we take out the battery with revamped tweezers. Detach the AirPods from the holder. Heat the bottom of the AirPods evenly for 3-5 minutes with Hot Air Gun at 100℃.
-
Insert the two holes of the battery anode with tweezers and clamp the anode to remove the battery.
-
-
-
Take out excess adhesive. For easy installation later, remove adhesive around the metal cap completely.
-
Apply tin to the anode of the battery with Soldering Iron.
-
-
-
Plug the battery into the AirPods.
-
Attach the AirPods to the holder and insulate with aluminum foil. Heat with Soldering Iron to solder the battery anode to the flex cable.
-
-
-
After soldering, press the flex cable down. Put the battery anode in position and heat with Soldering Iron to solder.
-
Then we put the AirPods into the charging case to test. The AirPods can be charged.
-
Apply B7000 Adhesive to the bottom of the AirPods.
Gent.mo ho sostituito le batterie degli AirPods 1 prima generazione. Si caricano ma non si connettono al cellulare pur avendo fatto il reset. Ho provato a dissociare dispositivo e ricollegarle. Il cellulare vede gli auricolari vede la carica ma non si collegano. Nell’attesa di consigli Grazie
-
-
-
Close the metal cap and fix it with tape. After about 1 hour, the adhesive has set and we peel off the tape.
-
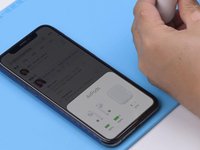
Put the AirPods into the charging case to test. The AirPods can pair with the phone and music can be played.
-
Take off the AirPods and the music stops. The battery has been successfully replaced.
-


To replace the battery of AirPods, use Hot Air Gun with helical wind to heat the metal cap. Pry up the metal cap from the side with an L letter after heating for about three minutes. Then remove adhesive and pay attention not to damage the flex cable. After adhesive removal, protect the plastic case with aluminum foil and separate the cathode and anode of the battery from the flex cable. To remove the battery, keep heating the bottom of the AirPods and take out the battery with revamped tweezers. Lastly, we install the new battery, solder the cathode and anode of the battery, and fix with adhesive.
To replace the battery of AirPods, use Hot Air Gun with helical wind to heat the metal cap. Pry up the metal cap from the side with an L letter after heating for about three minutes. Then remove adhesive and pay attention not to damage the flex cable. After adhesive removal, protect the plastic case with aluminum foil and separate the cathode and anode of the battery from the flex cable. To remove the battery, keep heating the bottom of the AirPods and take out the battery with revamped tweezers. Lastly, we install the new battery, solder the cathode and anode of the battery, and fix with adhesive.
crwdns2935221:0crwdne2935221:0
crwdns2935229:058crwdne2935229:0

crwdns2947412:020crwdne2947412:0
Where do you buy the batteries?
Why don't you ship products to Turkey?
You can buy the batteries from AliExpress and shipping to Turkey is cheap.
When it don’t work no more I love taking things apart and possibly upgrading them. I really don’t know why people throw electronics away when it could either be fixed or taken apart to build something else. Like many circuit boards for example.
Gent.mo ho sostituito le batterie degli AirPods 1 prima generazione. Si caricano ma non si connettono al cellulare pur avendo fatto il reset. Ho provato a dissociare dispositivo e ricollegarle. Il cellulare vede gli auricolari vede la carica ma non si collegano. Nell’attesa di consigli Grazie
Incredible work here. Shame on Apple for making this so difficult.
broken apple 2gen battery use very simple gen1 airpods very powerfull battery thanks
I followed this tutorial successfully. Tried on 3 AirPods (from 2 pairs) and got two of them working again. Except for a little bit of soldering this is really no more difficult than replacing an iPhone battery. If you are on the fence, give it a try.
Hi, thanks for your information. I follow your instruction and change my air pods bettery. But It is only working in pods. If airpods out of pod, it didn't working. device can't pairing. Could you know what is problem?
Ciao ! Le mie airpods A2031 non portano batterie cilindriche. Per errore un giorno me ne cadde una e si aprì il vado cassa e da lì uscì quella che credo fosse una batteria quadrata avvolta nel classico film argento, di piccolissime dimensioni… che a voi risulti, è esistito in commercio un modello che avesse questo tipo di batterie piuttosto che quelle cilindriche? Premetto che queste mi furono regalate da un amico che credendo di averle perse ne comprò un altro paio per poi ritrovare queste… ma se potessi ripararle sarebbe una soddisfazione per me. Grazie
Hi did you got links for tools that you used on the video ? I mean soldering machine, and other tools, i got tools but not adapted for this type of repair.
Very nice. I will use the heat gun to melt my face instead.
John Madsen (John A. Madsen) - crwdns2934203:0crwdne2934203:0
WARNING: This guide omits from step 6 the critical information that the Airpod's antenna, which is made of ceramic and very fragile, is glued to the side and top of the battery. Not knowing this at the time, I only found out because the antenna came out along with the battery, pretty much destroying the Airpod as the antenna cannot be repaired.
I failed once, tried twice. Few things that are critical.
1: Rewerted tweezers, just gently while heating up or the anode rips out
2: ultra fine point bent soldering tip or the airpod melts even when not touching.
3: Flux thevone they use.
4: worst thing is heating. Too much it melts. Too little it breaks.
5: prying the cap, it broke in half at the white separation lines. I thought it was all metal.
At the end, you gotta try and fail on few ones until you grt the grasp of it
I connected the battery terminals incorrectly. Is there any way to fix it?
What a work of art! (Referring to the author's work, not Apple's, obviously)
Hmm. I have 3 pairs of gen 2 airpods, did the replacement on the first set and the first AirPod I did (the right one) plays loudly out of the outer mesh now and quietly inside the ear, like its inverted on the speakers. The left one is normal. Not sure whats up with that. Maybe I damaged the ribbon cable? I don't understand how that would invert the speakers but still play out of both but oh well. I guess it was good practice.
Oh and for anyone that's going to attempt this; get heat resistant tape. I got some on Aliexpress when I ordered batteries. It was like $3 USD. Worked wonderfully. Didn't melt anything and somehow everything went swimmingly for my first attempt. Word of warning though be super careful with the ribbon cable; I'm guessing that I damaged the ribbon attached to the end cap on my first attempt because that AirPod plays very quietly in the ear but loudly outside of the ear. Or it could be that when I inserted the battery it wasn't perfectly lined up so maybe its shorting something. Just take it slow, use heat resistant tape, and rely more on isopropyl to pull the battery out than heat. The battery in the first one I did came out with just isopropyl and the heat of my hand.
I want to shооt myself in the head after following this guide. Thanks Apple.