crwdns2915892:0crwdne2915892:0
You will need a printed adapter to mount the ADXL345 to the rear of the X carriage. You can find one here
crwdns2942213:0crwdne2942213:0
-
-
Connect the Accelerometer to the RPI
-
Accelerometer 3V3 to RPI pin 17 3.3v
-
Accelerometer GND to RPI pin 20 Ground
-
Accelerometer CS to RPI pin 24 GPIO08 (SPI0_CE0_N)
-
Accelerometer SDO 21 to RPI pin GPIO09 (SPI0_MISO)
-
Accelerometer SDA to RPI pin 19 GPIO10 (SPI0_MOSI)
-
Accelerometer SCL 23 to RPI pin GPIO11 (SPI0_SCLK)
-
-
-
There are a number of options you can use to mount the accelerometer. I used this mount
-
-
-
You need to SSH into to your printer and install Numby.
-
~/klippy-env/bin/pip install -v numpy
-
sudo apt update
-
sudo apt install python3-numpy python3-matplotlib -y
-
Verify Linux SPI driver is enabled
-
sudo raspi-config
-
#3 Interface Options > P4 SPI > Yes > OK > Finish
-
-
-
-
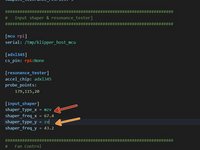
Uncomment the input shaper & resonance tester section in the config.
-
probe_points: It's recommended to use 1 point in the center of the bed slightly above. I used the same coordinates used when homing Z
-
Restart klipper with
-
RESTART
-
-
-
Check to make sure the RPI can communicate with the ADXL345 by running the following command in console
-
ACCELEROMETER_QUERY
-
It should return something like:
-
adxl345 values (x, y, z): -152.983740, 10249.910580, 152.983740
-
-
-
Home the printer.
-
During resonance testing the vibrations can become extremely violent. Make sure you're in proximity of the printer in case you need to cancel the test with M112
-
Now you can run the first resonance test for X
-
TEST_RESONANCES AXIS=X
-
When the test completes run it again for Y
-
TEST_RESONANCES AXIS=Y
-
When the test is complete it will generate CSV files stored on the pi.
TEST_RESONANCES AXIS=X
When the test completes run it again for Y
TEST_RESONANCE AXIS=Y
need to add S on the end of RESONANCE
Good catch thanks. It’s been corrected.
Thank you, most helpful indeed. An alternative to TEST_RESONANCE, is to use SHAPER_CALIBRATE for a coreXY using one sensor (or SHAPER_CALIBRATE AXIS=X and SHAPER_CALIBRATE AXIS=Y for a bed slinger with 2 separate sensors - hotend and bed). This allows to retrieve the results of the calibration test directly in the console, and results can be easily saved to the printer.cfg using SAVE_CONFIG. This method eliminates the need to SSH into the rpi and issuing the commands mentioned in the next step, then having to look up and copy the values yourself into the printer.cfg
-
-
-
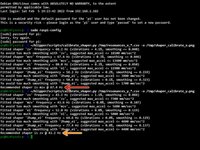
SSH back in to the printer and run the following 2 commands
-
~/klipper/scripts/calibrate_shaper.py /tmp/resonances_x_*.csv -o /tmp/shaper_calibrate_x.png
-
~/klipper/scripts/calibrate_shaper.py /tmp/resonances_y_*.csv -o /tmp/shaper_calibrate_y.png
-
This script will generate the charts /tmp/shaper_calibrate_x.png and /tmp/shaper_calibrate_y.png with frequency responses
-
You will also get the suggested frequencies for each input shaper, as well as which input shaper is recommended for your setup.
-
You can see my values for X
-
You can see my values for Y
-
-
-
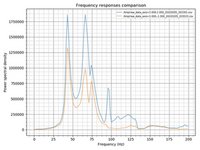
With a CoreXY you can also use Klipper to compare belt tension between X and Y. This doesn't tell you if the belts are too tight or too loose. It tells you have the belts are tensioned equally.
-
Run the following commands in the console
-
TEST_RESONANCES AXIS=1,1 OUTPUT=raw_data
-
TEST_RESONANCES AXIS=1,-1 OUTPUT=raw_data
-
SSH into the pi and run
-
~/klipper/scripts/graph_accelerometer.py -c /tmp/raw_data_axis*.csv -o /tmp/resonances.png
-
Based off the generated graph, X had much higher frequencies than Y. I had to tighten the left belt tensioner to to bring the frequencies closer to each other.
-
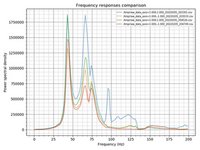
As you can see from the 2nd test the frequencies for X and Y are closer together, but could still use a little more adjustment. I think a lot of the frequency variation is due to my cable chain. At lower frequencies it rattles considerably more only when calibrating X.
-


crwdns2935221:0crwdne2935221:0
crwdns2935229:08crwdne2935229:0
crwdns2947410:01crwdne2947410:0
Great Post! You might want to add a paragraph on the RPi Microcontroller for multi mcu with the pi