crwdns2915892:0crwdne2915892:0
You will remove several cables, screws, and finally the motherboard. This opens up the device in order to repair practically everything.
crwdns2942213:0crwdne2942213:0
-
-
Turn the netbook upside down with the battery at the top, facing away from you.
-
-
-
Unlock the battery by sliding the switch located near the left hinge to the left "unlocked" position.
-
-
-
Slide the latch located on the opposite hinge from the lock while pushing the battery up.
-
-
-
Gently loosen the two Phillips #0 screws in the small panel that covers the wireless card.
-
-
-
Lift up the panel and remove it from the case.
-
-
-
Disconnect the two antenna cables from the left side of the wireless card.
-
-
-
Remove the single 3.9 mm Phillips #1 screw from the bottom left of the wireless card.
-
-
-
Gently lift up the left side of the wireless card and slide the card out of its socket.
-
-
-
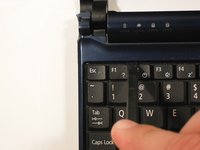
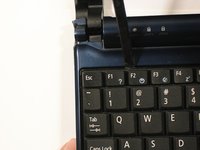
Turn the netbook over and open the display so that the keyboard is facing you.
-
-
-
-
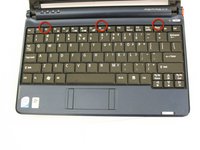
There are three tabs located on the top of the keyboard.
-
Start with the spudger pointing towards the display and pry up to push each tab off the keyboard.
-
As you move to the next tab, ensure the previous tab doesn't reset itself.
-
-
-
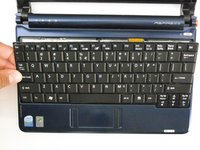
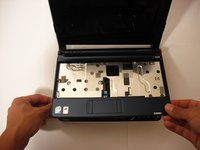
Lift top of keyboard up. If it doesn't lift easily, there may be tabs on the sides - use the tool to ease them aside and/or shift the keyboard from side to side.
-
-
-
Disconnect the ribbon by lifting the black plastic hinge and removing the clear blue cable.
-
-
-
Close the display and turn the ZG5 over so that the battery compartment faces away from you.
-
-
-
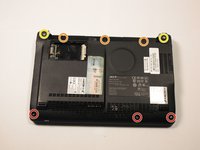
Remove three 5.8 mm Phillips #0 screws from the bottom of the case
-
Remove three 3.9 mm Phillips #1 screws from the battery compartment.
-
Remove two 5.8 mm Phillips #0 screws from underneath the feet near the hinges.
-
-
-
Turn the netbook back over and open the display with the keyboard cavity facing you.
-
-
-
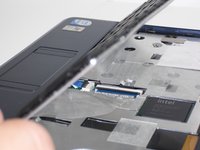
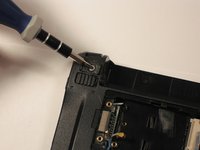
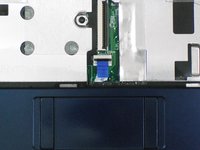
Flip up the retaining flap on the trackpad ribbon cable ZIF connector.
-
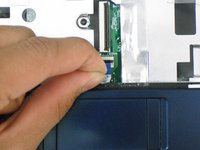
Using the blue tab, pull the trackpad ribbon cable from its socket on the motherboard.
-
-
-
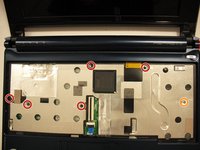
Remove the five black 4.7 mm Phillips #0 screws from the metal casing.
-
Remove the single silver 4.3 mm Phillips #00 screw from the right side of the metal casing.
-
-
-
Starting at the red rings along the hinge, insert a spudger or plastic opening tool into the seam between the two halves of the case.
-
Slide the spudger toward the front of the device, releasing the small clips that hold down the top case.
-
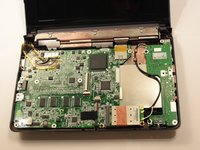
Gently lift off the top case.
-
-
-
Disconnect the two antenna cables from the right side of the wireless card.
-
-
-
Remove the single 3.9 mm Phillips #1 screw from the wireless card.
-
-
-
Gently pull the wireless card to the right and slide it out of its socket.
-
-
-
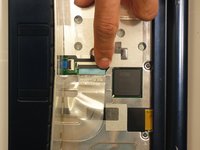
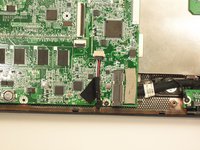
Disconnect the display cable from the top left of the motherboard.
-
-
-
Disconnect the speaker cable from its socket on the motherboard.
-
-
-
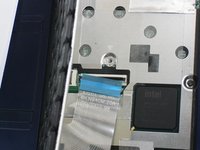
Remove three 3.9 mm Phillips #1 screws from the small I/O board.
-
Remove a single 3.9 mm Phillips #0 screw from the front of the motherboard.
-
-
-
Remove the two 4.7 mm Phillips #1 screws that connect the display to the motherboard.
-
-
-
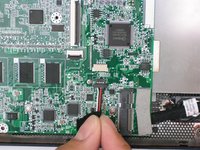
Gently lift the I/O board up from the right side of the case.
I took apart an SSD variant. At this step, there were two screws holding the SSD down, but the SSD did not come out with the main and daughter boards. Detaching the I/O cable freed the mainboard to come out with or without the daughterboard.
there are 2 silver screws that need to be removed in this step your picture shows them still installed (one is located neer audio plug, the other is located neer keyboard plug) in step 27 (next step) they have been removed without mention
I have added 1 gb of memory to my ZG5 thanks to this helpful guide. Total cost, including a spudger and a new mini screwdriver, to tackle the 00 Philips, GBP 17.57
I fear I haven't put the trackpad connector back properly, but device works great with a wireless mouse. Very many thanks.
-
-
-
Lift the entire motherboard assembly out the case.
-


To reassemble your device, follow these instructions in reverse order.
To reassemble your device, follow these instructions in reverse order.
crwdns2935221:0crwdne2935221:0
crwdns2935229:024crwdne2935229:0
crwdns2915084:0crwdne2915084:0

Cal Poly, Team 7-49, Amido Fall 2010 crwdns2935289:0Cal Poly, Team 7-49, Amido Fall 2010crwdne2935289:0
CPSU-AMIDO-F10S7G49
crwdns2931471:05crwdne2931471:0
crwdns2935297:027crwdne2935297:0
crwdns2947412:02crwdne2947412:0
Hi Doug,
I'm about to rebuild my old acer netbook ZG5 and discovered that there is nothing under the wireless card door. Does this mean that the wireless card is embedded? I ask because I am now doubting that the netbook was ever wifi (but it must have been.) Newegg doesn't seem to have any motherboards available for the ZG5 so I'm thinking I'll get one from ebay. Thanks for the guide.
Matt
Bro, i got problem with this mobo...
The resistor is broke, its located on side of keyboard port...
I'm trying to de-solder but it wont move.
What should i do?