crwdns2933423:0crwdne2933423:0

Acer Aspire A515-51G Lower Case Replacement

crwdns2942213:0crwdne2942213:0

  1. Acer Aspire A515-51G Lower Case Replacement, Unfasten the HDD hatch: crwdns2935265:01crwdnd2935265:01crwdnd2935265:02crwdne2935265:0 Acer Aspire A515-51G Lower Case Replacement, Unfasten the HDD hatch: crwdns2935265:01crwdnd2935265:02crwdnd2935265:02crwdne2935265:0
    • Use a Phillips screwdriver to remove the screw securing the HDD hatch on the bottom left of the lower case.

  2. Acer Aspire A515-51G Lower Case Replacement, Remove the HDD hatch: crwdns2935265:02crwdnd2935265:01crwdnd2935265:03crwdne2935265:0 Acer Aspire A515-51G Lower Case Replacement, Remove the HDD hatch: crwdns2935265:02crwdnd2935265:02crwdnd2935265:03crwdne2935265:0 Acer Aspire A515-51G Lower Case Replacement, Remove the HDD hatch: crwdns2935265:02crwdnd2935265:03crwdnd2935265:03crwdne2935265:0
    • Insert the flat end of a spudger under the cutout on the top right corner of the HDD hatch and pry it up.

    • Remove the HDD hatch.

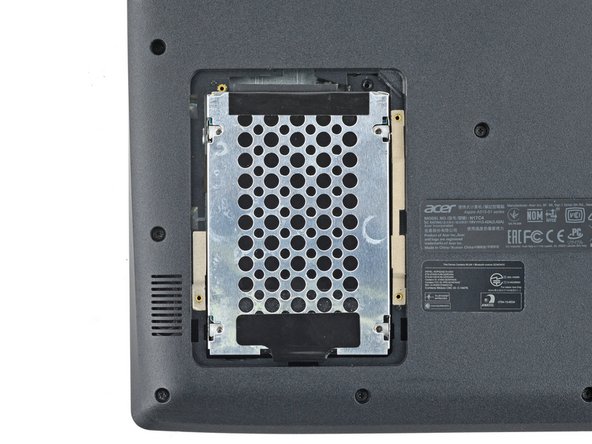
  3. Acer Aspire A515-51G Lower Case Replacement, Unfasten the HDD assembly: crwdns2935265:03crwdnd2935265:01crwdnd2935265:02crwdne2935265:0 Acer Aspire A515-51G Lower Case Replacement, Unfasten the HDD assembly: crwdns2935265:03crwdnd2935265:02crwdnd2935265:02crwdne2935265:0
    • Your HDD assembly may be secured to the lower case with screws. If it's not, skip this step.

    • Use a Phillips screwdriver to remove the four screws securing the HDD assembly.

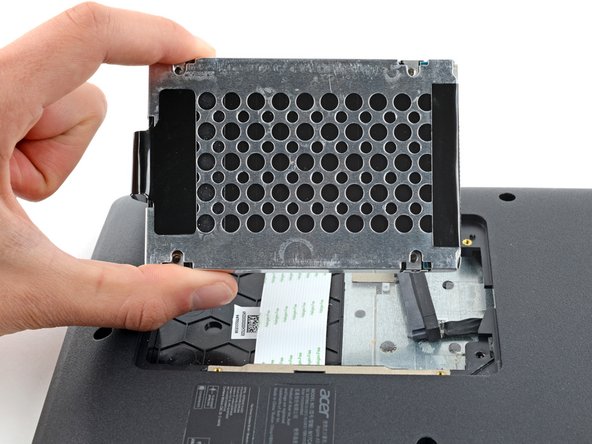
  4. Acer Aspire A515-51G Lower Case Replacement: crwdns2935265:04crwdnd2935265:01crwdnd2935265:03crwdne2935265:0 Acer Aspire A515-51G Lower Case Replacement: crwdns2935265:04crwdnd2935265:02crwdnd2935265:03crwdne2935265:0 Acer Aspire A515-51G Lower Case Replacement: crwdns2935265:04crwdnd2935265:03crwdnd2935265:03crwdne2935265:0
    • Firmly grip the HDD assembly and HDD cable connector head.

    • Pull the HDD cable connector out of its socket.

    • Remove the HDD assembly.

  5. Acer Aspire A515-51G Lower Case Replacement, Unfasten the lower case: crwdns2935265:05crwdnd2935265:01crwdnd2935265:02crwdne2935265:0 Acer Aspire A515-51G Lower Case Replacement, Unfasten the lower case: crwdns2935265:05crwdnd2935265:02crwdnd2935265:02crwdne2935265:0
    • Use a Phillips screwdriver to remove the eighteen 6.6 mm screws securing the case.

  6. Acer Aspire A515-51G Lower Case Replacement, Insert an opening pick: crwdns2935265:06crwdnd2935265:01crwdnd2935265:02crwdne2935265:0 Acer Aspire A515-51G Lower Case Replacement, Insert an opening pick: crwdns2935265:06crwdnd2935265:02crwdnd2935265:02crwdne2935265:0
    • Insert an opening pick between the lower case and the chassis on the front right edge.

  7. Acer Aspire A515-51G Lower Case Replacement, Release the case's front clips: crwdns2935265:07crwdnd2935265:01crwdnd2935265:03crwdne2935265:0 Acer Aspire A515-51G Lower Case Replacement, Release the case's front clips: crwdns2935265:07crwdnd2935265:02crwdnd2935265:03crwdne2935265:0 Acer Aspire A515-51G Lower Case Replacement, Release the case's front clips: crwdns2935265:07crwdnd2935265:03crwdnd2935265:03crwdne2935265:0
    • Slide the pick along the front edge to release the clips securing the lower case.

  8. Acer Aspire A515-51G Lower Case Replacement, Release the remaining clips: crwdns2935265:08crwdnd2935265:01crwdnd2935265:02crwdne2935265:0 Acer Aspire A515-51G Lower Case Replacement, Release the remaining clips: crwdns2935265:08crwdnd2935265:02crwdnd2935265:02crwdne2935265:0
    • Continue sliding the opening pick along the perimeter of the lower case to release the remaining clips.

  9. Acer Aspire A515-51G Lower Case Replacement: crwdns2935265:09crwdnd2935265:01crwdnd2935265:03crwdne2935265:0 Acer Aspire A515-51G Lower Case Replacement: crwdns2935265:09crwdnd2935265:02crwdnd2935265:03crwdne2935265:0 Acer Aspire A515-51G Lower Case Replacement: crwdns2935265:09crwdnd2935265:03crwdnd2935265:03crwdne2935265:0
    • Lift the lower case from the chassis and remove it.

    • During reassembly, this is a good point to power on your laptop and test all functions before sealing it up. Be sure to power your laptop back down before you continue working.

crwdns2915888:0crwdne2915888:0

To reassemble your device, follow these instructions in reverse order.

Take your e-waste to an R2 or e-stewards certified recycler.

Repair didn't go as planned? Try some basic troubleshooting, or ask our Acer Aspire answers community for help.

crwdns2935227:0crwdne2935227:0

Spencer Day

crwdns2935283:009/14/22crwdne2935283:0

55.203 crwdns2915208:0crwdne2915208:0

crwdns2935297:0408crwdne2935297:0

crwdns2915084:0crwdne2915084:0

iFixit crwdns2935289:0iFixitcrwdne2935289:0

Staff

crwdns2931471:0136crwdne2931471:0

crwdns2935297:017.430crwdne2935297:0

crwdns2944067:00crwdne2944067:0

crwdns2917038:0crwdne2917038:0

crwdns2936625:0crwdne2936625:0:

crwdns2936751:024crwdne2936751:0 6

crwdns2936753:07crwdne2936753:0 12

crwdns2936753:030crwdne2936753:0 58

crwdns2942667:0crwdne2942667:0 1,196