crwdns2915892:0crwdne2915892:0
Use this guide to replace the battery in your Acer Aspire A515-51G Laptop.
For your safety, discharge the battery below 25% before disassembling your device. This reduces the risk of fire if the battery is accidentally damaged during the repair. If your battery is swollen, take appropriate precautions.
crwdns2942213:0crwdne2942213:0
-
-
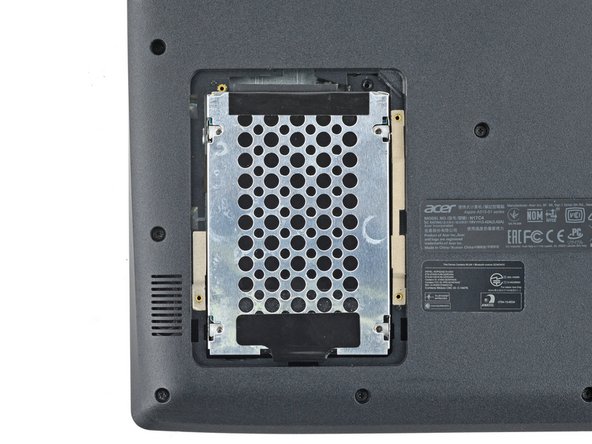
Use a Phillips screwdriver to remove the screw securing the HDD hatch on the bottom left of the lower case.
-
-
-
Insert the flat end of a spudger under the cutout on the top right corner of the HDD hatch and pry it up.
-
Remove the HDD hatch.
-
-
-
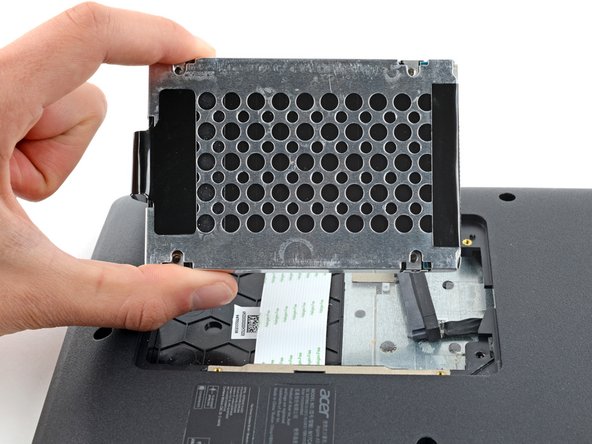
Use a Phillips screwdriver to remove the four screws securing the HDD assembly.
-
-
-
Firmly grip the HDD assembly and HDD cable connector head.
-
Pull the HDD cable connector out of its socket.
-
Remove the HDD assembly.
-
-
-
Use a Phillips screwdriver to remove the eighteen 6.6 mm screws securing the case.
WARNING, WARNING WILL ROBINSON!!
Before you remove the lower case, you MUST remove the HDD as it is attached to the lower case. If you pull the lower case up with HDD still attached you will rip the HDD cable off the motherboard. So ...
Unscrew the HDD hatch.
Pull HDD hatch on lower right off carefully.
Unscrew the four black screws holding the HDD assembly to lower case.
Carefully pull the HDD cable off the HDD (careful here, you could rip cable off motherboard).
Carefully pry HDD assembly upwards (with spunger) and remove HDD.
Now proceed with rest of remining steps.
Would someone be able to attach photos to these steps. I don't have the ability to do so, easily.
Hi Stephen, our device didn't have an HDD installed so I was unaware of this. I have updated the guide accordingly, thank you!
-
-
-
-
Insert an opening pick between the lower case and the chassis on the front right edge.
-
-
-
Slide the pick along the front edge to release the clips securing the lower case.
-
-
-
Continue sliding the opening pick along the perimeter of the lower case to release the remaining clips.
With the USB sockets, you can use the pick to engage between the bridges. If you push the housing slightly apart above the sockets, the housing around the USB sockets will come off easily.
-
-
-
Lift the lower case from the chassis and remove it.
-
-
-
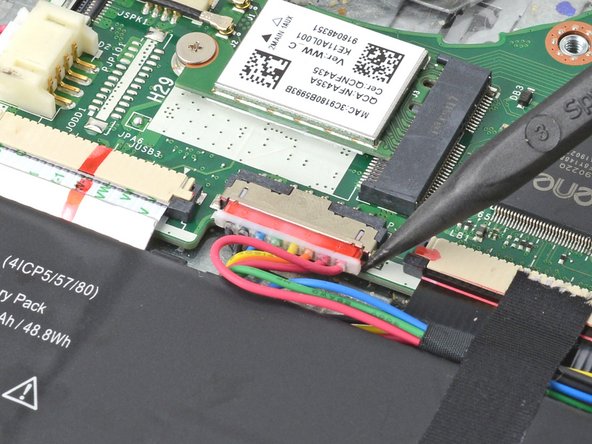
Use the pointed end of a spudger to push each side of the battery connector until it comes out of the socket.
-
-
crwdns2935267:0crwdne2935267:0Tweezers$4.99
-
Use tweezers, or your fingers, to peel back the tape connecting the battery to the motherboard.
-
-
-
Use a Phillips screwdriver to remove the two 4.5 mm-long screws securing the battery.
-
-
-
Pull the battery towards the top of the laptop to release its plastic clips.
-
Remove the battery.
-


To reassemble your device, follow these instructions in reverse order.
For optimal performance, calibrate your newly installed battery after completing this guide.
Take your e-waste to an R2 or e-Stewards certified recycler.
Repair didn’t go as planned? Try some basic troubleshooting, or ask our Answers community for help.
crwdns2935221:0crwdne2935221:0
crwdns2935227:0crwdne2935227:0


crwdns2947410:01crwdne2947410:0
Where would you suggest going to buy a replacement battery for this A515-51G model Acer laptop?