crwdns2933423:0crwdne2933423:0

3rd party DualShock 2 Wireless Controller Analog Stick Replacement

crwdns2942213:0crwdne2942213:0

  1. 3rd party DualShock 2 Wireless Controller Analog Stick Replacement, Analog Stick: crwdns2935265:01crwdnd2935265:01crwdnd2935265:02crwdne2935265:0 3rd party DualShock 2 Wireless Controller Analog Stick Replacement, Analog Stick: crwdns2935265:01crwdnd2935265:02crwdnd2935265:02crwdne2935265:0
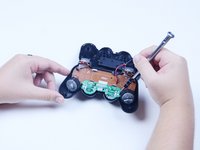
    • Remove the six 7.8 mm anchoring screws from the back casing of the controller using a Phillips #0 screwdriver.

    this is a guide for a 3rd party wireless controller! do not follow unless you have this really specific controller!

    Macro Man - crwdns2934203:0crwdne2934203:0

  2. 3rd party DualShock 2 Wireless Controller Analog Stick Replacement: crwdns2935265:02crwdnd2935265:01crwdnd2935265:02crwdne2935265:0 3rd party DualShock 2 Wireless Controller Analog Stick Replacement: crwdns2935265:02crwdnd2935265:02crwdnd2935265:02crwdne2935265:0
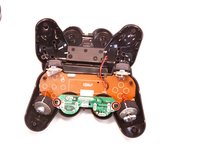
    • Pull apart the outer casing by hand, or by using a plastic opening tool, from the bottom of the controller.

    • Be mindful not to sever the connection between the battery pack attached to the back casing and the internal board

  3. 3rd party DualShock 2 Wireless Controller Analog Stick Replacement: crwdns2935265:03crwdnd2935265:01crwdnd2935265:02crwdne2935265:0 3rd party DualShock 2 Wireless Controller Analog Stick Replacement: crwdns2935265:03crwdnd2935265:02crwdnd2935265:02crwdne2935265:0
    • Remove the two 6.1 mm screws holding the internal analog stick board and the front of the controller together.

  4. 3rd party DualShock 2 Wireless Controller Analog Stick Replacement: crwdns2935265:04crwdnd2935265:01crwdnd2935265:02crwdne2935265:0 3rd party DualShock 2 Wireless Controller Analog Stick Replacement: crwdns2935265:04crwdnd2935265:02crwdnd2935265:02crwdne2935265:0
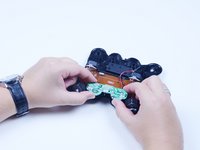
    • Lift the analog stick board away from the front of the controller.

    • Remove the detached or loose analog stick for realignment.

  5. 3rd party DualShock 2 Wireless Controller Analog Stick Replacement: crwdns2935265:05crwdnd2935265:01crwdnd2935265:01crwdne2935265:0
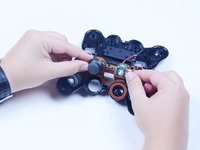
    • Realign the analog stick by pushing the removed stick back into its chassis with focus on pushing it in at the new, desired resting angle. You should feel or hear a small click if done correctly.

    • The stick may not immediately click into place under the pressure. Instead of pushing harder, try rotating the stick 90 degrees and pushing down again.

crwdns2915888:0crwdne2915888:0

To reassemble your device, follow these instructions in reverse order.

crwdns2935229:017crwdne2935229:0

Roger Campbell

crwdns2935283:007/12/17crwdne2935283:0

313 crwdns2915208:0crwdne2915208:0

crwdns2935295:0crwdne2935295:0

crwdns2915084:0crwdne2915084:0

Texas Tech, Team S1-G1, Rauch Summer 2017 crwdns2935289:0Texas Tech, Team S1-G1, Rauch Summer 2017crwdne2935289:0

TTU-RAUCH-SU17S1G1

crwdns2931471:02crwdne2931471:0

crwdns2935297:04crwdne2935297:0

crwdns2947412:02crwdne2947412:0

Hello,

My Dual Shock 2 is still working well after all these years! However, the left analog stick is becoming increasingly squeaky, and has begun to stick on rare occasion, but still functions near perfectly 99.9% of the time. Is there a simple trick to loosen the stick, and perhaps any buttons such as square and X, to prevent squeaking and sticking, using a household lubricant product such as WD 40?

Thank you,
Daniel McNamara

D_mac08 - crwdns2934203:0crwdne2934203:0

The controller featured here is not an official Dualshock 2 controller.

Synapse - crwdns2934203:0crwdne2934203:0

crwdns2917038:0crwdne2917038:0

crwdns2936625:0crwdne2936625:0:

crwdns2936751:024crwdne2936751:0 10

crwdns2936753:07crwdne2936753:0 75

crwdns2936753:030crwdne2936753:0 316

crwdns2942667:0crwdne2942667:0 15,552