crwdns2933423:0crwdne2933423:0

Clever power port blown help needed pls

My son plugged his clevo laptop into the scooter charger and it’s blown the little chip / capacitor/ doide/ resistor ect ect on the main board , the battery was goosed anyways , is they anyway to hardwire the charger into the laptop ? All help welcome pls , thx Shane

Update (10/17/25)

Block Image

Update (10/17/25)

Block Image
Block Image

Update (10/17/25)

Block Image
crwdns2934089:0crwdne2934089:0 crwdns2934093:0crwdne2934093:0

crwdns2934109:0crwdne2934109:0

crwdns2889612:0crwdne2889612:0 1
crwdns2944067:05crwdne2944067:0

Unsure on how to add pictures

Thx Shane

crwdns2934271:0crwdnd2934271:0crwdne2934271:0

Hi @bowmeat

What is the model number of the motherboard (printed on the board) and the make and model number of the laptop (if you can't find the board model number)?

Was the laptop turned on and working at the time this occurred?

crwdns2934271:0crwdnd2934271:0crwdne2934271:0

As far has I am aware it was powered off because the battery I goosed , where would I find the model number , ?

Thx for the reply

crwdns2934271:0crwdnd2934271:0crwdne2934271:0

I know it’s a laptop . But it never moves so I wouldn’t be bothered hard wiring it to the charger if possible , , if that makes sense

crwdns2934271:0crwdnd2934271:0crwdne2934271:0

Thx for the reply’s

I don’t think I would be confident to do this with my lack of knowledge and crap equipment , does anybody know anywhere local to Leeds uk that would. Try this fix for me ? Also any ideas on prices I could be looking at ,,

Thx Shane

crwdns2934271:0crwdnd2934271:0crwdne2934271:0

crwdns2934285:0crwdne2934285:0

crwdns2933315:02crwdne2933315:0

crwdns2934057:0crwdne2934057:0

Hi @bowmeat

Bypassing the power management circuit is not a good idea.

Besides which you don't know what else may be wrong with it.

Couldn't find a free download online but you can purchase the schematics from here for a reasonable cost.

The schematics will identify the type of components (and the their model numbers) so that you can find replacements.

Also if there are any other problem they will help to find them as well.

You will need smd soldering skills and tools to do the repair and possibly a DMM (digital multimeter) as well if there are other problems.

crwdns2934105:0crwdne2934105:0

crwdns2889612:0crwdne2889612:0 1
crwdns2934285:0crwdne2934285:0

@bowmeat picture 1 and 2 are a bit to close. We need to see more of the surrounding area as well as the reference designator (those white printed numbers and letters). See if you can get a little better focus on the images :-)

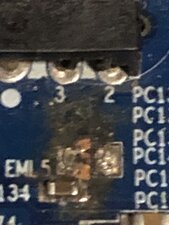
If it says EML5 right next to the component then it is a HCB2012kf-800T80 EMI/RFI Filter (Ferrite Bead Inductor). Essentially you are looking for a ferrite bead filter (inductor) 80 Ohms, 8A max rated current in a 0805 package. kind of hard to find due to the high amperage but you do have some wiggle room. You can always go a bit higher. Something like this will work but it is a 0.2mm shorter. You will need to bridge that small gap with your soldering.

It's doable and not as complicated as it seems. It is also relatively inexpensive. Of course, you can purchase the component from wherever you have easy access to. I just use the company in the link a lot and know what they sell. No kickbacks involved :-)

To work on your computer and to scope out the rest of the circuitry, if you ever have the need to do so, use the Cleevo P670SA Service Manual which does include the schematic.

crwdns2934105:0crwdne2934105:0

crwdns2889612:0crwdne2889612:0 1

crwdns2944067:03crwdne2944067:0:

I am ok with soldering , but on much larger objects , could anybody please explain in detail on what I have to do exactly , any help welcome , my little boy is so upset about this. And. I don’t have the money to buy a new laptop for him

Thx Shane

crwdns2934271:0crwdnd2934271:0crwdne2934271:0

@bowmeat it's actually pretty straight forward. Check something like this video to get an idea. In your case you will need to clean the solder pads with some de-soldering wick and plenty of flux :-) Apply the flux to the pads, touch the de-soldering wick on the solder pads of the board and use your soldering iron. You should see the solder flowing into the wick. Keep moving the soldering iron and the wick across the old solder to clean it up. No, you do not need to remove the old solder, just cleaning the area. Main thing is to watch the heat. All you need is enough heat to melt the solder, not the traces or the solder pad.

Once the pads are clean, apply new solder to those and place the components on the pads. Then resolder component to the pads. Clean the joints with isopropyl alcohol, and a Q-tip.

I know it's easier said then done but this is the hardest part about remote repair. We can't be there when you do it and can't really guide you.

crwdns2934271:0crwdnd2934271:0crwdne2934271:0

@bowmeat Shane this "little boy is so upset about this. And. I don’t have the money to buy a new laptop for him" is the right motivation and the only motivation that is need. To repair things for others and to save our hard earned money. Repair is War on Entropy!

crwdns2934271:0crwdnd2934271:0crwdne2934271:0

crwdns2934285:0crwdne2934285:0

crwdns2934229:0crwdne2934229:0

Bowmeat crwdns2934231:0crwdne2934231:0
crwdns2936625:0crwdne2936625:0:

crwdns2936751:024crwdne2936751:0 6

crwdns2936753:07crwdne2936753:0 13

crwdns2936753:030crwdne2936753:0 62

crwdns2942667:0crwdne2942667:0 62