crwdns2933423:0crwdne2933423:0

Repair guides, disassembly information, and troubleshooting for the Logitech Signature M650 wireless mouse. Identifiable by part numbers (P/N) 910-006250, 910-006251, and 910-006252.

Logitech Signature M650 left click not working

Why is the left click on my Logitech Signature M650 mouse not working properly? I have to press it harder than usual or force click for it to register. What could be causing this, and how can I fix it?

crwdns2934089:0crwdne2934089:0 crwdns2934093:0crwdne2934093:0

crwdns2934109:0crwdne2934109:0

crwdns2889612:0crwdne2889612:0 1
crwdns2934285:0crwdne2934285:0

crwdns2933315:02crwdne2933315:0

crwdns2934057:0crwdne2934057:0

Yup, same problem. Disassembled it. Tried to directly press the button underneath slightly, which is just right for my use - doesn't register. Have to press it harder. The disassembly process is just like M550 (on Youtube), but be careful of the extra twisted wire for LED on the top shell on the M650.

So far, finding the switch for the 'SW1' has been unfruitful. Will update if I find anything.

crwdns2934105:0crwdne2934105:0

crwdns2889612:0crwdne2889612:0 1

crwdns2947414:01crwdne2947414:0:

There are many on Amazon or AliEx. Search for phrases like:

Silent Mouse Button Switch 6*6*7.3MM Square Microswitch Two Pin

The switch is 7.3mm tall, and 6mm (or 6.2mm) square.

crwdns2934271:0crwdnd2934271:0crwdne2934271:0

crwdns2934285:0crwdne2934285:0

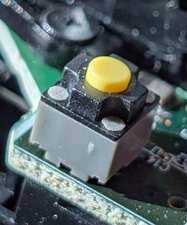
The switch failed. You can find the part on Amazon or AliEx. Search for phrases like:

Silent Mouse Button Switch 6*6*7.3MM Square Microswitch Two Pin

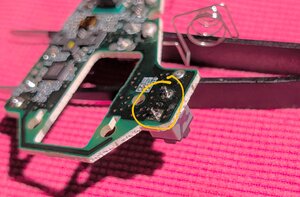
The switch is 7.3mm tall, and 6mm (or 6.2mm) square. You will need a solder sucker or wick, and to remove the board from the shell (4 screws and carefully pry out the battery contacts). The switch is held on by its own 2 pins and is easy to remove.

Block Image

Update (11/16/25)

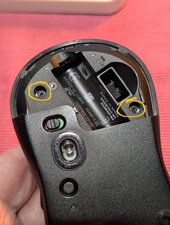
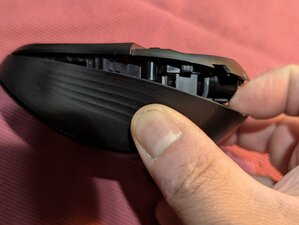
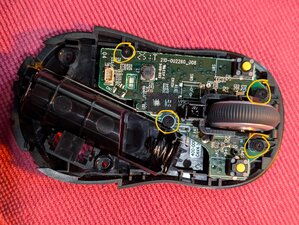
Getting in to the mouse is pretty easy. Start with these two screws inside the battery door. Then gently separate the mouse from the back. There is a clip near the front so you have to kind of slide the bottom forward to release it.

Block Image
Block Image

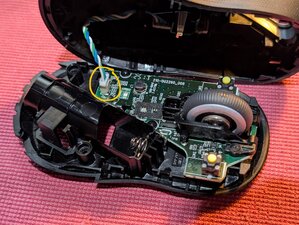
Remove the main cable

Block Image

Remove 4 screws for the PCB & scroll wheel (scroll wheel comes off separately)

Block Image

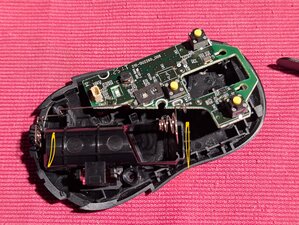
Remove the battery terminals by gently pulling up the whole PCB. Don't bend or stress the battery wires.

Block Image

Use a solder-sucker to remove and then resolder with new switches for the left and right mouse button. .

Block Image

crwdns2934105:0crwdne2934105:0

crwdns2889612:0crwdne2889612:0 1
crwdns2934285:0crwdne2934285:0

crwdns2934229:0crwdne2934229:0

Horenus Dessalegn crwdns2934231:0crwdne2934231:0
crwdns2936625:0crwdne2936625:0:

crwdns2936751:024crwdne2936751:0 4

crwdns2936753:07crwdne2936753:0 40

crwdns2936753:030crwdne2936753:0 116

crwdns2942667:0crwdne2942667:0 140