crwdns2933423:0crwdne2933423:0

The original Xbox is Microsoft's first widely popular video gaming system. It has an easily identifiable black case with 'XBOX' emblazoned on the top and front. Repair is easy with common tools.

Screen flickers when activity on screen on OG Xbox Console

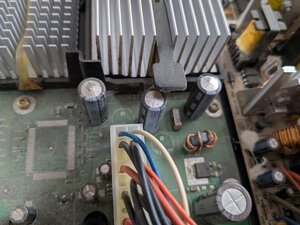
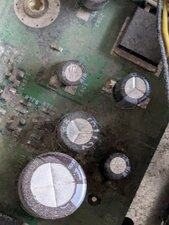
So picked this console up a couple of weeks ago. Finally got around to testing it. I didnt have a AV cable for it, so bought some cheapy one online. It works great when reading discs and playing games, but anytime there is movement/activity, the screen flickers. Like the outline of all the objects in the screen flicker. I read it could be the 3 capacitors leaking near the processor that needs replaced. So I opened it up and I dont really see any issues visually. I am not an expert, so I could be missing out on something. I attached photos of the capacitors. Do you see any issues? Or maybe I just got a bad AV cable?
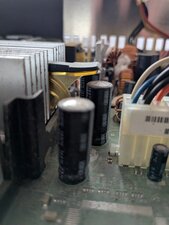
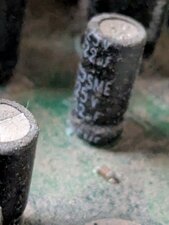
Block Image
Block Image
Block Image
Block Image
Block Image

UPDATE 1:

This is the photo of the clock capacitor
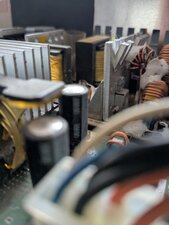
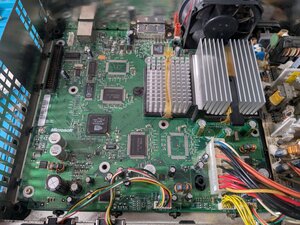
Block Image
Block Image

UPDATE 2:

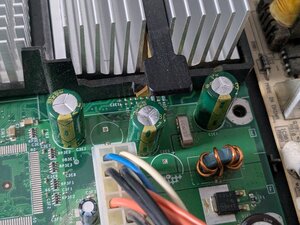
Ok I installed the new capacitors near the CPU. I guess the last one is the clock one. Below are a couple of photos after install and cleaning the board...

Block Image
Block Image
crwdns2934089:0crwdne2934089:0 crwdns2934093:0crwdne2934093:0

crwdns2934109:0crwdne2934109:0

crwdns2889612:0crwdne2889612:0 0
crwdns2934285:0crwdne2934285:0

crwdns2933313:01crwdne2933313:0

crwdns2934057:0crwdne2934057:0

Hi there!

Those 3 capacitors are bad. They are blown and need to be replaced. Those caps didn’t fail entirely yet, otherwise your Xbox didn’t turn on anymore. You need 3x 6.3V 3300uF caps.

Replacing those is needed as soon as possible, otherwise they will leak and could damage the motherboard for good!

I never heard that they can cause issues with screen flickering. So my guess is that your AV cable is bad as well…. Would replace this one for a somewhat better on (or get the original one, they are more expensive, but worth it).

Can you also place some photo’s regarding the clock capacitor?? They are known to get bad and also need to be replaced as soon as possible. The clock cap is a 2.5V 1F cap. This capacitor can cause way more damage then the other 3. It can cause serious issues with the on/off button, LED and disk drive eject button, and way more.

Be aware that you DO need to solder. But to save your motherboard, this is really needed. Otherwise you can bring it to a local repair shop to do the repair for you.

Please keep us posted! Thanks!

crwdns2934105:0crwdne2934105:0

crwdns2889612:0crwdne2889612:0 1

crwdns2944067:08crwdne2944067:0:

Hey, really appreciate your post! I will see about getting it replaced right away. I have a soldering station, but I am a noobie. I do like soldering batteries for gameboy games, simple stuff like that. I added photos of the clock capacitor to the original post. Please let me know if that looks bad too. Thanks again! Oh and yes, it needs a complete cleaning too. So dusty. I believe it was in someones storage unit for a very long time... Better than the roaches I found in the other one a few months ago.

crwdns2934271:0crwdnd2934271:0crwdne2934271:0

Glad that I can help :)! Alright, it's not too hard to solder them out. It's just desoldering the solder from the legs under the motherboard and then wiggle it to get it out (while heating is recommended and easier to get it out).

No problem at all! Best thing is to clean it first yes and get rid of all the dust. This clock capacitor is still the "old" version and also need to be replaced ASAP! It did not leak yet, but it will for sure...

And yes, way better to have dust then roaches inside the Xbox!!!

Please let us know how it goes :)!

crwdns2934271:0crwdnd2934271:0crwdne2934271:0

Wow that was difficult for me. The difficulty wasnt getting the old capacitors out, it was getting the new ones in. Had a hard time getting the solder out of the holes to put the legs in. I tried a combination of the manual solder sucker and the wick. I would put fresh solder in the holes, then try to get them out. Took awhile, but finally came out. Also didnt know what polarity goes to what side. I just assumed the dot on the board goes with the dot on the side of the new capacitor. After replacing all 3, the xbox powers on and now zero screen flickering. Works great, except now the games are loading very slow. Could be I still have the xbox apart and the disk drive is at an angle. But now just gonna clean the console up the best I can, put it back completely and hope things work out. Might need to take the disk drive apart and clean the inside of that as well, including the lens.

crwdns2934271:0crwdnd2934271:0crwdne2934271:0

Yeah, I always use the copper solder wick to get it out! It does take some time indeed! Glad that you replaced everything! Did you also replaced the clock cap? Good to hear that the screen flickering is gone now! Usually not caused by them, but glad that it did work!!!

Hmm, yes. Always a good idea to clean everything. The slow loading could be caused by the disk drive it's laser or HDD. The lasers are basically no where to be found and a working disc drive is really expensive to buy. So, hopefully it's not the disk drive. You can clean the lens and see if that will improve things! Thanks for keep us updated :)!

Replacing the HDD is possible, but is locked with a unique HDD key, which is stored in the Xbox EEPROM. There are ways to get the code from the EEPROM or HDD and lock a new HDD with the specific code! If you have a WD HDD it is easier to get the unique HDD key. BUT let's try cleaning the lens first!

crwdns2934271:0crwdnd2934271:0crwdne2934271:0

On the capacitors, there are white lines. The motherboard also have those white lines there, they need to match! This is the most easy way to know what polarity goes where!

crwdns2934271:0crwdnd2934271:0crwdne2934271:0

crwdns2934275:03crwdne2934275:0

crwdns2934285:0crwdne2934285:0

crwdns2934229:0crwdne2934229:0

Sillychaoss2988 crwdns2934231:0crwdne2934231:0
crwdns2936625:0crwdne2936625:0:

crwdns2936751:024crwdne2936751:0 1

crwdns2936753:07crwdne2936753:0 41

crwdns2936753:030crwdne2936753:0 41

crwdns2942667:0crwdne2942667:0 41