crwdns2933423:0crwdne2933423:0

{A1989 / EMC3214}—Released in July 2018, the 13" MacBook Pro features quad-core i5 and i7 processors and Intel Iris Plus integrated graphics.

Board repair: Touchbar dead, inductor blown after repair attempt

I recently replaced the display on my 2018 Macbook Pro 13" A1989, and forgot to disconnect the battery. In doing so I must have short-circuited a board or something, and blown a connector/inductor for the touchbars power as it no longer works or is recognised by the system.

I am new to microsoldering but would give it a go if replacing the connector would fix the issue, but I havent had any luck finding what this part is and where to get it from. If anyone could help with the part number and how to go about replacing it that would be amazing :)

Block Image
crwdns2934089:0crwdne2934089:0 crwdns2934093:0crwdne2934093:0

crwdns2934109:0crwdne2934109:0

crwdns2889612:0crwdne2889612:0 1
crwdns2934285:0crwdne2934285:0

crwdns2933315:02crwdne2933315:0

How to Proceed

  1. Get the Board Schematics or Boardview File
    • Websites like Zadig or RepairBoard offer Apple MacBook schematics and boardview files for your model.
    • These show the exact location and specs of the inductor.
  2. Locate the Blown Inductor on the Board
    • Use a multimeter to check continuity and verify the blown component.
    • Often, the blown inductor looks burnt or damaged.
  3. Find a Replacement Inductor
    • Once identified, source a matching inductor from electronics suppliers (e.g., Digi-Key, Mouser).
    • If you have the boardview, the specs (inductance, size, current rating) will guide you.
  4. Microsoldering Repair
    • Use hot air rework or soldering iron with fine tip.
    • Remove the damaged inductor carefully.
    • Replace with the new one precisely—avoid heating nearby components.

crwdns2934105:0crwdne2934105:0

crwdns2889612:0crwdne2889612:0 0

crwdns2947414:01crwdne2947414:0:

@i_am_the_cosmos AI generated Technobabble

crwdns2934271:0crwdnd2934271:0crwdne2934271:0

crwdns2934285:0crwdne2934285:0

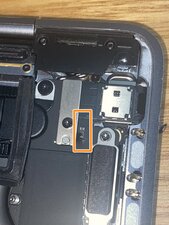
@sengraham looks like your board is a 820-00850 board and the components are located by the left USB-C connector. It appears you lost two components from the bottom of your picture up, you got reference designator CC701 which is a 3.0pF +/- 0.1PF 25V capacitor in a 0201 package. Next component up, is L5100 which is a 1.2UH-20%-0.12A-1.17OHM inductor in a 0402 package. Those components should be readily available at places like Mouser.com or Digikey.com as well as many other places.

Now, as for the repair. You do know that you will need to go ahead and remove your board. MacBook Pro 13" Touch Bar 2018 Logic board Replacement then clean everything off with some isopropyl alcohol. Evaluate your board for any other damage.

To de-solder as well as re-solder the new components, you will need some decent tools. A good rework station is a must to solder on Apples logic boards. I would recommend that you start to practice on some old junk boards to get your technique down and that you know what heat etc. you will need. This is really not something that we can teach on here. Even a YouTube video can only give you ideas but it's not a substitute for practice.

Also, for now I do not see any reason to replace the connector since that is most likely not the reason since it does not look damaged at all. Of course, it could just be my old eyes and I may not see it. If you do, take another picture and post that as well.

Let us know once you have the board out etc. what your plans are and we can ty to guide you further.

crwdns2934105:0crwdne2934105:0

crwdns2889612:0crwdne2889612:0 0
crwdns2934285:0crwdne2934285:0

crwdns2934229:0crwdne2934229:0

Sen Graham crwdns2934231:0crwdne2934231:0
crwdns2936625:0crwdne2936625:0:

crwdns2936751:024crwdne2936751:0 0

crwdns2936753:07crwdne2936753:0 16

crwdns2936753:030crwdne2936753:0 27

crwdns2942667:0crwdne2942667:0 27