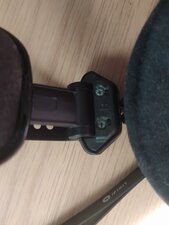
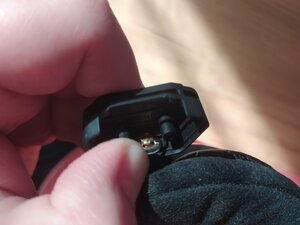
I actually had the exact same issue with the right ear cup. Here's how I disassembled mine:
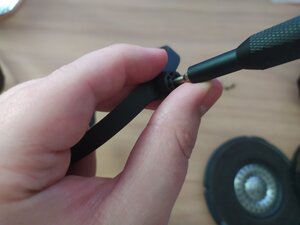
The good part is, the main assembly comes apart pretty easily and elegantly, you just need to undo the two screws (If you have an iFixit screwdriver kit, the "J0" cross head is the exact right size for the job):
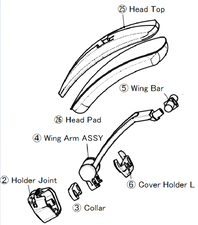
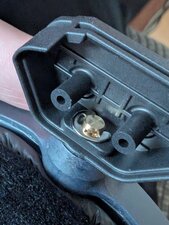
Here's a diagram piece that shows how it all fits together (Sadly, this cropped segment is all I have from an old email with AT customer support. It doesn't actually show the part where it connects to the earcup, but it paints a picture for getting there, at least):
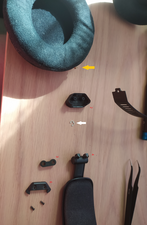
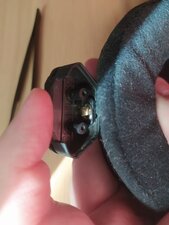
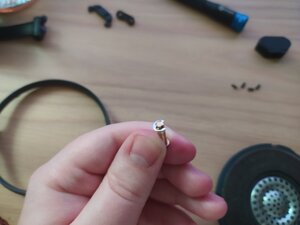
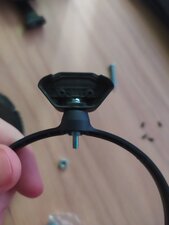
Now, once you take it apart, it may all come loose instantly (like in my case), or the earcup might stay connected to the #2 "Holder Joint" piece, depending on what the damage is. I was left with the pieces in the following image:
I have labeled the ones that are shown on the diagram with the same numbers for reference, but we are interested in the earcup connecting pin (gold arrow) and the retaining clip that goes around it & keeps it connected to the headband assembly (white arrow). In my case, the problem was that the clip had come loose.
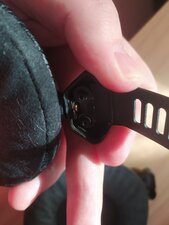
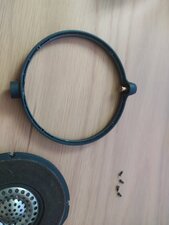
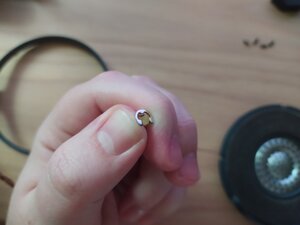
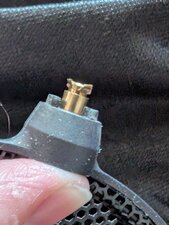
Here's an image from the other side, to show how it's supposed to stay together:
Note that the exact orientation of the ring (which way the opening is pointing) does not seem to be important - All that matters is that it should sit snugly under the rim of the pin, with the points of the clip in the indents on the pin.
So if the earcup is loose or turning in a weird way, the issue is probably that the retaining clip has come partially or completely loose, or that this interface point itself (or the plastic around it) has worn away/broken.
If the clip has come off but is still in one piece, like in my case, you can put it back by placing the pin on the earcup back in the hole, forcing the ends of the clip under it, and then putting enough pressure on it to slip it back into place. This process is a very fiddly three-handed affair with small components, but possible. For the last part of pushing the clip, I suggest using a wider piece of metal that gives you better leverage than just using your fingers - I managed with the back-end of a set of iFixit pliers.
In my case, I was able to put the retaining clip back on, but the earcup is still somewhat rattly and loose. I suspect because one of the indents on the pin has worn away, and the end of the clip that sits there wants to slip off if there is any duress. The whole thing is certainly a pretty convoluted way of attaching the earcup, but I suppose they did it this way to give the whole system a little more sideways wiggle room so it can fit different head shapes more comfortably.
EDIT: I ended up taking it apart a bit more.
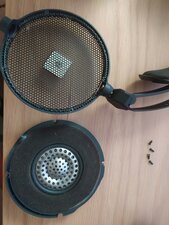
First, if you take the earpad off, you'll see 4 screws at the edges of the earcup. These come out with the same cross-head screwdriver as the ones in the headband.
Once they're out, the speaker and the outer metal grille can be simply lifted out, which just leaves the frame and the pin.
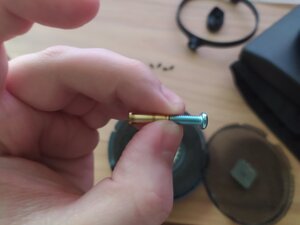
The pin is only held in place by the cap on the end and friction, so it can be removed pretty easily. If needed, the same screwdriver works as a punch for this.
Once it's out, you can get a better look at how it interfaces with the clip. Can confirm the issue with mine is that one of the indents has basically worn through, and if the clip is in the wrong position (which it will end up in inevitably, if it moves around enough), it will just slip off.
I guess the proper fix would be to replace the pin at this point, but it doesn't seem to show up among the orderable spare parts on AT's site. So one would probably have to send a request to their customer support to see if they can provide these.
As an intermediate fix, I noticed that the pin is actually basically just an M4 screw in diameter and form factor - It's just smooth, and slightly longer than the standard 12mm long M4.
So, if you had a 13-14mm long M4 screw and a matching nut, you could probably improvise a pretty durable (if more rigid) replacement. A similarly long M3 with some washers would probably also do the trick, while retaining some of the "wiggle factor" of the original attachment solution.
To illustrate what I mean, here's an assembly with a longer 19mm M3 screw. I can verify that the headband connection pieces will fit in place over the screw head, and the nut will fit between the speaker assembly and the earcup frame basically exactly. But, the screw needs to end where the nut ends - There is no more viable space below it.