I had what sounds like the same exact issue as you, so hopefully the solution is the same. No amount of cleaning the rollers or tinkering would fix the problem. In fact, it seemed like the feeder rollers weren't spinning at all.
I dug up the service manual online and proceeded to take everything apart until I could get to the gearing and have a look for anything out of place.
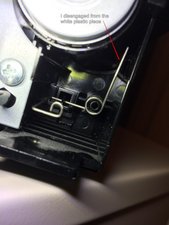
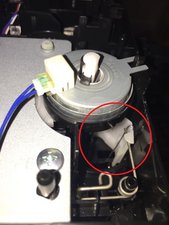
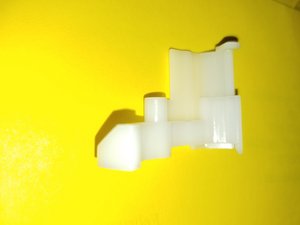
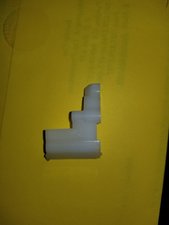
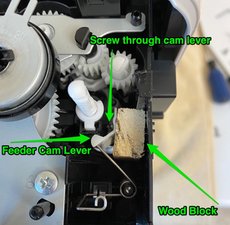
There is a small plastic lever that is used to lift/lower a gear in order to start and stop the feeder rollers. This lever can come out of position such that it can no longer wedge beneath the gear, and instead pushes against the side of the gear. Thus, the feeder rollers will no longer work.
Fortunately, the problem exists in a place that requires no disassembly.
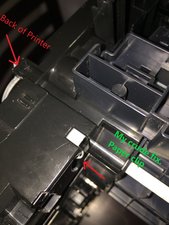
1. Remove the paper tray.
2. Facing the printer from the front: Immediately to the left of the paper tray slot, there is a small hole (Circled in RED) with a white piece of plastic visible through it (Squared in BLUE). This white piece of plastic is the lever we need to put back into position. If it looks like in my photo, it's where it should be. If you see less of the white plastic, it is out of position.
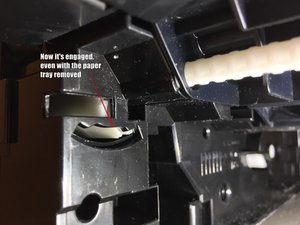
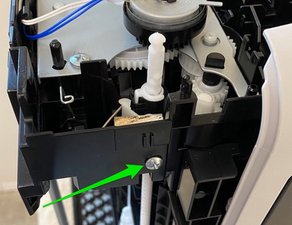
Before step 3: Notice the curved slot (Underlined in YELLOW) directly beneath the hole where the white plastic lever lives. There is a very small clip/hook on the lever which is supposed to rest in this slot, keeping the lever from dislodging and causing the very issue we are having. If you look into the slot, you should be able to see the clip. When I did this fix, this clip broke because I was impatient. You will need to gently flex the clip up (toward the top of the printer) while following step 3, so that it seats correctly in the curved slot.
3. With some small pliers/needle nose, grab the white plastic piece as seen in the image and gently but firmly pull it toward the right side of the printer (BLUE arrow). It should slide into the correct position, and the small clip should latch into the slot, hopefully stopping this from ever happening again. If you fail to flex the clip up, it will press against the inside of the printer's casing and snap off.
-- If the clip breaks like mine, it's not the end of the world. You'll just be more likely to need to do this simple process again in the future.
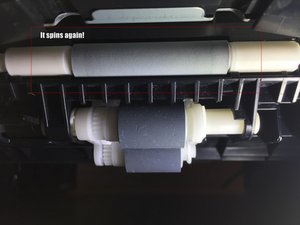
4. Slide the paper tray back in and give it a whirl. Hopefully it works for you.
crwdns2934105:0crwdne2934105:0
crwdns2934113:0crwdne2934113:0
crwdns2915270:0crwdne2915270:0
crwdns2889612:0crwdne2889612:0
171


crwdns2944067:025crwdne2944067:0
This worked great. I used a bent paperclip (as a hook) to pull the clip to the right, then used a small standard screwdriver to guide the clip into the slot at the same time. Thanks so much for the solution.
crwdns2934271:0crwdnd2934271:0 stbenish crwdne2934271:0
Use of a two-part platform allows for its easy removal after the printing process is finished. Thanks to this feature, the model can be easily removed without causing any calibration issues. Perforations on the platform allow to print using materials based on ABS which have a tendency to warp. They prevent the model from peeling off during printing process. Additionally, an extra layer of raft is used as a special base for the object. This is very important for printing large models. The platform is heated to the correct temperature for each type of filament. Wide range of temperatures (from 20° C to 110° C) allow to print using many kinds of materials.
crwdns2934271:0crwdnd2934271:0 Larry K. Clark crwdne2934271:0
wow, this worked, thanks. such a great workhorse , i was about to throw this printer in the trash. used a needle nose and gently put that white piece in place, and walaah.
crwdns2934271:0crwdnd2934271:0 Frank Mijares crwdne2934271:0
I pushed it in instead of out... but the left side cover goes out easy .
I took out the drum unit and the paper tray and left the drum door open then the left side is retainer by clips and two holes one in the front and one in the back prying it out one by one i took out the cover and able to push the plastic white piece back in place .
Put back the cover , drum unit, paper tray and that's it .
crwdns2934271:0crwdnd2934271:0 Pierre crwdne2934271:0
Awesome information! Perfect fix that took 10 seconds! Thanks so much!!!
crwdns2934271:0crwdnd2934271:0 David Adams crwdne2934271:0
crwdns2934275:020crwdne2934275:0