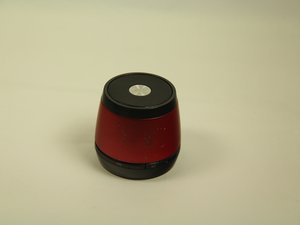
How do I bypass charging port?
The charging port is damaged and was wondering if there was any way on bypassing it
crwdns2934109:0crwdne2934109:0
crwdns2889612:0crwdne2889612:0
7

crwdns2934065:0crwdne2934065:0: 85
![]() 2
2
![]() 2
2
The charging port is damaged and was wondering if there was any way on bypassing it
crwdns2934109:0crwdne2934109:0
crwdns2934065:0crwdne2934065:0: 1
![]() 2
2
Open the unit and solder pin 1 to negative and pin 5 with positive to a cable or jack... supply it with 5v 1a or 6v 3a max
crwdns2934105:0crwdne2934105:0

crwdns2934065:0crwdne2934065:0: 836.2crwdns2936485:0crwdne2936485:0
![]() 1.3crwdns2936485:0crwdne2936485:0
1.3crwdns2936485:0crwdne2936485:0
![]() 941
941
![]() 2.4crwdns2936485:0crwdne2936485:0
2.4crwdns2936485:0crwdne2936485:0
Lidia Ascencio, not quite sure what you mean by bypassing. You will need some port in order to charge the battery. I would suggest a charging cable, cut the micro USB end off and solder the wires to the contacts on the port. Of course, if you can find a replacement port, unsolder the old one and replace with a new one. Using this guide you can actual get to the connector.
crwdns2934105:0crwdne2934105:0

crwdns2934065:0crwdne2934065:0: 25
![]() 1
1
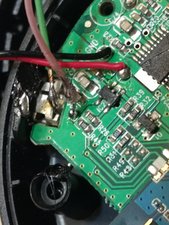
I can’t do the microsurgery to replace the actual connector but I found a spot to wire the ground and + wires from a USB cable. Apologies for my terrible soldering my eyesight is even worse then my Radio Shack soldering iron.. There are many places you can ground the connection. I just went for the easy target and soldered the green lead from my cable to the outside shield of the micro USB connector. You could probably also solder to the negative battery input. For the + terminal whuch for my cable is a pink wire I found a small through hole in the circuit board. I shoved a small wire into it and soldered my + lead. I then tested everything and used hot glue to make sure the wires didn’t move and compromise my terrible soldering job.
crwdns2934105:0crwdne2934105:0

crwdns2934065:0crwdne2934065:0: 1
![]() 1
1
that is AAAmazing . thanks
btw the world is having a pandemic these days.
crwdns2934105:0crwdne2934105:0
crwdns2936751:024crwdne2936751:0 1
crwdns2936753:07crwdne2936753:0 10
crwdns2936753:030crwdne2936753:0 50
crwdns2942667:0crwdne2942667:0 29,761
crwdns2944067:04crwdne2944067:0
Where do you find pin 1 and pin 5 on the chargering port
crwdns2934271:0crwdnd2934271:0 Mike crwdne2934271:0
What the f*** how can I get this fixed and where
crwdns2934271:0crwdnd2934271:0 Darren Ramsay crwdne2934271:0
Sometimes Radio Shack will fix $@$* like this
crwdns2934271:0crwdnd2934271:0 Ian crwdne2934271:0
Could I charge my axess Bluetooth speaker with a itek wireless charger
crwdns2934271:0crwdnd2934271:0 Benzo Hall crwdne2934271:0