
The Basics
Before undertaking any of the more time-consuming solutions below, here are a few fundamentals to get you started.
- Hard restart your Switch to rule out any potential software issues. Hold down your Switch's power button for 12 seconds, then press the button once to turn on the console.
- Ensure that Wi-Fi is enabled and Airplane Mode is off especially if you have recently bveen in a situation where you may have limited these intentionally.
- Verify your Network Information is Correct: One of the first things you should check when experiencing an issue connecting to your Wi-Fi is to ensure you are entering the correct information. Ensure you attempt to log onto the correct Wireless Network with the correct password. Check out the Manual Network Miss-Configuration Section if you manually enter your network configuration options.
- Test your Wireless Router: Access the internet from a different device and see if you can recreate the issue. If other devices are also affected, try restarting your router or check out iFixit's page on Wireless Routers.
Weak Signal
If your signal is on the low end, you can experience network drops or
- Move Closer to Your Wireless Router: If you're too far from your router, your Switch will have issues connecting to your Wi-Fi. Try moving closer to improve the signal strength. Walls and other obstacles can weaken Wi-Fi signals in addition to distance.
- Reduce Wireless Interference: Avoid placing your Nintendo Switch near electronic devices that may cause wireless interference, such as microwave ovens, cordless phones, or Bluetooth devices. These devices can disrupt Wi-Fi signals and affect your Switch's ability to connect to Wi-Fi.
Network Misconfiguration
Your Nintendo Switch will automatically handle networking settings by default. However, if you need to configure your network information manually, you might want to review the information you entered and ensure it is correct.
- IP Address Settings: IP addresses are unique numerical labels assigned to devices connected to a network, enabling them to communicate and identify each other. By default, this is set to Automatic and is recommended for most home networks, but if you have this setting set to Manual, then make sure that another device is not already using the IP address you are using.
- DNS (Domain Name System) Settings: DNS settings specify the DNS servers a device should use to translate human-readable domain names (like example.com) into IP addresses. Ensure you are using the correct Primary and Secondary DNS settings, or you can use Google's public DNS as listed below.
- Primary Public Google DNS: 8.8.8.8
- Secondary Public Google DNS: 8.8.4.4
Torn or Disconnected Antenna
An antenna is responsible for collecting signal. Without an antenna, or a complete antenna, you may not be able to connect to a network, even if you can see it. That's because the signal isn't strong enough.
- The WiFi antenna runs along the top of the Switch, through the same area as the heat sink fins. If your Switch was recently repaired, a thorough inspect is warranted.
- It's a pretty hardy cable, so it's unlikely anything would have happened to it without a repair attempt or significant damage.
- Be sure the antenna is connected soundly. It should snap onto the connector on the board.
- Replace your antenna if you find any damage.

Fault with WiFi Controller
Orange Screen of Death
All the wireless communications of the Nintendo Switch's main board are controlled from a specific chip. It is also responsible for Bluetooth communications your Switch may use. If your switch crashes to or boots to an orange screen periodically, this may actually indicate hardware failure of the WiFi controller.
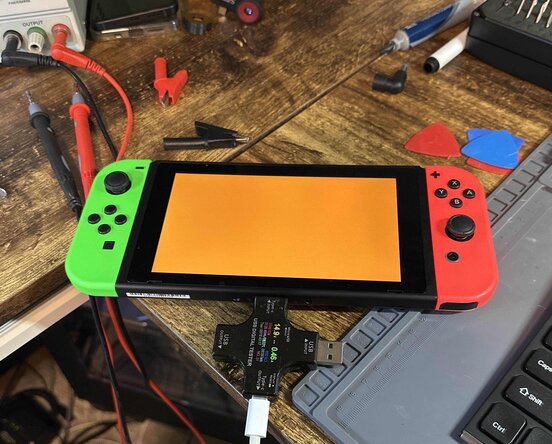
- This often happens at random—sometimes at boot, or sometimes in the middle of something unrelated. The only way to get it to resolve is to hard shut the device down (press and hold power for 12 seconds).
If this happens often, especially if accompanied by wireless connectivity issues, a trip to a board repair specialist is in order.
- The underlying cause is typically a disconnect (cracked solder joint) between the WiFi controller and the board due to drop or bend. Or the controller itself is faulty. Either way you will need microsoldering know how to fix this issue. Or to replace your motherboard.
Motherboard Fault
The motherboard is the hub for the vast majority of console functionality. Any number of the tiny board components may have failed or become damaged. It's safe to assume a motherboard fault is your cause if nothing else on this page has worked.
- Check for obvious signs of a board issue - burned or cracked components, liquid residue, corrosion, or bend. If there are signs of liquid the iPhone Liquid Damage Guide might help (this method applies to most circuit boards, not just iPhones).
- You can use this motherboard replacement guide to help get inside the device.
- Replacing the board with a new one is often the most practical solution for a DIYer in this position. If you see signs of liquid damage, this may be your best course of action.
- Contrary to popular belief, the board itself can be repaired. It requires specialized tools and microsoldering know-how. This is not something most people can do themselves, but many independent repair shops can do it for you! Give your local electronics repair shop a call and chat about how they can help.


crwdns2944067:00crwdne2944067:0