crwdns2933423:0crwdne2933423:0

iRobot Braava 380t Teardown

crwdns2942213:0crwdne2942213:0

  1. iRobot Braava 380t Teardown, iRobot Braava 380t: crwdns2935265:01crwdnd2935265:01crwdnd2935265:01crwdne2935265:0
    • Flip over the Braava

    • Remove the 4 screws circled in red in the photo.

  2. iRobot Braava 380t Teardown: crwdns2935265:02crwdnd2935265:01crwdnd2935265:01crwdne2935265:0
    • Flip over the Bravva

    • Raise the cover, which should offer no resistance.

    • Disconnect the red and black wire plug.

    • Remove the cover.

  3. iRobot Braava 380t Teardown: crwdns2935265:03crwdnd2935265:01crwdnd2935265:01crwdne2935265:0
    • The robot is now open. Take the opportunity to clean the contactors on the front.

  4. iRobot Braava 380t Teardown: crwdns2935265:04crwdnd2935265:01crwdnd2935265:01crwdne2935265:0
    • To continue dismantling and gaining access to the motors, remove the stickers.

  5. iRobot Braava 380t Teardown: crwdns2935265:05crwdnd2935265:01crwdnd2935265:01crwdne2935265:0
    • The screws of the engine covers are then clearly visible.

  6. iRobot Braava 380t Teardown: crwdns2935265:06crwdnd2935265:01crwdnd2935265:01crwdne2935265:0
    • Remove the covers.

    • Do not try to pull the engine out at this time!

  7. iRobot Braava 380t Teardown: crwdns2935265:07crwdnd2935265:01crwdnd2935265:01crwdne2935265:0
    • Remove the wheel cover by turning it a few degrees.

  8. iRobot Braava 380t Teardown: crwdns2935265:08crwdnd2935265:01crwdnd2935265:02crwdne2935265:0 iRobot Braava 380t Teardown: crwdns2935265:08crwdnd2935265:02crwdnd2935265:02crwdne2935265:0
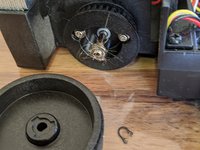
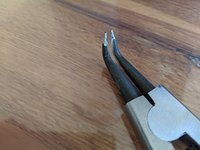
    • Remove the circlip using special pliers (cut here to be small enough)

    • Take out the wheels, and remove all the stuck hair and dirt.

  9. iRobot Braava 380t Teardown: crwdns2935265:09crwdnd2935265:01crwdnd2935265:01crwdne2935265:0
    • Undo the 2 screws. Next, remove the wheel guard.

  10. iRobot Braava 380t Teardown: crwdns2935265:010crwdnd2935265:01crwdnd2935265:02crwdne2935265:0 iRobot Braava 380t Teardown: crwdns2935265:010crwdnd2935265:02crwdnd2935265:02crwdne2935265:0
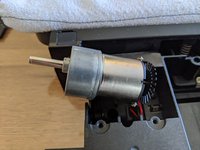
    • You can then take out the motor and possibly dismantle the gearbox. But it's no use, as I didn't find any hair inside.

crwdns2915888:0crwdne2915888:0

To reassemble your device, follow the instructions in reverse order.

crwdns2934873:0crwdne2934873:0

fr en

100%

crwdns2934885:0crwdne2934885:0 crwdns2934875:0crwdne2934875:0
crwdns2934877:0crwdne2934877:0 ›

Bossard Nicolas

crwdns2935283:009/21/18crwdne2935283:0

1,221 crwdns2915208:0crwdne2915208:0

crwdns2935297:06crwdne2935297:0

crwdns2947410:01crwdne2947410:0

crwdns2917038:0crwdne2917038:0

crwdns2936625:0crwdne2936625:0:

crwdns2936751:024crwdne2936751:0 1

crwdns2936753:07crwdne2936753:0 7

crwdns2936753:030crwdne2936753:0 28

crwdns2942667:0crwdne2942667:0 1,318