crwdns2933423:0crwdne2933423:0

crwdns2942213:0crwdne2942213:0

crwdns2935311:0crwdnd2935311:0crwdne2935311:0 crwdns2935313:0Xbox 360 Scrwdnd2935313:0crwdnd2935313:0crwdne2935313:0

  1. Xbox 360 S Teardown, Xbox 360 S Teardown: crwdns2935265:01crwdnd2935265:01crwdnd2935265:01crwdne2935265:0
    • Slide latch back and pull up to take the part of the side cover off.

  2. Xbox 360 S Teardown: crwdns2935265:02crwdnd2935265:01crwdnd2935265:01crwdne2935265:0
    • Take a flat head screwdriver and pull up on the two ends of the side cover.

  3. Xbox 360 S Teardown: crwdns2935265:03crwdnd2935265:01crwdnd2935265:01crwdne2935265:0
    • It would be a good idea to take out your hard drive so gently pull it out and set it aside.

  4. Xbox 360 S Teardown: crwdns2935265:04crwdnd2935265:01crwdnd2935265:01crwdne2935265:0
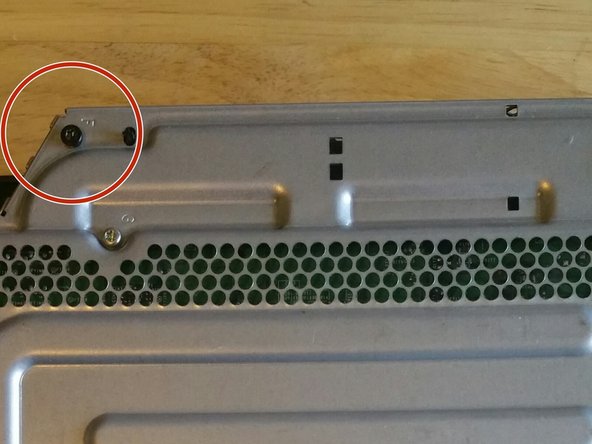
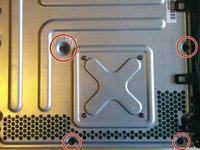
    • Take your flat head screwdriver and lift up on every hole like the ones circled in the picture until it comes off.

    This breaks the rivets and is not the best way to take the trim off.

    kevinweber - crwdns2934203:0crwdne2934203:0

    It is easier to take off the whole rim because the clips are bigger and less prone to cracking

    Santiago Vicente Martínez - crwdns2934203:0crwdne2934203:0

  5. Xbox 360 S Teardown: crwdns2935265:05crwdnd2935265:01crwdnd2935265:01crwdne2935265:0
    • To take off the frame, take a flat head screwdriver and pull of the latches until it comes off.

  6. Xbox 360 S Teardown: crwdns2935265:06crwdnd2935265:01crwdnd2935265:01crwdne2935265:0
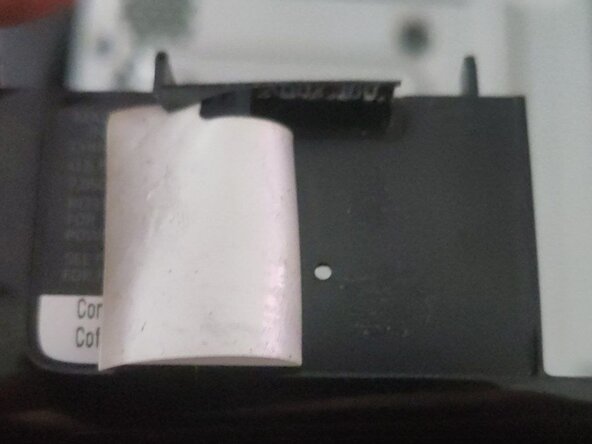
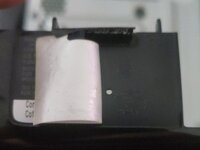
    • Take your flat head screwdriver and place in one of the cracks of the side cover on the other side and pull up to take it off.

  7. Xbox 360 S Teardown: crwdns2935265:07crwdnd2935265:01crwdnd2935265:01crwdne2935265:0
    • Take your flat head screwdriver and place it in the holes like the ones in the picture until the piece comes off.

  8. Xbox 360 S Teardown: crwdns2935265:08crwdnd2935265:01crwdnd2935265:01crwdne2935265:0
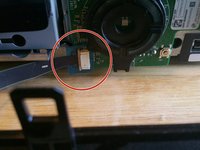
    • Take a T10 Torx screwdriver and unscrew your network chip so you don't ruin it.

  9. Xbox 360 S Teardown: crwdns2935265:09crwdnd2935265:01crwdnd2935265:01crwdne2935265:0
    • Take your flat head screwdriver and unlatch the two latches and then place a different screwdriver through the latch so it doesn't latch.

  10. Xbox 360 S Teardown: crwdns2935265:010crwdnd2935265:01crwdnd2935265:01crwdne2935265:0
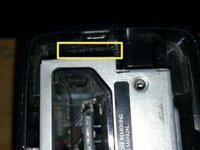
    • On the other side, take your flat head screwdriver and unlatch the latch. There is a harder latch farther inside so you have to stick the screwdriver far down and try to find it by feeling around. It helps to push both sides of your Xbox security sticker.

    There is a pin hole under the sticker on the back that pops the lower clip.

    TJ Hughes - crwdns2934203:0crwdne2934203:0

    Im not able to identify the pinhole, could you elaborate more?

    Pkhaloo Bonaccio -

    Right under the security sticker, there is another sticker that says “contains” , “cofetel ID” etc. If you rip that sticker out, there is a tiny pinhole !

    Chrys - crwdns2934203:0crwdne2934203:0

    This sucker did not want to unlatch, I eventually got it.

    NR26 - crwdns2934203:0crwdne2934203:0

  11. Xbox 360 S Teardown: crwdns2935265:011crwdnd2935265:01crwdnd2935265:02crwdne2935265:0 Xbox 360 S Teardown: crwdns2935265:011crwdnd2935265:02crwdnd2935265:02crwdne2935265:0
    • Use your T8 and T10 Torque screwdriver and take out the five black screws that are shown in the picture.

  12. Xbox 360 S Teardown: crwdns2935265:012crwdnd2935265:01crwdnd2935265:03crwdne2935265:0 Xbox 360 S Teardown: crwdns2935265:012crwdnd2935265:02crwdnd2935265:03crwdne2935265:0 Xbox 360 S Teardown: crwdns2935265:012crwdnd2935265:03crwdnd2935265:03crwdne2935265:0
    • Take your front cover with your home and eject button and lay it down in front of the console. The front cover is connected to a power source by the home button. Be very careful to pull it over and then out so you don't break it.

    pero antes de eso para poder sacar completamente la La cubierta frontal se debe de retirar la pieza de la que se le quito el primer tornillo que se menciona en el paso No. 8

    edufloper53 - crwdns2934203:0crwdne2934203:0

  13. Xbox 360 S Teardown: crwdns2935265:013crwdnd2935265:01crwdnd2935265:01crwdne2935265:0
    • This is what you will see when you are done with all the previous steps. For other teardowns like the disc tray or power source, look at ifixit.com to get the best on how to teardown something.

Julian Gonzalez

crwdns2935283:004/19/18crwdne2935283:0

383 crwdns2915208:0crwdne2915208:0

crwdns2935295:0crwdne2935295:0

crwdns2944067:013crwdne2944067:0

Some of these photos are just zoomed in and I have no idea which side, or which way up they are in respect of the console. I recommend further photos for clarity.

I don’t have this console, but I just like going through the teardowns.

Keith Woolven - crwdns2934203:0crwdne2934203:0

i have the console and it was pretty easy to follow, the only thing was the last clip he was saying to just feel around for, i just pushed in on the spot where it would be and it separated easily after that

MrrCabooodle -

This is pretty bad, pretty vague. I had to refer to a YouTube video for more information and a visual demonstration because this how-to is sparse in information. This article fails to mention what is happening at crucial steps and does not describe how it should feel when pieces come apart; if I only had this article to refer to, I probably would have given up in fear that I’d damage the case or system. I did eventually get my case apart, hardly any help from this source, sadly.

Anthony Albanese - crwdns2934203:0crwdne2934203:0

Hi Anthony,

As stated in the warning at top, a teardown is an educational look at the device, and is not meant to be used as a guide. Our repair guides will show up here, and contain accurate details (such as tools needed, how to unlock ZIF connectors, etc.) as well as step by step instructions on how to complete the repair.

Arthur Shi -

In the middle of the sticker on the back there is a pin hole to put something into to get the last clip off

Luke Eastley - crwdns2934203:0crwdne2934203:0

Could definitely give alittle more detail but for this not being the actual service manual it helps a lot and I was able to take mine apart and clean it with no real issues so all in all 5 stars will definitely be coming back here for any other repairs or tear downs in the future

Mikey Hess - crwdns2934203:0crwdne2934203:0

Ppl if you read this isn't a repair guide lol. There's instructions at the top that states that and yoy can click the link for a actual repair guide ?‍♂️

Dun 716 - crwdns2934203:0crwdne2934203:0

i just like going to the tear downs it is really cool

tostypinapple - crwdns2934203:0crwdne2934203:0

I did this entire teardown and when I was done reconstructing the Xbox and turned it on the power on light turned on and it played the power on noise every couple seconds and wouldn't display anything on screen. It wouldn't react to the eject tray button but would react to the sync controller button. After a couple of seconds of that the power on light turned off and the noise stopped playing. Any idea where I went wrong? There is no hard drive btw, I'm using an HDMI cord for the audio/video.

Noah Adams - crwdns2934203:0crwdne2934203:0

thanks a lot, now the bottom side of my xbox wont snap together anymore. I did everything it showed me, and now i have an xbox with a broken frame that i am now worried as to how i will be able to fix.

Abraham Ross - crwdns2934203:0crwdne2934203:0

Worked very well for me, I took it all the way down to the step where I could pull out the disc drive. I then took apart the disc drive with another guide and pulled out the needle I'd been using to push the eject button.

As a side note, that thing hadn't been cleaned in a decade. The amount of dust and debris in there was unreal! It ran so much better after cleaning!

Dillon Howington - crwdns2934203:0crwdne2934203:0

the instructions are helpfull, but it is hard to tell what side the picture is showing

AlbertEinstien - crwdns2934203:0crwdne2934203:0

crwdns2917038:0crwdne2917038:0

crwdns2936625:0crwdne2936625:0:

crwdns2936751:024crwdne2936751:0 38

crwdns2936753:07crwdne2936753:0 395

crwdns2936753:030crwdne2936753:0 1,695

crwdns2942667:0crwdne2942667:0 91,704