crwdns2933423:0crwdne2933423:0

crwdns2942213:0crwdne2942213:0

crwdns2935311:0crwdnd2935311:0crwdne2935311:0 crwdns2935313:0GD Midea FT30-3Dcrwdnd2935313:0crwdnd2935313:0crwdne2935313:0

  1. Teardown of GD Midea FT30-3D, Bottom Base: crwdns2935265:01crwdnd2935265:01crwdnd2935265:01crwdne2935265:0
    • Locate and remove the 14.5 mm Phillips #1 screw on the bottom of the fan base.

  2. Teardown of GD Midea FT30-3D: crwdns2935265:02crwdnd2935265:01crwdnd2935265:02crwdne2935265:0 Teardown of GD Midea FT30-3D: crwdns2935265:02crwdnd2935265:02crwdnd2935265:02crwdne2935265:0
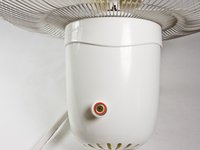
    • Locate the gray base support release tabs found on either side pictured in the first image.

    • There are release tabs on each side of the base.

    • Press both release tabs in with the tip of your fingers and pull the gray base support until the tabs are cleared.

  3. Teardown of GD Midea FT30-3D: crwdns2935265:03crwdnd2935265:01crwdnd2935265:01crwdne2935265:0
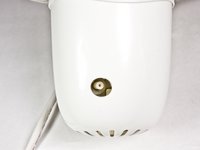
    • Continue removing the gray base support by pressing your thumb into the circular opening in the base and pulling with your figures on the back side.

    • Notice that on the internal front tip of the base there is a tab. Because of this tab the back end will pivot off at that point.

  4. Teardown of GD Midea FT30-3D: crwdns2935265:04crwdnd2935265:01crwdnd2935265:01crwdne2935265:0
    • After the base has separated more it will be easy to fully remove it. Continue pulling the back edge of the gray base support, rotating it around the front tab until it comes off completely.

  5. Teardown of GD Midea FT30-3D: crwdns2935265:05crwdnd2935265:01crwdnd2935265:01crwdne2935265:0
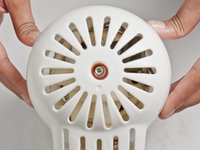
    • Remove the following five 14.5 mm Phillips #1 screws found on the bottom.

    • All of the screws are recessed by 17.5 mm, so ensure your screwdriver can reach that far.

  6. Teardown of GD Midea FT30-3D: crwdns2935265:06crwdnd2935265:01crwdnd2935265:01crwdne2935265:0
    • Once all five screws have been removed the base cover should fall right off with out any effort.

    • When putting the base cover back on; be careful to make sure that none of the wires are pinched.

  7. Teardown of GD Midea FT30-3D, AC Power Cord: crwdns2935265:07crwdnd2935265:01crwdnd2935265:01crwdne2935265:0
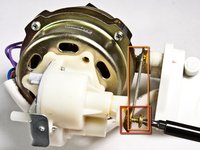
    • Remove the two 15 mm Phillips screws on the retention plate.

    • The tan retention plate will fall off once the screws are removed.

  8. Teardown of GD Midea FT30-3D: crwdns2935265:08crwdnd2935265:01crwdnd2935265:01crwdne2935265:0
    • Take the 1.5 mm Flathead Screwdriver, or any thin elongated tool that fits into the semi-circular holes along side the AC power cord white wire. Press into the hole gently to release the grip on the wire.

    • The AC power cord wire should release with ease if done properly.

  9. Teardown of GD Midea FT30-3D: crwdns2935265:09crwdnd2935265:01crwdnd2935265:01crwdne2935265:0
    • Cut the existing cable tie bundling the other AC power cord, red, orange, gray, and blue wires together.

    • Remove or cut the crimp connector connecting the blue wire and the AC power cord wire.

  10. Teardown of GD Midea FT30-3D, Power/Speed Switch: crwdns2935265:010crwdnd2935265:01crwdnd2935265:01crwdne2935265:0
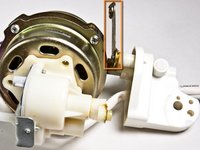
    • Remove the two 10 mm Phillips #1 screws found connecting the switch to the case.

    • Notice the AC power cord line (white wire) goes into the switch under the [Off] button

  11. Teardown of GD Midea FT30-3D: crwdns2935265:011crwdnd2935265:01crwdnd2935265:01crwdne2935265:0
    • Take the 1.5 mm Flathead Screwdriver, or any thin elongated tool that fits into the semi-circular holes along side the wires. Press into the hole gently to release the grip on the wires.

    • The wires should release with ease if done properly.

    • When reassembling; skip this step.

  12. Teardown of GD Midea FT30-3D: crwdns2935265:012crwdnd2935265:01crwdnd2935265:01crwdne2935265:0
    • Take the new switch, and simply push the wiring into the correct holes:

    • AC Power Cord (white wire)

    • Low speed (gray wire)

    • Medium speed (orange wire)

    • High speed (red wire)

  13. Teardown of GD Midea FT30-3D, Fan Blades: crwdns2935265:013crwdnd2935265:01crwdnd2935265:02crwdne2935265:0 Teardown of GD Midea FT30-3D, Fan Blades: crwdns2935265:013crwdnd2935265:02crwdnd2935265:02crwdne2935265:0
    • Release the 3 clips that attach the front fan guard to the rear fan guard.

    • Notice: The lower connecting bracket is NOT a clip. It acts as a mounting alignment bracket for the front fan guard.

  14. Teardown of GD Midea FT30-3D: crwdns2935265:014crwdnd2935265:01crwdnd2935265:01crwdne2935265:0
    • Pull the front fan guard off.

  15. Teardown of GD Midea FT30-3D: crwdns2935265:015crwdnd2935265:01crwdnd2935265:02crwdne2935265:0 Teardown of GD Midea FT30-3D: crwdns2935265:015crwdnd2935265:02crwdnd2935265:02crwdne2935265:0
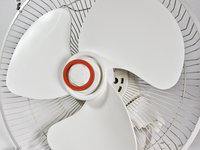
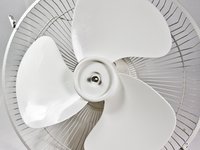
    • Remove the spinner from the center of the fan blade.

  16. Teardown of GD Midea FT30-3D: crwdns2935265:016crwdnd2935265:01crwdnd2935265:01crwdne2935265:0
    • The fan blades should now be easy to lift up.

    • When reassembling the fan make sure the notches in the center of the fan blade line up with the protrusions in the motor's shaft.

  17. Teardown of GD Midea FT30-3D, Motor: crwdns2935265:017crwdnd2935265:01crwdnd2935265:02crwdne2935265:0 Teardown of GD Midea FT30-3D, Motor: crwdns2935265:017crwdnd2935265:02crwdnd2935265:02crwdne2935265:0
    • At the base of the upper assembly there is a plug which conceals a screw.

    • The plug can be removed with a screwdriver. Removing the plug may take a few attempts.

  18. Teardown of GD Midea FT30-3D: crwdns2935265:018crwdnd2935265:01crwdnd2935265:01crwdne2935265:0
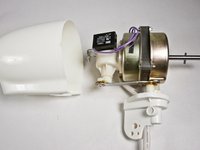
    • Slide the motor out of the base of the upper assembly.

  19. Teardown of GD Midea FT30-3D, Oscillation Mechanism: crwdns2935265:019crwdnd2935265:01crwdnd2935265:01crwdne2935265:0
    • Remove the rear fan guard by taking off the plastic nut that holds the rear fan guard to the upper assembly.

    • The plastic nut needs to be twisted off; like a screw.

  20. Teardown of GD Midea FT30-3D: crwdns2935265:020crwdnd2935265:01crwdnd2935265:02crwdne2935265:0 Teardown of GD Midea FT30-3D: crwdns2935265:020crwdnd2935265:02crwdnd2935265:02crwdne2935265:0
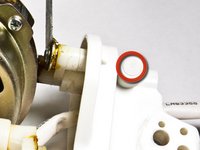
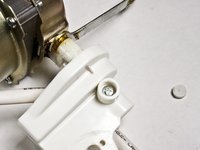
    • Remove the screw at the center of the oscillator knob and remove the oscillator knob.

    • If the oscillator knob is clean and undamaged then the problem is with the oscillator. If the knob is damaged replace it and test your fan before proceeding forward in the guide.

  21. Teardown of GD Midea FT30-3D: crwdns2935265:021crwdnd2935265:01crwdnd2935265:01crwdne2935265:0
    • Remove the front motor housing by removing 4 screws.

  22. Teardown of GD Midea FT30-3D: crwdns2935265:022crwdnd2935265:01crwdnd2935265:02crwdne2935265:0 Teardown of GD Midea FT30-3D: crwdns2935265:022crwdnd2935265:02crwdnd2935265:02crwdne2935265:0
    • The main motor housing can be taken off by removing a single screw at the back of the upper assembly.

  23. Teardown of GD Midea FT30-3D: crwdns2935265:023crwdnd2935265:01crwdnd2935265:01crwdne2935265:0
    • There is a capacitor attached to the oscillator by a single screw. Once the screw is removed the capacitor should come off easily.

  24. Teardown of GD Midea FT30-3D: crwdns2935265:024crwdnd2935265:01crwdnd2935265:02crwdne2935265:0 Teardown of GD Midea FT30-3D: crwdns2935265:024crwdnd2935265:02crwdnd2935265:02crwdne2935265:0
    • Remove the screw that connects the oscillator to the rocker arm.

    • Push down on the rocker arm after removing the screw and turn it away from the oscillator.

  25. Teardown of GD Midea FT30-3D: crwdns2935265:025crwdnd2935265:01crwdnd2935265:01crwdne2935265:0
    • The oscillator should now be easy to pull off.

    • Clean the oscillator and remove any jams. If the problem persists the oscillator is damaged and needs to be replaced.

Jonathan Leposky

crwdns2935283:010/04/12crwdne2935283:0

72 crwdns2915208:0crwdne2915208:0

crwdns2935295:0crwdne2935295:0

crwdns2915084:0crwdne2915084:0

Cal Poly, Team 24-28, Regan Fall 2012 crwdns2935289:0Cal Poly, Team 24-28, Regan Fall 2012crwdne2935289:0

CPSU-REGAN-F12S24G28

crwdns2931471:04crwdne2931471:0

crwdns2935297:014crwdne2935297:0

crwdns2944067:00crwdne2944067:0

crwdns2917038:0crwdne2917038:0

crwdns2936625:0crwdne2936625:0:

crwdns2936751:024crwdne2936751:0 0

crwdns2936753:07crwdne2936753:0 0

crwdns2936753:030crwdne2936753:0 3

crwdns2942667:0crwdne2942667:0 3,913