crwdns2933423:0crwdne2933423:0

crwdns2942213:0crwdne2942213:0

crwdns2936621:0crwdne2936621:0

crwdns2935311:0crwdnd2935311:0crwdne2935311:0 crwdns2935313:0PlayStation 3 Super Slimcrwdnd2935313:0crwdnd2935313:0crwdne2935313:0

  1. PlayStation 3 Super Slim Teardown - Video tutorial, PlayStation 3 Super Slim Teardown - Video tutorial: crwdns2935265:01crwdnd2935265:01crwdnd2935265:03crwdne2935265:0 PlayStation 3 Super Slim Teardown - Video tutorial, PlayStation 3 Super Slim Teardown - Video tutorial: crwdns2935265:01crwdnd2935265:02crwdnd2935265:03crwdne2935265:0 PlayStation 3 Super Slim Teardown - Video tutorial, PlayStation 3 Super Slim Teardown - Video tutorial: crwdns2935265:01crwdnd2935265:03crwdnd2935265:03crwdne2935265:0
    • Remove the three rubber feet, warranty sticker and four screws.

    • Gently pull up on the bottom cover to remove it.

  2. PlayStation 3 Super Slim Teardown - Video tutorial: crwdns2935265:02crwdnd2935265:01crwdnd2935265:03crwdne2935265:0 PlayStation 3 Super Slim Teardown - Video tutorial: crwdns2935265:02crwdnd2935265:02crwdnd2935265:03crwdne2935265:0 PlayStation 3 Super Slim Teardown - Video tutorial: crwdns2935265:02crwdnd2935265:03crwdnd2935265:03crwdne2935265:0
    • Slide the HDD cover toward the rear of the device to remove it.

    • Remove the blue screw shown to remove the HDD caddy with a #1 Phillips.

    • Remove the 3 chassis screws with a TR8 Bit.

  3. PlayStation 3 Super Slim Teardown - Video tutorial: crwdns2935265:03crwdnd2935265:01crwdnd2935265:03crwdne2935265:0 PlayStation 3 Super Slim Teardown - Video tutorial: crwdns2935265:03crwdnd2935265:02crwdnd2935265:03crwdne2935265:0 PlayStation 3 Super Slim Teardown - Video tutorial: crwdns2935265:03crwdnd2935265:03crwdnd2935265:03crwdne2935265:0
    • Use a metal spudger to push the tab on the rear top finisher, and lift up to remove it.

  4. PlayStation 3 Super Slim Teardown - Video tutorial: crwdns2935265:04crwdnd2935265:01crwdnd2935265:03crwdne2935265:0 PlayStation 3 Super Slim Teardown - Video tutorial: crwdns2935265:04crwdnd2935265:02crwdnd2935265:03crwdne2935265:0 PlayStation 3 Super Slim Teardown - Video tutorial: crwdns2935265:04crwdnd2935265:03crwdnd2935265:03crwdne2935265:0
    • Repeat step 3 for the front top finisher.

  5. PlayStation 3 Super Slim Teardown - Video tutorial: crwdns2935265:05crwdnd2935265:01crwdnd2935265:03crwdne2935265:0 PlayStation 3 Super Slim Teardown - Video tutorial: crwdns2935265:05crwdnd2935265:02crwdnd2935265:03crwdne2935265:0 PlayStation 3 Super Slim Teardown - Video tutorial: crwdns2935265:05crwdnd2935265:03crwdnd2935265:03crwdne2935265:0
    • Remove the two TR8 screws indicated in the disk reader.

    • Remove the five Phillips #1 screws shown around the edge of the top cover.

    • Lift the top cover up to remove it.

  6. PlayStation 3 Super Slim Teardown - Video tutorial: crwdns2935265:06crwdnd2935265:01crwdnd2935265:03crwdne2935265:0 PlayStation 3 Super Slim Teardown - Video tutorial: crwdns2935265:06crwdnd2935265:02crwdnd2935265:03crwdne2935265:0 PlayStation 3 Super Slim Teardown - Video tutorial: crwdns2935265:06crwdnd2935265:03crwdnd2935265:03crwdne2935265:0
    • Move the optical disk reader assembly to the left to expose one of the screws holding the power supply in.

    • Remove the two Phillip #1 screws indicated and carefully disconnect the cable on the right side of the power supply.

    • Lift the power supply straight up to remove it.

    • The left side has a board connector underneath, so there will be some resistance when lifting.

  7. PlayStation 3 Super Slim Teardown - Video tutorial: crwdns2935265:07crwdnd2935265:01crwdnd2935265:03crwdne2935265:0 PlayStation 3 Super Slim Teardown - Video tutorial: crwdns2935265:07crwdnd2935265:02crwdnd2935265:03crwdne2935265:0 PlayStation 3 Super Slim Teardown - Video tutorial: crwdns2935265:07crwdnd2935265:03crwdnd2935265:03crwdne2935265:0
    • Carefully disconnect the ribbon cables indicated.

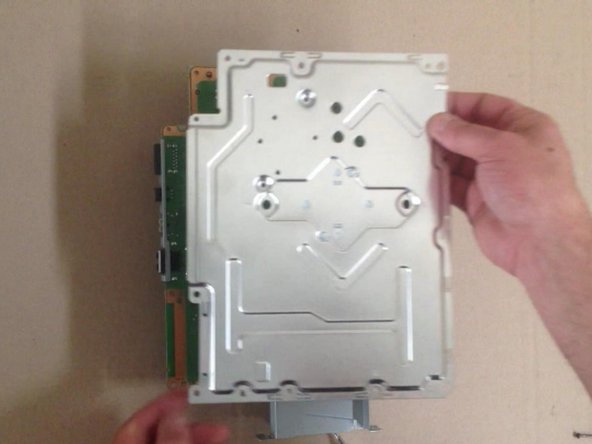
    • Lift the optical disk reader up to remove it.

    • Disconnect and remove the white cable and ribbon cable indicated.

  8. PlayStation 3 Super Slim Teardown - Video tutorial: crwdns2935265:08crwdnd2935265:01crwdnd2935265:03crwdne2935265:0 PlayStation 3 Super Slim Teardown - Video tutorial: crwdns2935265:08crwdnd2935265:02crwdnd2935265:03crwdne2935265:0 PlayStation 3 Super Slim Teardown - Video tutorial: crwdns2935265:08crwdnd2935265:03crwdnd2935265:03crwdne2935265:0
    • Remove the seven Phillips #1 screws indicated.

    • Lift the motherboard assembly up out of the lower half of the case to remove it.

    • Carefully disconnect the Wi-Fi antenna cables and fan connector indicated by red arrows.

  9. PlayStation 3 Super Slim Teardown - Video tutorial: crwdns2935265:09crwdnd2935265:01crwdnd2935265:03crwdne2935265:0 PlayStation 3 Super Slim Teardown - Video tutorial: crwdns2935265:09crwdnd2935265:02crwdnd2935265:03crwdne2935265:0 PlayStation 3 Super Slim Teardown - Video tutorial: crwdns2935265:09crwdnd2935265:03crwdnd2935265:03crwdne2935265:0
    • Remove the six Phillip #1 screws indicated to separate the heatsink and shield from the motherboard.

  10. PlayStation 3 Super Slim Teardown - Video tutorial: crwdns2935265:010crwdnd2935265:01crwdnd2935265:01crwdne2935265:0
    • Congrats!

ZFix

crwdns2935283:012/09/13crwdne2935283:0

191,182 crwdns2915208:0crwdne2915208:0

crwdns2935297:0330crwdne2935297:0

crwdns2915084:0crwdne2915084:0

Master Techs crwdns2935289:0Master Techscrwdne2935289:0

Community

crwdns2931471:0322crwdne2931471:0

crwdns2935297:02,521crwdne2935297:0

crwdns2944067:013crwdne2944067:0

What's the name of the screwdriver that undo's the star shaped screws?

themasterassassin8787 - crwdns2934203:0crwdne2934203:0

It is a T8 Torx screwdriver! I'll add the tools to this guide =)

Sam Goldheart -

i took apart my ps3 super slim and put it back together but there is no power what so ever no red light at all

pastorjon.m - crwdns2934203:0crwdne2934203:0

Same here did you fix it?

Kriss -

One thing to pay attention to: The T8 Torx screws (at least on my 500GB model) are Tamper Proof TR8 screws, meaning you need a special screwdriver to undo them. A normal T8 wont work.

Wesley V - crwdns2934203:0crwdne2934203:0

crwdns2917038:0crwdne2917038:0

crwdns2936625:0crwdne2936625:0:

crwdns2936751:024crwdne2936751:0 43

crwdns2936753:07crwdne2936753:0 229

crwdns2936753:030crwdne2936753:0 1,092

crwdns2942667:0crwdne2942667:0 95,243