crwdns2933423:0crwdne2933423:0

crwdns2942213:0crwdne2942213:0

crwdns2935311:0crwdnd2935311:0crwdne2935311:0 crwdns2935313:0Oscal Tiger 12crwdnd2935313:0crwdnd2935313:0crwdne2935313:0

  1. Oscal Tiger 12: Teardown, Heating: crwdns2935265:01crwdnd2935265:01crwdnd2935265:02crwdne2935265:0 Oscal Tiger 12: Teardown, Heating: crwdns2935265:01crwdnd2935265:02crwdnd2935265:02crwdne2935265:0
    • Begin by heating the back panel (where the cameras are).

    • I use a heating pad set to 100 Celsius for this job. Usually put it on before it's heated, then let it sit 6-7 minutes at 100.

    • You can use a heat gun instead. Just make sure to heat all the surfaces enough. How much enough is, you will have to find out.

    • There are 3 steps dedicated to this, as iFixit allows only up to 30 second videos.

    • Once you're done heating the back cover, it's time to remove it.

    • I start with a bit of a box cutter blade bit that I've wrapped in insulating tape. If you decide to do the same, do be careful when pushing it deeper in. It is very easy to leave scratch marks on the inside of the back cover.

    • After I get a bit of a start, I slip Jimmy in and force a bit larger gap.

    • The back cover is very flexible, but has paint on the inside part of it, which can easily be scratched off. This damage is purely cosmetic and can easily be covered by a phone case.

    • After the gap is large enough, I use a plastic card to open the rest.

    • Be significantly more careful than I was on the side with the fingerprint sensor (Left if the phone is face down, camera up, and right if the phone is face up). I would recommend only detaching the other side using tools, then simply lifting it.

  2. Oscal Tiger 12: Teardown, Meow: crwdns2935265:05crwdnd2935265:01crwdnd2935265:01crwdne2935265:0
    • Not going to lie, I never catch her on the top.

  3. Oscal Tiger 12: Teardown, Camera Cover: crwdns2935265:06crwdnd2935265:01crwdnd2935265:03crwdne2935265:0 Oscal Tiger 12: Teardown, Camera Cover: crwdns2935265:06crwdnd2935265:02crwdnd2935265:03crwdne2935265:0 Oscal Tiger 12: Teardown, Camera Cover: crwdns2935265:06crwdnd2935265:03crwdnd2935265:03crwdne2935265:0
    • Now, remove the camera cover. If you have a heat gun, heat it prior.

    • It is simply glued on.

  4. Oscal Tiger 12: Teardown, External frame removal: crwdns2935265:07crwdnd2935265:01crwdnd2935265:03crwdne2935265:0 Oscal Tiger 12: Teardown, External frame removal: crwdns2935265:07crwdnd2935265:02crwdnd2935265:03crwdne2935265:0 Oscal Tiger 12: Teardown, External frame removal: crwdns2935265:07crwdnd2935265:03crwdnd2935265:03crwdne2935265:0
    • Remove the marked screws.

    • Slip something in between the LCD's frame and the external frame. Jimmy should work, but it's easier to get a start using something sharp.

  5. Oscal Tiger 12: Teardown, Fingerprint sensor: crwdns2935265:08crwdnd2935265:01crwdnd2935265:03crwdne2935265:0 Oscal Tiger 12: Teardown, Fingerprint sensor: crwdns2935265:08crwdnd2935265:02crwdnd2935265:03crwdne2935265:0 Oscal Tiger 12: Teardown, Fingerprint sensor: crwdns2935265:08crwdnd2935265:03crwdnd2935265:03crwdne2935265:0
    • Remove the fingerprint sensor.

  6. Oscal Tiger 12: Teardown, Final connectors and motherboard screws: crwdns2935265:09crwdnd2935265:01crwdnd2935265:03crwdne2935265:0 Oscal Tiger 12: Teardown, Final connectors and motherboard screws: crwdns2935265:09crwdnd2935265:02crwdnd2935265:03crwdne2935265:0 Oscal Tiger 12: Teardown, Final connectors and motherboard screws: crwdns2935265:09crwdnd2935265:03crwdnd2935265:03crwdne2935265:0
    • This black cover (thermal diffusor?) is glued onto the battery with a very thin layer of adhesive.

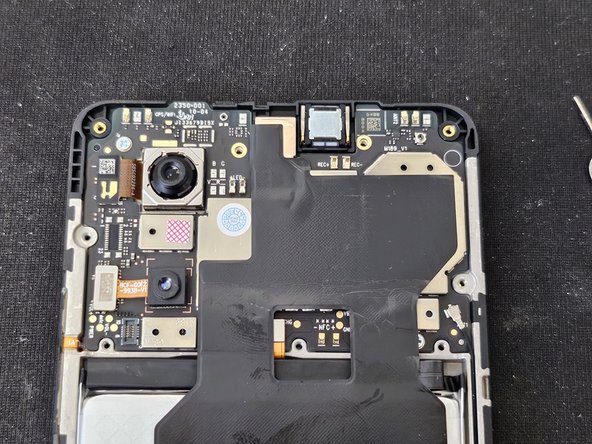
    • Remove the cameras from the motherboard, then lift the black cover over the motherboard to expose the battery and LCD connectors.

    • Disconnect them, then remove the 2 screws that hold in the motherboard.

    • I used to mark these (to remember where they go), but I've noticed they're pointed to by 2 very small arrows on the motherboard.

  7. Oscal Tiger 12: Teardown, Removing the motherboard: crwdns2935265:010crwdnd2935265:01crwdnd2935265:02crwdne2935265:0 Oscal Tiger 12: Teardown, Removing the motherboard: crwdns2935265:010crwdnd2935265:02crwdnd2935265:02crwdne2935265:0
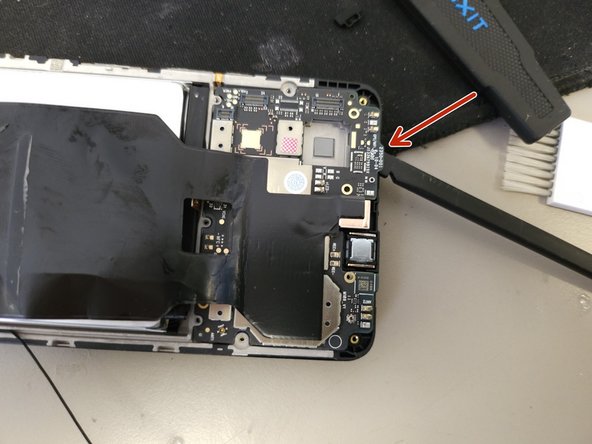
    • Now, remove the motherboard.

    • I recommend using a plastic spudger where marked in picture 1 to get some leverage. It's usually stuck quite a bit by some thermal paste that almost glues it to the frame.

DegenFixer

crwdns2935283:009/18/24crwdne2935283:0

4,537 crwdns2915208:0crwdne2915208:0

crwdns2935297:024crwdne2935297:0

crwdns2947412:00crwdne2947412:0

crwdns2917038:0crwdne2917038:0

crwdns2936625:0crwdne2936625:0:

crwdns2936751:024crwdne2936751:0 3

crwdns2936753:07crwdne2936753:0 22

crwdns2936753:030crwdne2936753:0 75

crwdns2942667:0crwdne2942667:0 438