crwdns2942213:0crwdne2942213:0
-
-
Start by removing all the screws visible on the body of the device.
-
-
-
-
Once all the screws are removed, gently lift the back of the device as it is connected to the motherboard by two ribbon cables.
-
Remove the screws and then, the metal protection plate.
-
Disconnect the ribbon cables from the motherboard by gently lifting the plastic valves.
-
Then, remove the mounting screws from the motherboard. Remove the motherboard but be careful, as it is still connected to the frame with the speaker wires.
-
-
-
Now, remove the top cover.
-
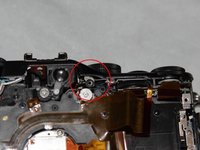
Remove the screw which still maintains the frame. You will find it behind this red circle.
-
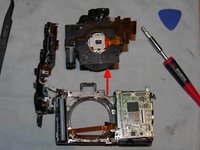
All you have to do now is to remove the optical unit, it comes more easily when pulling it up.
-
Your device is disassembled with success and you now have access to all its components.
-


To reassemble your device, follow these instructions in reverse order.
To reassemble your device, follow these instructions in reverse order.
crwdns2935221:0crwdne2935221:0
crwdns2935229:03crwdne2935229:0
crwdns2934873:0crwdne2934873:0
100%


crwdns2934885:0crwdne2934885:0 crwdns2934875:0crwdne2934875:0
crwdns2934877:0crwdne2934877:0 ›
crwdns2947412:06crwdne2947412:0
Hardy:
Thanks very much for your hard work on this. I have a P7000 whose memory card slot isn’t recognizing cards. I can’t tell for sure, but it looks like the card slot is part of the battery housing. Would you be able to confirm this?
Thanks
were you able to figure it out, i realized im also having the same problem
paper -
Thank you!!! Is there a way to replace the internal battery? Is it present? My p7000 no longer keeps the date/time and settings memory whenever I remove the EN-EL14 battery...
i Have the same issue, Did you fix yours? I think my the issue is related to the Lithium-ion flash capacitor.
But I'm struggling to find that specific part.
хорошая работа - поделиться с людьми информацией. здоровья и удачи мастеру .
Hi, I'm having an issue with the mode dial (it only works in P, S Auto, and U1). I tried a factory reset, but it didn't solve the problem. I also reinstalled the firmware, but that didn't help either. I am considering opening it up to check the connections or see what is inside that I can touch or reconnect, move them around, and see if that fixes the issue. Do you have any suggestions? Thanks!
Bottom view: wrong screw marked next to the tripod thread! Loosen all the screws around the tripod thread except of the marked one.
Andreas Rose - crwdns2934203:0crwdne2934203:0