crwdns2915892:0crwdne2915892:0
This guide is not a total teardown. Rather, it covers only the largest components of the device. See the video below for a visual representation.
Note: On this specific speaker, a new charge port was installed.
crwdns2942213:0crwdne2942213:0
crwdns2936621:0crwdne2936621:0
-
-
Use a plastic spudger/spatula, credit card or something similar to remove the protective mesh.
-
-
-
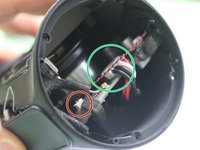
Remove the four screws holding the plastic moulding on the end of the speaker.
-
Next, remove the plastic to reveal four more screws requiring removal.
-
-
-
-
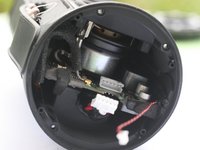
You now have access to the motherboard.
-
-
-
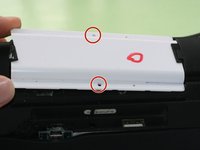
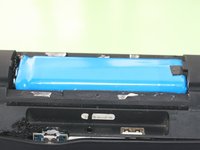
Remove the two screws securing the white battery cover. Once removed, you will have direct access to the battery.
-


To reassemble your device, follow these instructions in reverse order.
To reassemble your device, follow these instructions in reverse order.
crwdns2935221:0crwdne2935221:0
crwdns2935229:010crwdne2935229:0
crwdns2934873:0crwdne2934873:0
100%


crwdns2934885:0crwdne2934885:0 crwdns2934875:0crwdne2934875:0
crwdns2934877:0crwdne2934877:0 ›

crwdns2947412:013crwdne2947412:0
About to try this, will give feedback
This is the charge2 + not the charge2
there aren,t any screws in the cap
I have the same problem. I think this is a TL model, but I have not been able to find any information on how to correctly remove the end caps. I don’t want to scratch or break anything trying to pop the end caps off.
Bobcov -
Thanks so much! I had a broken bit of plastic inside the tube after I left my speaker in my checked luggage and it got smashed around. I followed the instructions and managed to get it out, the speaker is purring again without the annoying ass rattle!! You're a legend my friend. TY