crwdns2933423:0crwdne2933423:0

crwdns2942213:0crwdne2942213:0

crwdns2935311:0crwdnd2935311:0crwdne2935311:0 crwdns2935313:0DualShock 4crwdnd2935313:0crwdnd2935313:0crwdne2935313:0

  1. DualShock 4 Teardown, Open the chassis of the controller: crwdns2935265:01crwdnd2935265:01crwdnd2935265:03crwdne2935265:0 DualShock 4 Teardown, Open the chassis of the controller: crwdns2935265:01crwdnd2935265:02crwdnd2935265:03crwdne2935265:0 DualShock 4 Teardown, Open the chassis of the controller: crwdns2935265:01crwdnd2935265:03crwdnd2935265:03crwdne2935265:0
    • Begin by removing the screws in the back of the controller.

  2. DualShock 4 Teardown, Remove analog sticks and motors: crwdns2935265:02crwdnd2935265:01crwdnd2935265:02crwdne2935265:0 DualShock 4 Teardown, Remove analog sticks and motors: crwdns2935265:02crwdnd2935265:02crwdnd2935265:02crwdne2935265:0
    • Remove the analog sticks and motors.

  3. DualShock 4 Teardown, Remove the top layer PCB: crwdns2935265:03crwdnd2935265:01crwdnd2935265:01crwdne2935265:0
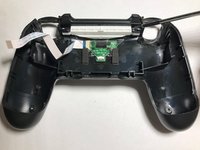
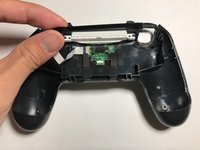
    • Remove the top layer PCB. The PCB must be popped out of place and then angled in such a way that the trigger buttons at the top of the controller slide out of their slots.

  4. DualShock 4 Teardown, Remove the second layer PCB: crwdns2935265:04crwdnd2935265:01crwdnd2935265:01crwdne2935265:0
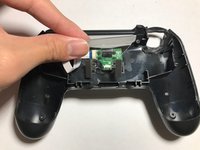
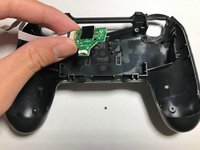
    • Remove the second layer PCB. This simply pops out of place.

  5. DualShock 4 Teardown, Remove the battery: crwdns2935265:05crwdnd2935265:01crwdnd2935265:01crwdne2935265:0
    • Flip over the second layer PCB. Remove the battery from its holder.

  6. DualShock 4 Teardown, Remove the light assembly: crwdns2935265:06crwdnd2935265:01crwdnd2935265:03crwdne2935265:0 DualShock 4 Teardown, Remove the light assembly: crwdns2935265:06crwdnd2935265:02crwdnd2935265:03crwdne2935265:0 DualShock 4 Teardown, Remove the light assembly: crwdns2935265:06crwdnd2935265:03crwdnd2935265:03crwdne2935265:0
    • Unscrew the two screws holding the light assembly together. Once the screws are undone, the parts of the assembly can be pulled out.

  7. DualShock 4 Teardown, Remove the USB module: crwdns2935265:07crwdnd2935265:01crwdnd2935265:02crwdne2935265:0 DualShock 4 Teardown, Remove the USB module: crwdns2935265:07crwdnd2935265:02crwdnd2935265:02crwdne2935265:0
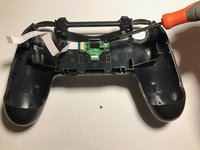
    • Unscrew the two screws holding down the USB module.

Joshua Wong

crwdns2935283:011/28/18crwdne2935283:0

265 crwdns2915208:0crwdne2915208:0

crwdns2935295:0crwdne2935295:0

crwdns2944067:06crwdne2944067:0

Thanks this was so helpful because every time I do this I break it like literally break the plastic

nodachi Galaxy poison - crwdns2934203:0crwdne2934203:0

Do you know where I can get broken PS4 controllers?

Chane Akwau Jones - crwdns2934203:0crwdne2934203:0

it doesn’t come out like that. upon opening the chassis, everything is stuck to the top part of the controller, not the bottom part.

Dennis Hasford - crwdns2934203:0crwdne2934203:0

First time fixing sticking buttons my triangle button and ps button stick hopefully this works and am able to put back together

Tkuball - crwdns2934203:0crwdne2934203:0

This video on how to open a ps4 controller should help you too : https://youtu.be/9Chgw4sRTzs

Repair & Resell - crwdns2934203:0crwdne2934203:0

crwdns2917038:0crwdne2917038:0

crwdns2936625:0crwdne2936625:0:

crwdns2936751:024crwdne2936751:0 18

crwdns2936753:07crwdne2936753:0 137

crwdns2936753:030crwdne2936753:0 643

crwdns2942667:0crwdne2942667:0 65,692