crwdns2933423:0crwdne2933423:0

crwdns2942213:0crwdne2942213:0

crwdns2935311:0crwdnd2935311:0crwdne2935311:0 crwdns2935313:0Dreamcast VMUcrwdnd2935313:0crwdnd2935313:0crwdne2935313:0

  1. Dreamcast VMU Teardown, battery cover: crwdns2935265:01crwdnd2935265:01crwdnd2935265:02crwdne2935265:0 Dreamcast VMU Teardown, battery cover: crwdns2935265:01crwdnd2935265:02crwdnd2935265:02crwdne2935265:0
    • Remove the silver screw and batteries

  2. Dreamcast VMU Teardown, Rear shell: crwdns2935265:02crwdnd2935265:01crwdnd2935265:03crwdne2935265:0 Dreamcast VMU Teardown, Rear shell: crwdns2935265:02crwdnd2935265:02crwdnd2935265:03crwdne2935265:0 Dreamcast VMU Teardown, Rear shell: crwdns2935265:02crwdnd2935265:03crwdnd2935265:03crwdne2935265:0
    • Remove the four black screws

    • Be careful of the speaker wire

    • Carefully peel the speaker away from the shell with a Spudger

  3. Dreamcast VMU Teardown, Battery terminals: crwdns2935265:03crwdnd2935265:01crwdnd2935265:02crwdne2935265:0 Dreamcast VMU Teardown, Battery terminals: crwdns2935265:03crwdnd2935265:02crwdnd2935265:02crwdne2935265:0
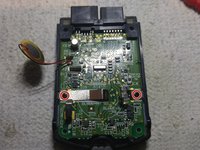
    • Remove the two battery terminal screws

  4. Dreamcast VMU Teardown, Motherboard: crwdns2935265:04crwdnd2935265:01crwdnd2935265:03crwdne2935265:0 Dreamcast VMU Teardown, Motherboard: crwdns2935265:04crwdnd2935265:02crwdnd2935265:03crwdne2935265:0 Dreamcast VMU Teardown, Motherboard: crwdns2935265:04crwdnd2935265:03crwdnd2935265:03crwdne2935265:0
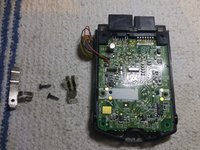
    • Lift the main board from the shell

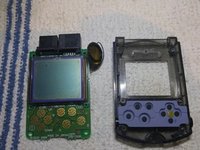
    • Remove the screen from the motherboard

    • Remove the screen stay, D-pad and rubber buttons from the shell

    • And you're done!

Caleb

crwdns2935283:003/22/17crwdne2935283:0

121 crwdns2915208:0crwdne2915208:0

crwdns2935295:0crwdne2935295:0

crwdns2944067:03crwdne2944067:0

crwdns2917038:0crwdne2917038:0

crwdns2936625:0crwdne2936625:0:

crwdns2936751:024crwdne2936751:0 4

crwdns2936753:07crwdne2936753:0 20

crwdns2936753:030crwdne2936753:0 99

crwdns2942667:0crwdne2942667:0 6,305