crwdns2915892:0crwdne2915892:0
I really like my Dark Core, but unfortunately Corsair support is lackluster at best when it comes to self repair (mostly just discouraging it).
In this guide I will attempt to provide help to others in my predicament.
Thanks to @thefoilist for providing the information I needed in this thread: Corsair Dark Core RGB (non SE))
crwdns2942213:0crwdne2942213:0
-
-
Apply heat to the leftmost pad as shown in the image, near where the back of the palm rests while in use.
-
Once heated, try to gently pry off the PTFE pad with a spudger or a guitar pick
-
Heat the adhesive again and try to pry it off in one piece so you can reuse it.
-
Now, using your T5 Torx screwdriver, remove the 2 screws as marked in the image.
-
-
-
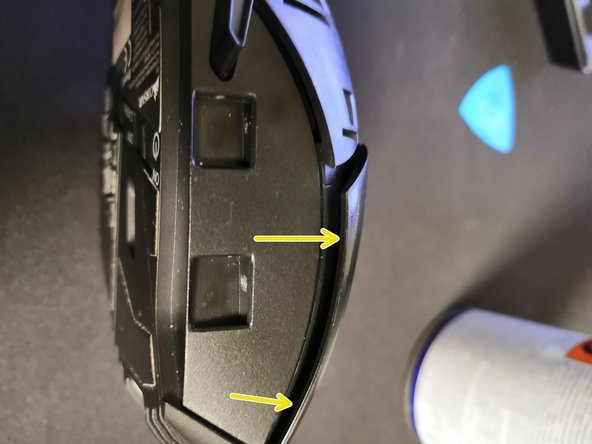
With the screws removed, we can try to remove the palmrest.
-
If you remove the pinkie rest piece you should be able to see a divide between the upper palm rest and the rest of the shell, we will only be removing the upper part for now.
-
Try to carefully pry it open using a spudger, creditcard, wiggle the tool and take your time and slowly increase the amount of force exterted while wiggling.
-
Once one side's clip has popped out, slide a credit card/pick all the way along the newly created opening to the other side and wiggle the other side's clip loose as well (this shouldn't take nearly the amount of force used for the other side.)
-
-
-
-
To gain access to the internals we need to remove the upper shell, to do this we need to remove two more screws, which are (unfortunately) located underneath the two main mouse buttons.
-
The left button is rather easy to remove, just apply light upwards pressure between the shell and the mouse button, you will be able to lift it up as it's on a hinge, and gently remove it from the hinge for better access to the screw
-
For the right button, apply pressure from multiple angles if the button doesn't come off like the left button. Try to apply pressure from the points marked by yellow arrows.
-
Once both buttons are removed, we can access the screws located in the red circle markers, use a Phillips screwdriver to remove them.
-
-
-
With the screws removed, we can remove the last clamshell that stands between us and the internals.
-
Using a spudger or your prying tool of choice, apply press between the upper shell and the bottom part, there are two clips near the front of the mouse that prevent the upper shell from moving forward, so remove the shell in the direction of the green arrows.
-
-
-
If all went according to plan, you now have access to the internals
-


crwdns2947412:02crwdne2947412:0
I found it far easier to remove the right button by squeezing the part where the hinge is (near the back) with tweezers, which unpegs the hinge. Then you just lift the hinge part out the back, slide the button forward slightly, and then remove it
I love corsair when it comes to build quality vs razer scam mice, however this mouse was INCREDIBLY dificult to take off without breaking anything, I chipped one holding pin and broke the right mouse button plunger even when using painfully slow and delicate movements. Screws are all different sizes but not manufacture locked which is a good thing. Just be super extra careful when removing the right button and the plate that protects the circut boards, both need uncomfortable amounts of force in just the right places.