crwdns2933423:0crwdne2933423:0

crwdns2935175:0crwdne2935175:0 – crwdns2935177:0crwdne2935177:0

crwdns2942213:0crwdne2942213:0

  1. Audiovox CD-Radio Teardown, Audiovox CD-Radio Teardown: crwdns2935265:01crwdnd2935265:01crwdnd2935265:03crwdne2935265:0 Audiovox CD-Radio Teardown, Audiovox CD-Radio Teardown: crwdns2935265:01crwdnd2935265:02crwdnd2935265:03crwdne2935265:0 Audiovox CD-Radio Teardown, Audiovox CD-Radio Teardown: crwdns2935265:01crwdnd2935265:03crwdnd2935265:03crwdne2935265:0
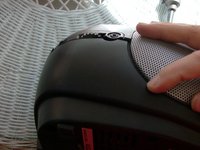
    • Here it is, ready to be torn'd!

  2. Audiovox CD-Radio Teardown: crwdns2935265:02crwdnd2935265:01crwdnd2935265:03crwdne2935265:0 Audiovox CD-Radio Teardown: crwdns2935265:02crwdnd2935265:02crwdnd2935265:03crwdne2935265:0 Audiovox CD-Radio Teardown: crwdns2935265:02crwdnd2935265:03crwdnd2935265:03crwdne2935265:0
    • Pop off the battery cover and remove the 6 C batteries. Keep them though, they might still be good.

    • Unscrew the 4 highly visible screws with the medium size screwdriver.

    • You'll need a longer bit or a different screwdriver for the other 3 holes. I attempted to unscrew it with my bit based driver, but was unsuccessful.

  3. Audiovox CD-Radio Teardown: crwdns2935265:03crwdnd2935265:01crwdnd2935265:03crwdne2935265:0 Audiovox CD-Radio Teardown: crwdns2935265:03crwdnd2935265:02crwdnd2935265:03crwdne2935265:0 Audiovox CD-Radio Teardown: crwdns2935265:03crwdnd2935265:03crwdnd2935265:03crwdne2935265:0
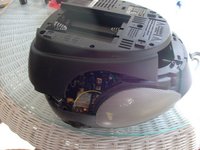
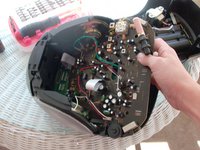
    • Work your way around the edge shown here with your fingers until a crack appears. Then it should be easy to lift the bottom off.

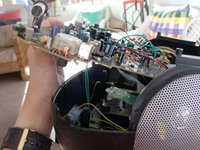
    • Be careful, The bottom is attached by a few wires. I nearly ripped these apart as I removed the bottom of the case.

  4. Audiovox CD-Radio Teardown: crwdns2935265:04crwdnd2935265:01crwdnd2935265:03crwdne2935265:0 Audiovox CD-Radio Teardown: crwdns2935265:04crwdnd2935265:02crwdnd2935265:03crwdne2935265:0 Audiovox CD-Radio Teardown: crwdns2935265:04crwdnd2935265:03crwdnd2935265:03crwdne2935265:0
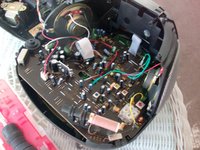
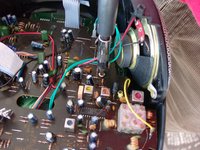
    • Now, hunt down all the little screws on the motherboard and remove them. There are 4 or 5, so if it doesn't want to move, it's probably being held by a screw or two.

    • Now that all the screws, are gone, slowly lift and remove the motherboard. I say slowly because there are still a few cables attatched to the underside.

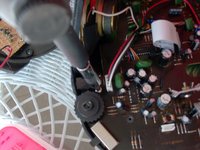
    • Disconnect all cables that aren't soldered on.

  5. Audiovox CD-Radio Teardown: crwdns2935265:05crwdnd2935265:01crwdnd2935265:03crwdne2935265:0 Audiovox CD-Radio Teardown: crwdns2935265:05crwdnd2935265:02crwdnd2935265:03crwdne2935265:0 Audiovox CD-Radio Teardown: crwdns2935265:05crwdnd2935265:03crwdnd2935265:03crwdne2935265:0
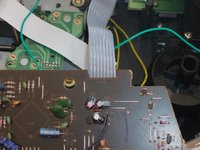
    • Now that those cables are removed, lift the motherboard up and out... or not.

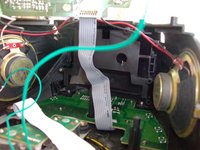
    • The motherboard is attached to the LCD board via one of those pesky ribbon cables that's soldered on both ends and always seems to be covered in some sticky substance.

    • Lift the motherboard up so you have a good view of the LCD board.

platnicat

crwdns2935283:010/11/09crwdne2935283:0

44 crwdns2915208:0crwdne2915208:0

crwdns2935295:0crwdne2935295:0

crwdns2944067:00crwdne2944067:0

crwdns2917038:0crwdne2917038:0

crwdns2936625:0crwdne2936625:0:

crwdns2936751:024crwdne2936751:0 0

crwdns2936753:07crwdne2936753:0 2

crwdns2936753:030crwdne2936753:0 10

crwdns2942667:0crwdne2942667:0 1,341