iMac Late 2015 A1418 SSD Replacement and the Issues I Faced


crwdns2853023:0crwdne2853023:0
My iMac Late 2015 had become frustratingly slow—so slow that it took at least 6 full minutes just to boot up to the desktop. I had already upgraded one of my other computers with a SATA SSD and saw a significant performance boost, so naturally I wanted to do the same for the iMac. However, the process of opening and reassembling the iMac intimidated me. I had looked into it before, but once I saw how involved it was to open it safely and cleanly, I always gave up.
Still, the idea of speeding up the iMac stayed on my mind for months. I even had a spare SATA SSD from the other upgrade, just sitting in a drawer. I knew it was compatible. I kept telling myself I'd get around to it "someday," but I never had the courage—mainly because I didn’t want to deal with the adhesive display and risk breaking the screen or damaging a cable.
Then one night, out of nowhere, I just decided I couldn’t stand it anymore. I wanted my iMac to be fast again. I grabbed what tools I had around the house and told myself: “Even if I fail, at least I tried.” That’s how this journey began.
crwdns2853024:0crwdne2853024:0
That night, I first tried to separate the screen using a piece of string I found in a drawer—just like I had seen on YouTube—but it didn’t work at all. Then I looked for something flat and sturdy and found a dull, non-sharp metal piece, like a thick spatula or blade. I gently slid it under the screen from a corner and began slowly working my way around. Surprisingly, it started to lift.
I had also bought suction cups beforehand, but I didn’t really use them for pulling the display. Instead, I used them to support the screen once it was loose, holding it gently in a tilted position on the desk, since I hadn’t removed the bottom adhesive yet.
Once I had the top and side adhesives cut, I could finally see inside. I used the same flat metal tool to unlock the display cable’s latch without opening the screen fully, and then I carefully detached it. I also removed the FaceTime camera cable. My hands were shaking with excitement—this was something I had planned to do for so long, and I had finally gotten to this point without breaking anything.
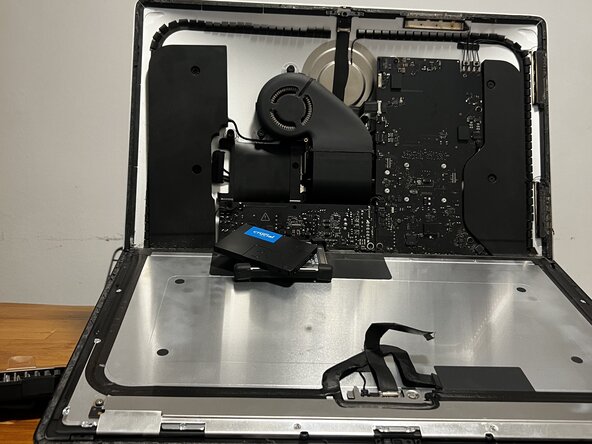
Next, I laid the screen flat on the desk with the suction cup handles holding it. I unscrewed the hard drive and set it aside. But the SATA cable was ridiculously short and very tight. I couldn’t fit my SSD in that small space. I figured maybe if I unscrewed the speaker, I could make a little room. I removed the speaker screws and tried to lift the speaker just enough—but it wouldn’t come out entirely. I struggled quite a bit, but still couldn’t get enough space to connect the SSD.
Eventually, I gave up and decided to remove the speaker completely. It didn’t want to come out easily either. But after more pushing and pulling, I finally managed to plug the SSD into the SATA cable. I didn’t screw anything back in yet—I just wanted to test it before reassembling anything.
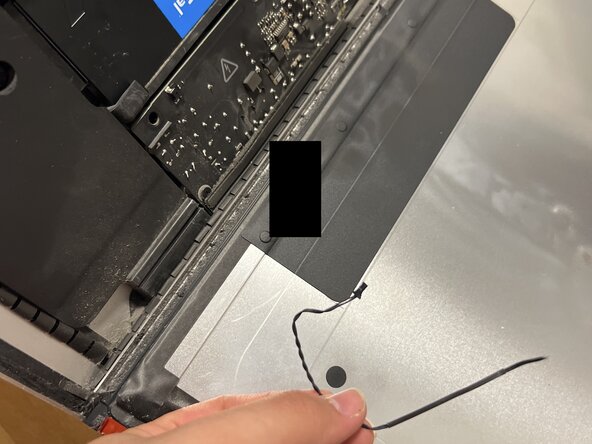
I plugged in the iMac and… nothing. No sound, no fan, no lights. My heart dropped. I thought I had broken something. I unplugged it immediately. Then I remembered a YouTube video that mentioned how a torn power button cable could prevent the board from powering on entirely. I looked—and sure enough, the cable was ripped out from the back of the button.
I removed the torn cable from the board and plugged the iMac in again. This time, one of the four diagnostic LEDs on the logic board lit up—the one that indicates the PSU is working. That gave me hope. Carefully, using a flat metal tool, I shorted the two pins behind the power button socket, and to my amazement, the computer turned on!
Since I hadn’t reattached the screen, I couldn’t see anything, but I knew it was booting. I let it sit for a while, then unplugged it to shut it off. I took the opportunity to remove the rest of the adhesive strips from both the screen and the chassis, to clean them for reassembly.
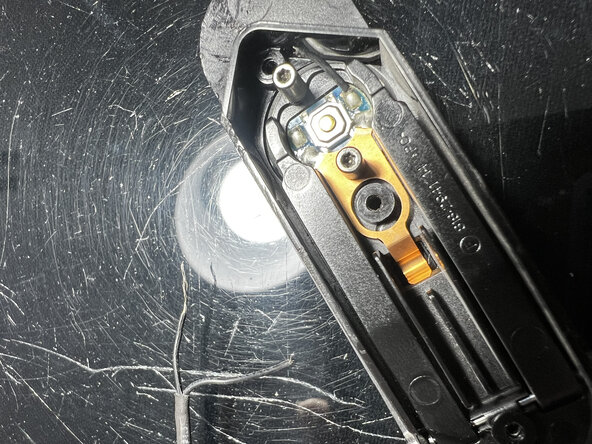
Now I had to fix the power button. To remove it, I had to fully take out the speaker (which meant also removing the fan). Once I reached the power button area, I saw that it had a weird shape and was extremely well glued. I heated it with a hairdryer for a few minutes, then slowly pried it out using the same flat metal tool. Finally, I grabbed it with pliers and pulled it free. It had two tiny screws, which I removed to expose the torn cable.
I tried to reconnect the wires myself using basic tools, but it didn’t work. Since I don’t have a soldering iron at home, I took the button to a local phone repair shop the next morning and asked them to solder it back for me.
As soon as I got home, I plugged it back in and pressed the button—and it worked! I was overjoyed. Now came the challenge of placing it back without putting tension on the cable. I tried using double-sided tape to stick the button into its place, but when I reinstalled the speaker, I noticed the button was being blocked and didn’t click properly.
I removed the tape and carefully positioned the button into place without adhesive—just sitting loose but aligned. It worked fine that way, and when I reinstalled the speaker, I could press it normally. The speaker didn’t sit perfectly flat at first, but I pushed it down gently while aligning the screw holes and tightened it slowly. This time, I was extremely careful with the power cable routing.
After reinstalling the fan, I tested the system again by pressing the button—it turned on! I held it to shut it down, then moved on to sealing the display.
I applied transparent double-sided tape around the edges of the screen and trimmed any excess. First, I stuck down the bottom edge, then peeled off the top and side films and gently lowered the screen. I reconnected the display and camera cables, pressed the screen into the tape, and sealed it. Some tape squeezed out from the sides, but I didn’t mind—it held strong.
Just to be safe, I wrapped a few rubber bands around the display and the case to hold it tightly while the adhesive settled. I tried to clean up the excess tape, but it started to smear and stretch, so I gave up and left it as-is.
And now… everything works. The SSD is blazing fast, and the iMac feels brand new. And even though the result isn’t cosmetically perfect, I’m incredibly proud of what I managed to do at home. I had never opened an iMac before, but I enjoy projects like this—so while it was my first time, I wasn’t completely unfamiliar
crwdns2853025:0crwdne2853025:0
This repair ended up being much more than just a simple SSD upgrade. What started as a plan to speed up my iMac turned into a full-on adventure—complete with a torn power button cable, a trip to the repair shop for soldering, and plenty of trial and error around tight cables, stubborn adhesives, and fragile connectors. It tested my patience more than once, but it also reminded me how rewarding it is to solve something with your own hands.
If you're thinking about doing this yourself, take your time and research thoroughly. Watch several videos and make sure you understand the internal layout—especially how dangerously short and sensitive some cables are. And please be extra cautious around the power button and its tiny cable. That design choice alone nearly derailed the entire process.
It’s not a visually perfect repair, and I had never opened an iMac before. But I’ve always loved projects like this, and in the end, I got it working—faster than ever. That’s a win in my book.
And finally—greetings to the Apple engineers who thought it was a great idea to route a critical power cable behind a speaker and glue the power button like it's hiding state secrets. You got me good. 😄
crwdns2944067:00crwdne2944067:0