crwdns2933423:0crwdne2933423:0

why! W650SZ CPU Replacement

crwdns2942213:0crwdne2942213:0

  1. why! W650SZ CPU Replacement, Battery: crwdns2935265:01crwdnd2935265:01crwdnd2935265:03crwdne2935265:0 why! W650SZ CPU Replacement, Battery: crwdns2935265:01crwdnd2935265:02crwdnd2935265:03crwdne2935265:0 why! W650SZ CPU Replacement, Battery: crwdns2935265:01crwdnd2935265:03crwdnd2935265:03crwdne2935265:0
    • Slide the latch on the right to the unlocked position.

    • Slide the latch on the left to the unlocked position.

    • Remove the battery pack from the slot.

  2. why! W650SZ CPU Replacement, why! W650SZ Bottom Cover Replacement: crwdns2935265:02crwdnd2935265:01crwdnd2935265:03crwdne2935265:0 why! W650SZ CPU Replacement, why! W650SZ Bottom Cover Replacement: crwdns2935265:02crwdnd2935265:02crwdnd2935265:03crwdne2935265:0 why! W650SZ CPU Replacement, why! W650SZ Bottom Cover Replacement: crwdns2935265:02crwdnd2935265:03crwdnd2935265:03crwdne2935265:0
    • With your #0 Philips screwdriver remove the 2 screws from the bottom panel.

    • Now you can remove the bottom cover.

  3. why! W650SZ CPU Replacement, CPU: crwdns2935265:03crwdnd2935265:01crwdnd2935265:03crwdne2935265:0 why! W650SZ CPU Replacement, CPU: crwdns2935265:03crwdnd2935265:02crwdnd2935265:03crwdne2935265:0 why! W650SZ CPU Replacement, CPU: crwdns2935265:03crwdnd2935265:03crwdnd2935265:03crwdne2935265:0
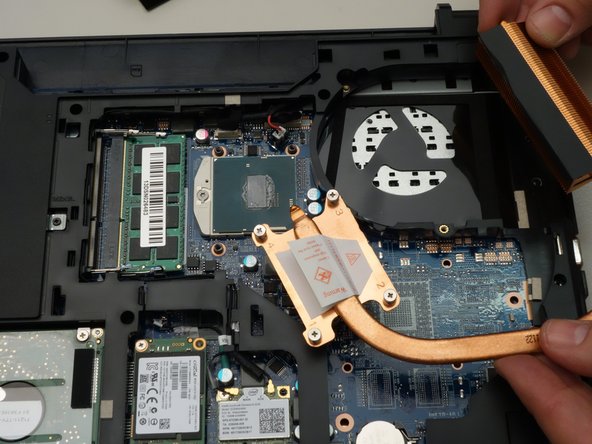
    • Using a Phillips screwdriver, unscrew the four captive screws securing the heatsink to the motherboard.

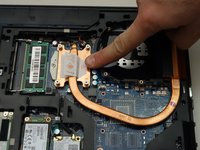
    • Remove the heatsink.

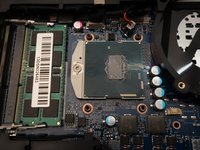
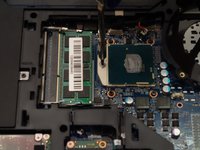
    • The processor and its retention mechanism is now visible.

  4. why! W650SZ CPU Replacement: crwdns2935265:04crwdnd2935265:01crwdnd2935265:03crwdne2935265:0 why! W650SZ CPU Replacement: crwdns2935265:04crwdnd2935265:02crwdnd2935265:03crwdne2935265:0 why! W650SZ CPU Replacement: crwdns2935265:04crwdnd2935265:03crwdnd2935265:03crwdne2935265:0
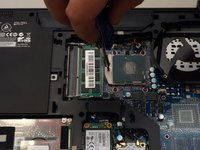
    • Unlock the processor using a small Torx screwdriver by turning the lock 180 degrees counterclockwise

    • Make sure the locking latch is pointing in the opposite direction.

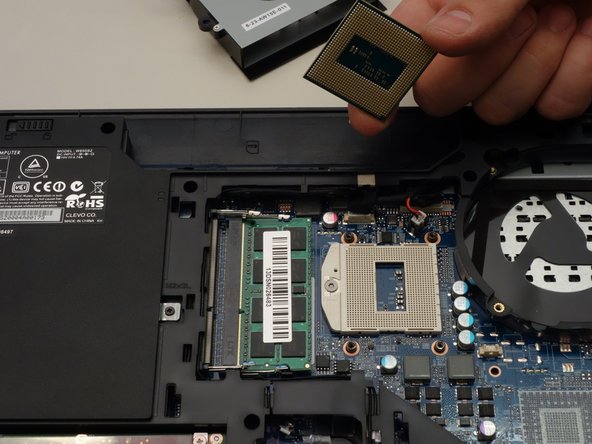
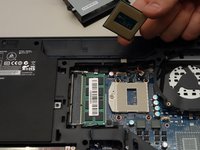
    • You can now carefully remove the processor from its socket.

crwdns2915888:0crwdne2915888:0

To reassemble your device, follow these instructions in reverse order.

crwdns2934873:0crwdne2934873:0

fr en

100%

crwdns2934883:0Jerry Wheelercrwdne2934883:0 crwdns2934875:0crwdne2934875:0
crwdns2934877:0crwdne2934877:0 ›

Felice Suglia

crwdns2935283:006/15/13crwdne2935283:0

31,100 crwdns2915208:0crwdne2915208:0

crwdns2935297:0264crwdne2935297:0

crwdns2944067:00crwdne2944067:0

crwdns2917038:0crwdne2917038:0

crwdns2936625:0crwdne2936625:0:

crwdns2936751:024crwdne2936751:0 0

crwdns2936753:07crwdne2936753:0 2

crwdns2936753:030crwdne2936753:0 7

crwdns2942667:0crwdne2942667:0 155