crwdns2933423:0crwdne2933423:0

why! Replacing the W253EU 15.6” screen

crwdns2942213:0crwdne2942213:0

  1. why! Replacing the W253EU 15.6” screen, Battery from why! Remove W253EU: crwdns2935265:01crwdnd2935265:01crwdnd2935265:03crwdne2935265:0 why! Replacing the W253EU 15.6” screen, Battery from why! Remove W253EU: crwdns2935265:01crwdnd2935265:02crwdnd2935265:03crwdne2935265:0 why! Replacing the W253EU 15.6” screen, Battery from why! Remove W253EU: crwdns2935265:01crwdnd2935265:03crwdnd2935265:03crwdne2935265:0
    • Turn off the computer.

    • Before each operation it is important to start with the removal of the accumulator.

    • Take the slide unlocked into position, remove the battery.

  2. why! Replacing the W253EU 15.6” screen, 15.6-inch screen: crwdns2935265:02crwdnd2935265:01crwdnd2935265:03crwdne2935265:0 why! Replacing the W253EU 15.6” screen, 15.6-inch screen: crwdns2935265:02crwdnd2935265:02crwdnd2935265:03crwdne2935265:0 why! Replacing the W253EU 15.6” screen, 15.6-inch screen: crwdns2935265:02crwdnd2935265:03crwdnd2935265:03crwdne2935265:0
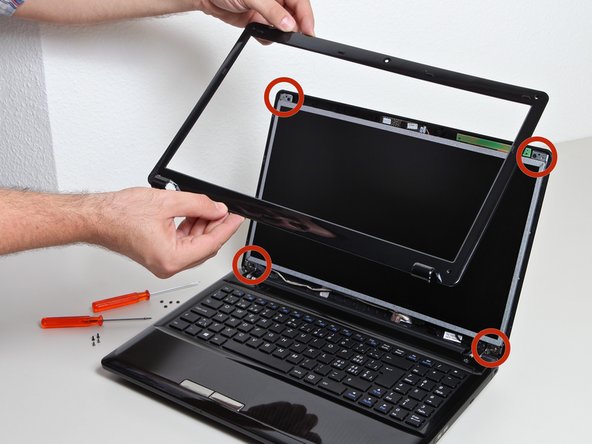
    • Remove the 4 protective covers from the four corners of the screen using a needle or the tip of a utility knife.

  3. why! Replacing the W253EU 15.6” screen: crwdns2935265:03crwdnd2935265:01crwdnd2935265:03crwdne2935265:0 why! Replacing the W253EU 15.6” screen: crwdns2935265:03crwdnd2935265:02crwdnd2935265:03crwdne2935265:0 why! Replacing the W253EU 15.6” screen: crwdns2935265:03crwdnd2935265:03crwdnd2935265:03crwdne2935265:0
    • After removing the 4 screws, unclip the screen frame.

    • Remove the screen bezel to expose the screws underneath.

    • Use the Phillips screwdriver to remove the 8 screws that secure the back cover.

  4. why! Replacing the W253EU 15.6” screen: crwdns2935265:04crwdnd2935265:01crwdnd2935265:02crwdne2935265:0 why! Replacing the W253EU 15.6” screen: crwdns2935265:04crwdnd2935265:02crwdnd2935265:02crwdne2935265:0
    • Expose the rear cover of the screen.

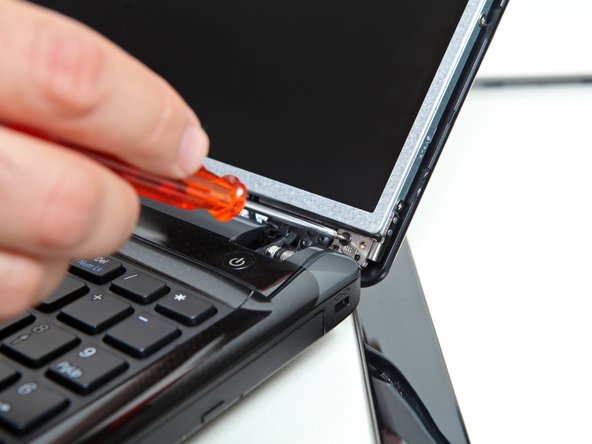
    • Locate the flat connector for the screen.

    • Remove the flat connector after flipping the connector lock slightly.

  5. why! Replacing the W253EU 15.6” screen: crwdns2935265:05crwdnd2935265:01crwdnd2935265:03crwdne2935265:0 why! Replacing the W253EU 15.6” screen: crwdns2935265:05crwdnd2935265:02crwdnd2935265:03crwdne2935265:0 why! Replacing the W253EU 15.6” screen: crwdns2935265:05crwdnd2935265:03crwdnd2935265:03crwdne2935265:0
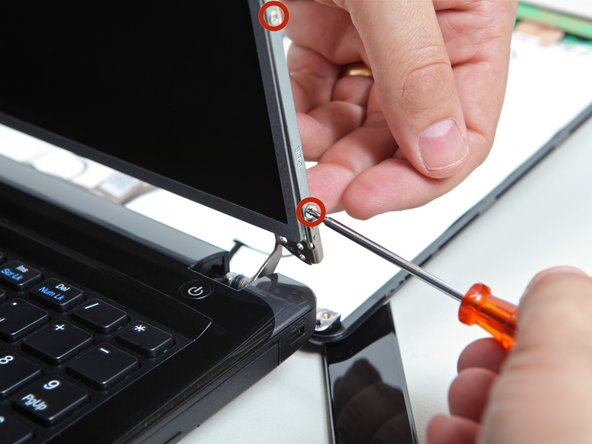
    • Using the Philips screwdriver, loosen the 8 screws that secure the screen to the chassis on both sides.

    • You can now remove the screen.

crwdns2915888:0crwdne2915888:0

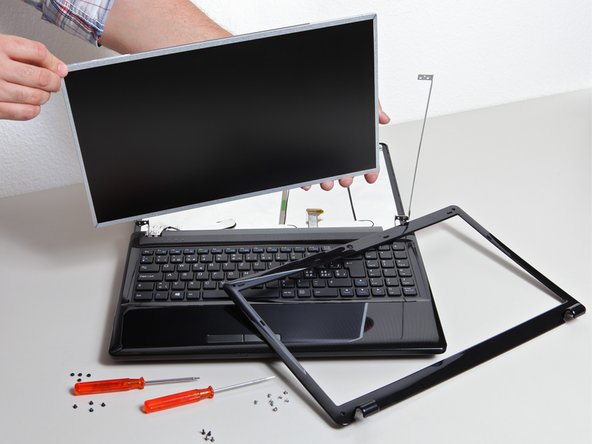
To reassemble the machine, follow the above instructions in reverse order.

crwdns2934873:0crwdne2934873:0

de en

100%

crwdns2934883:0oldturkey03crwdne2934883:0 crwdns2934875:0crwdne2934875:0
crwdns2934877:0crwdne2934877:0 ›

Felice Suglia

crwdns2935283:006/15/13crwdne2935283:0

33,538 crwdns2915208:0crwdne2915208:0

crwdns2935297:0283crwdne2935297:0

crwdns2947412:00crwdne2947412:0

crwdns2917038:0crwdne2917038:0

crwdns2936625:0crwdne2936625:0:

crwdns2936751:024crwdne2936751:0 0

crwdns2936753:07crwdne2936753:0 6

crwdns2936753:030crwdne2936753:0 10

crwdns2942667:0crwdne2942667:0 367