crwdns2933423:0crwdne2933423:0

why! N240JU Replacing the LCD screen

crwdns2942213:0crwdne2942213:0

  1. why! N240JU Replacing the LCD screen, Battery: crwdns2935265:01crwdnd2935265:01crwdnd2935265:02crwdne2935265:0 why! N240JU Replacing the LCD screen, Battery: crwdns2935265:01crwdnd2935265:02crwdnd2935265:02crwdne2935265:0
    • Start by unlocking the right locking latch.

    • Then, by simultaneously unlocking the left latch, lift the battery out of its socket.

  2. why! N240JU Replacing the LCD screen, Access to main components: crwdns2935265:02crwdnd2935265:01crwdnd2935265:02crwdne2935265:0 why! N240JU Replacing the LCD screen, Access to main components: crwdns2935265:02crwdnd2935265:02crwdnd2935265:02crwdne2935265:0
    • Begin by spotting the dummy memory card.

    • Then, remove it and put it on your workplan.

  3. why! N240JU Replacing the LCD screen: crwdns2935265:03crwdnd2935265:01crwdnd2935265:03crwdne2935265:0 why! N240JU Replacing the LCD screen: crwdns2935265:03crwdnd2935265:02crwdnd2935265:03crwdne2935265:0 why! N240JU Replacing the LCD screen: crwdns2935265:03crwdnd2935265:03crwdnd2935265:03crwdne2935265:0
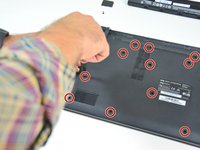
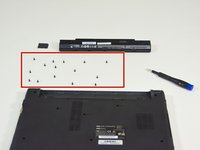
    • Locate the 15 screws that hold the bottom cover of the device in place.

    • Unscrew them and place them on your work surface.

    • Then, un-clip the bottom cover, starting with the side shown in the third picture.

  4. why! N240JU Replacing the LCD screen, LCD screen: crwdns2935265:04crwdnd2935265:01crwdnd2935265:03crwdne2935265:0 why! N240JU Replacing the LCD screen, LCD screen: crwdns2935265:04crwdnd2935265:02crwdnd2935265:03crwdne2935265:0 why! N240JU Replacing the LCD screen, LCD screen: crwdns2935265:04crwdnd2935265:03crwdnd2935265:03crwdne2935265:0
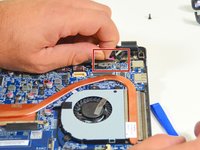
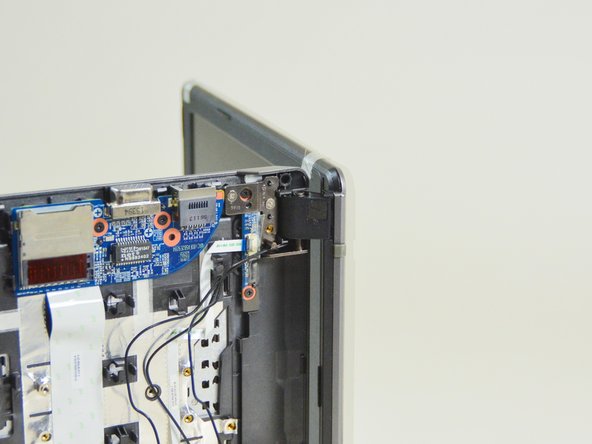
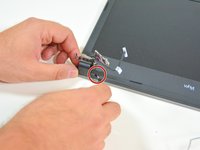
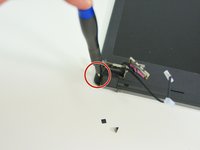
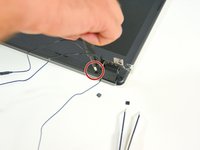
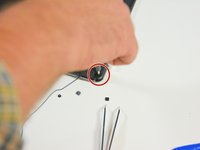
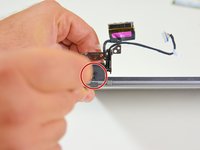
    • In order to remove the LCD screen, you must remove the connection cables from the Wi-Fi chipset.

    • Then locate the two connectors on the LCD screen.

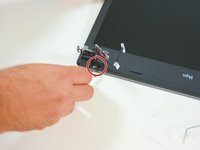
    • Disconnect the first connector.

  5. why! N240JU Replacing the LCD screen: crwdns2935265:05crwdnd2935265:01crwdnd2935265:03crwdne2935265:0 why! N240JU Replacing the LCD screen: crwdns2935265:05crwdnd2935265:02crwdnd2935265:03crwdne2935265:0 why! N240JU Replacing the LCD screen: crwdns2935265:05crwdnd2935265:03crwdnd2935265:03crwdne2935265:0
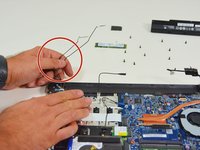
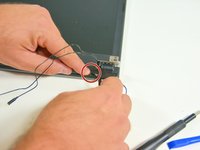
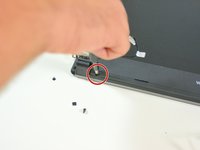
    • Peel off the tape from the second connector.

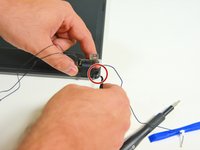
    • Then disconnect the second connector.

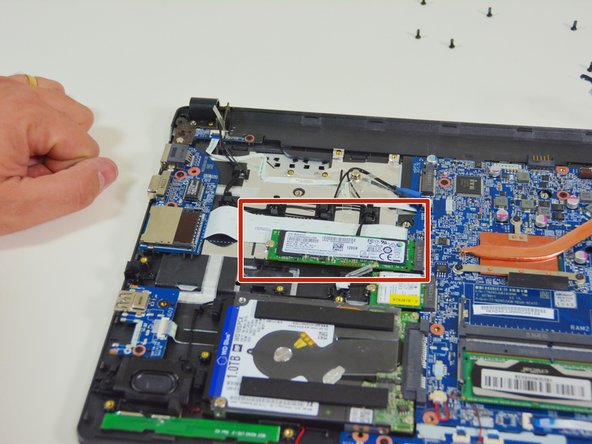
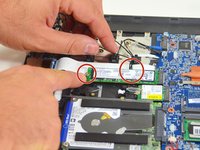
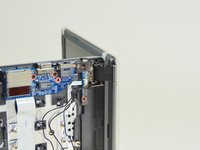
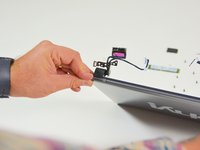
    • Locate the SSD M.2 drive.

  6. why! N240JU Replacing the LCD screen: crwdns2935265:06crwdnd2935265:01crwdnd2935265:03crwdne2935265:0 why! N240JU Replacing the LCD screen: crwdns2935265:06crwdnd2935265:02crwdnd2935265:03crwdne2935265:0 why! N240JU Replacing the LCD screen: crwdns2935265:06crwdnd2935265:03crwdnd2935265:03crwdne2935265:0
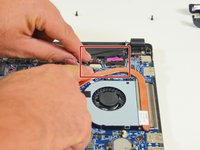
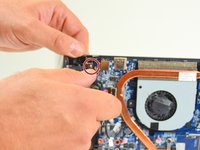
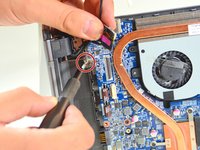
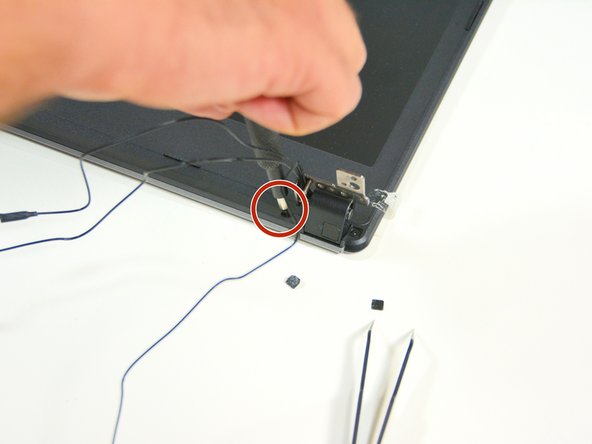
    • Then dismount this disk because it must release the connection cables of the Wi-Fi chipset.

    • Free Wi-Fi connection cables now

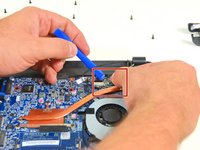
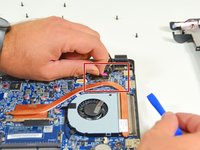
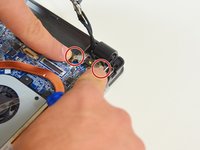
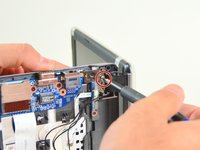
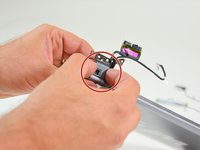
    • Now locate the two screws that secure the screen to the rest of the Laptop (fan side)

  7. why! N240JU Replacing the LCD screen: crwdns2935265:07crwdnd2935265:01crwdnd2935265:03crwdne2935265:0 why! N240JU Replacing the LCD screen: crwdns2935265:07crwdnd2935265:02crwdnd2935265:03crwdne2935265:0 why! N240JU Replacing the LCD screen: crwdns2935265:07crwdnd2935265:03crwdnd2935265:03crwdne2935265:0
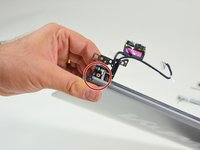
    • Now locate the two screws that secure the screen to the rest of the Laptop (the other side).

    • Then lift the Laptop as shown in the second image of this step.

    • Unscrew the first screw.

  8. why! N240JU Replacing the LCD screen: crwdns2935265:08crwdnd2935265:01crwdnd2935265:03crwdne2935265:0 why! N240JU Replacing the LCD screen: crwdns2935265:08crwdnd2935265:02crwdnd2935265:03crwdne2935265:0 why! N240JU Replacing the LCD screen: crwdns2935265:08crwdnd2935265:03crwdnd2935265:03crwdne2935265:0
    • Then unscrew the second screw.

    • Rest the Laptop as shown in the second image of this step and unscrew the third screw.

    • Then the fourth screw.

  9. why! N240JU Replacing the LCD screen: crwdns2935265:09crwdnd2935265:01crwdnd2935265:03crwdne2935265:0 why! N240JU Replacing the LCD screen: crwdns2935265:09crwdnd2935265:02crwdnd2935265:03crwdne2935265:0 why! N240JU Replacing the LCD screen: crwdns2935265:09crwdnd2935265:03crwdnd2935265:03crwdne2935265:0
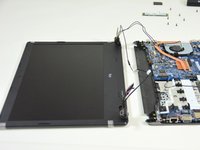
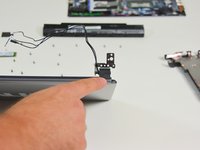
    • With the four screws unscrewed, separate the screen from the rest of the Laptop. Note that the hinge remains attached to the screen.

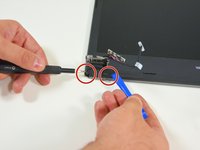
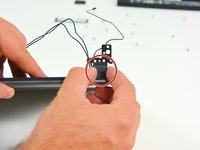
    • On the screen near the hinge now locate the two caches screws on the left.

    • Then look for those on the right.

  10. why! N240JU Replacing the LCD screen: crwdns2935265:010crwdnd2935265:01crwdnd2935265:03crwdne2935265:0 why! N240JU Replacing the LCD screen: crwdns2935265:010crwdnd2935265:02crwdnd2935265:03crwdne2935265:0 why! N240JU Replacing the LCD screen: crwdns2935265:010crwdnd2935265:03crwdnd2935265:03crwdne2935265:0
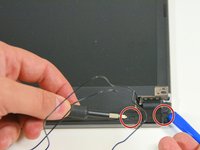
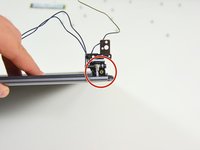
    • Now remove the screw covers near the left hinge.

    • first on the right side of the hinge.

    • then on the left side.

  11. why! N240JU Replacing the LCD screen: crwdns2935265:011crwdnd2935265:01crwdnd2935265:03crwdne2935265:0 why! N240JU Replacing the LCD screen: crwdns2935265:011crwdnd2935265:02crwdnd2935265:03crwdne2935265:0 why! N240JU Replacing the LCD screen: crwdns2935265:011crwdnd2935265:03crwdnd2935265:03crwdne2935265:0
    • Repeat near the right hinge

    • .Now return to the hinge on the left side and unscrew the outer screw.

  12. why! N240JU Replacing the LCD screen: crwdns2935265:012crwdnd2935265:01crwdnd2935265:03crwdne2935265:0 why! N240JU Replacing the LCD screen: crwdns2935265:012crwdnd2935265:02crwdnd2935265:03crwdne2935265:0 why! N240JU Replacing the LCD screen: crwdns2935265:012crwdnd2935265:03crwdnd2935265:03crwdne2935265:0
    • Then unscrew the inner screw.

    • Repeat on the side of the right hinge.

  13. why! N240JU Replacing the LCD screen: crwdns2935265:013crwdnd2935265:01crwdnd2935265:03crwdne2935265:0 why! N240JU Replacing the LCD screen: crwdns2935265:013crwdnd2935265:02crwdnd2935265:03crwdne2935265:0 why! N240JU Replacing the LCD screen: crwdns2935265:013crwdnd2935265:03crwdnd2935265:03crwdne2935265:0
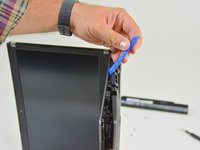
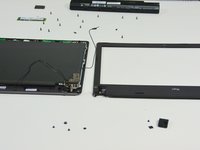
    • You can now gently unclip the screen cover.

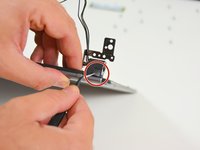
    • Locate the left hinge screw cover.

    • Locate the right hinge screw cover.

  14. why! N240JU Replacing the LCD screen: crwdns2935265:014crwdnd2935265:01crwdnd2935265:03crwdne2935265:0 why! N240JU Replacing the LCD screen: crwdns2935265:014crwdnd2935265:02crwdnd2935265:03crwdne2935265:0 why! N240JU Replacing the LCD screen: crwdns2935265:014crwdnd2935265:03crwdnd2935265:03crwdne2935265:0
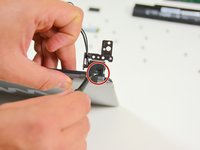
    • Gently remove the screw cover on the left hinge.

    • Also remove the screw cover on the right hinge.

    • Once the screw caps are removed you will see the fixing screws.

  15. why! N240JU Replacing the LCD screen: crwdns2935265:015crwdnd2935265:01crwdnd2935265:03crwdne2935265:0 why! N240JU Replacing the LCD screen: crwdns2935265:015crwdnd2935265:02crwdnd2935265:03crwdne2935265:0 why! N240JU Replacing the LCD screen: crwdns2935265:015crwdnd2935265:03crwdnd2935265:03crwdne2935265:0
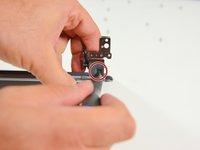
    • Now unscrew the screw on the left hinge.

    • Then unscrew the screw on the right hinge.

    • Once this is done you can now remove the hinge cover (left).

  16. why! N240JU Replacing the LCD screen: crwdns2935265:016crwdnd2935265:01crwdnd2935265:03crwdne2935265:0 why! N240JU Replacing the LCD screen: crwdns2935265:016crwdnd2935265:02crwdnd2935265:03crwdne2935265:0 why! N240JU Replacing the LCD screen: crwdns2935265:016crwdnd2935265:03crwdnd2935265:03crwdne2935265:0
    • Left hinged cover removed.

    • Then remove the cover from the right hinge.

    • Right hinge cover removed.

  17. why! N240JU Replacing the LCD screen: crwdns2935265:017crwdnd2935265:01crwdnd2935265:03crwdne2935265:0 why! N240JU Replacing the LCD screen: crwdns2935265:017crwdnd2935265:02crwdnd2935265:03crwdne2935265:0 why! N240JU Replacing the LCD screen: crwdns2935265:017crwdnd2935265:03crwdnd2935265:03crwdne2935265:0
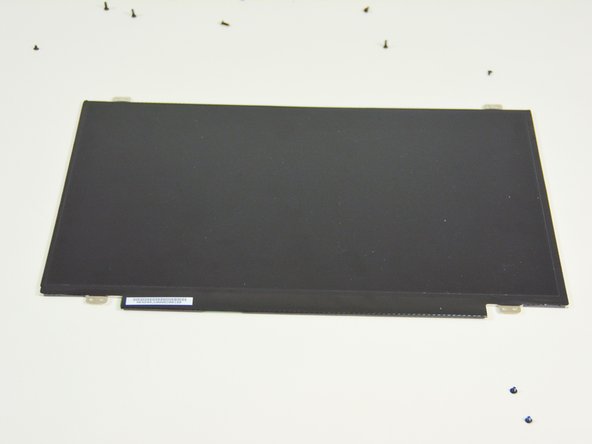
    • once these operations are done you see the LCD screen ready to be dismounted.

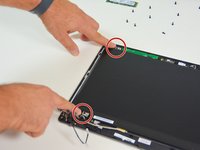
    • Now locate the screws that secure the LCD screen to the bracket and unscrew them. Two on the left.

    • Two on the right.

  18. why! N240JU Replacing the LCD screen: crwdns2935265:018crwdnd2935265:01crwdnd2935265:03crwdne2935265:0 why! N240JU Replacing the LCD screen: crwdns2935265:018crwdnd2935265:02crwdnd2935265:03crwdne2935265:0 why! N240JU Replacing the LCD screen: crwdns2935265:018crwdnd2935265:03crwdnd2935265:03crwdne2935265:0
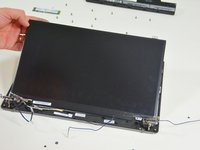
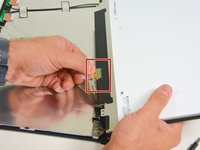
    • Once the screws are unscrewed, lift the LCD screen gently and flip it over.

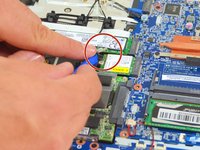
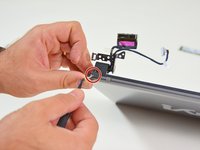
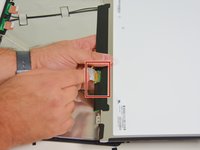
    • You will then see the connection cable of the screen.

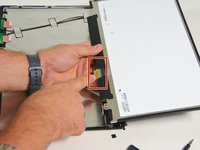
    • Locate its connector.

  19. why! N240JU Replacing the LCD screen: crwdns2935265:019crwdnd2935265:01crwdnd2935265:02crwdne2935265:0 why! N240JU Replacing the LCD screen: crwdns2935265:019crwdnd2935265:02crwdnd2935265:02crwdne2935265:0
    • Disconnect the cable.

    • And here you can now put it on your work plan.

crwdns2915888:0crwdne2915888:0

To reassemble your device, Follow these instructions in reverse order.

crwdns2935227:0crwdne2935227:0

crwdns2934873:0crwdne2934873:0

fr en

100%

crwdns2934883:0irlandacrwdne2934883:0 crwdns2934875:0crwdne2934875:0
crwdns2934877:0crwdne2934877:0 ›

Felice Suglia

crwdns2935283:006/15/13crwdne2935283:0

30.884 crwdns2915208:0crwdne2915208:0

crwdns2935297:0263crwdne2935297:0

crwdns2944067:00crwdne2944067:0

crwdns2917038:0crwdne2917038:0

crwdns2936625:0crwdne2936625:0:

crwdns2936751:024crwdne2936751:0 0

crwdns2936753:07crwdne2936753:0 2

crwdns2936753:030crwdne2936753:0 4

crwdns2942667:0crwdne2942667:0 440