crwdns2933423:0crwdne2933423:0

Changement dissipateur thermique Microsoft Surface Pro 5

crwdns2931529:0crwdnd2931529:0crwdnd2931529:0crwdnd2931529:013crwdnd2931529:0crwdne2931529:0

crwdns2935425:01crwdne2935425:0

crwdns2936315:0crwdne2936315:0
crwdns2936317:0crwdne2936317:0
crwdns2931653:01crwdne2931653:0
Microsoft Surface Pro 5 Heat Sink Replacement, Remove the heat sink shield: crwdns2935265:00crwdnd2935265:01crwdnd2935265:02crwdne2935265:0 Microsoft Surface Pro 5 Heat Sink Replacement, Remove the heat sink shield: crwdns2935265:00crwdnd2935265:02crwdnd2935265:02crwdne2935265:0
Remove the heat sink shield
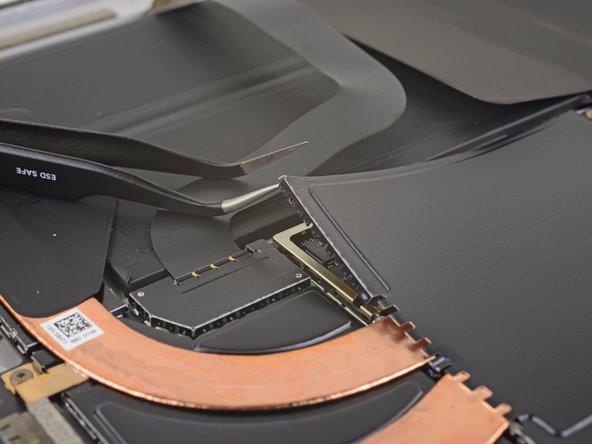
  • Insert one point of a pair of pointed tweezers into a gap in the corner of the EMI shield covering the heat sink.

  • Use the tweezers to pry the EMI shield away from the motherboard as much as you can without bending it. Do not remove it yet.

  • Try not to deform the shield too much—you will need to reinstall it during reassembly.

  • Take care not to puncture the battery with the tweezers while working on this shield.

Insérez une pointe d'une pincette pointue dans une encoche du coin du blindage électromagnétique (EMI) qui recouvre le dissipateur thermique.

Avec la pincette, faites levier sur le blindage électromagnétique (EMI) de la carte mère, autant que possible sans le plier. Ne le retirez pas encore.

Évitez de trop déformer le blindage, car vous devrez le remettre lors du remontage.

Veillez à ne pas percer la batterie avec la pincette pendant que vous manipulez ce blindage.

crwdns2944171:0crwdnd2944171:0crwdnd2944171:0crwdnd2944171:0crwdne2944171:0