crwdns2933423:0crwdne2933423:0

MacBook Pro 15" Retina Display Mitte 2012 I/O Board Kabel austauschen

crwdns2931529:0crwdnd2931529:0crwdnd2931529:0crwdnd2931529:042crwdnd2931529:0crwdne2931529:0

crwdns2935425:01crwdne2935425:0

crwdns2936315:0crwdne2936315:0
crwdns2936319:0crwdne2936319:0
crwdns2931653:01crwdne2931653:0
MacBook Pro 15" Retina Display Mid 2012 I/O Board Cable Replacement: crwdns2935265:00crwdnd2935265:01crwdnd2935265:03crwdne2935265:0 MacBook Pro 15" Retina Display Mid 2012 I/O Board Cable Replacement: crwdns2935265:00crwdnd2935265:02crwdnd2935265:03crwdne2935265:0 MacBook Pro 15" Retina Display Mid 2012 I/O Board Cable Replacement: crwdns2935265:00crwdnd2935265:03crwdnd2935265:03crwdne2935265:0
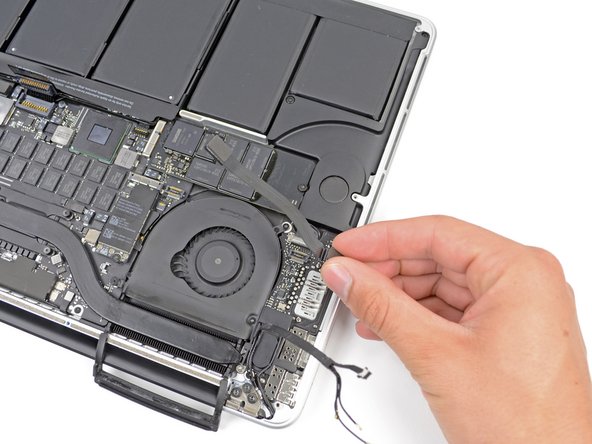
  • If your I/O Board cable's connectors have notches in the padding, you will need to release a locking lever underneath the notch in order to remove the cable. If this is the case, don't pry up on the connector until the levers are unlatched.

  • Using the flat end of a spudger, pry the I/O Board connector straight up out of its socket on the logic board.

  • During reassembly, connect this end first, as it does not flex.

  • In a similar fashion, remove the I/O Board cable connector from its socket on the I/O Board.

  • Remove the I/O Board cable from the MacBook Pro.

Wenn die Stecker am Kabel zum I/O-Board auf der Oberseite Einbuchtungen haben, dann müssen zuerst Verriegelungen unter der Einbuchtung gelöst werden, bevor das Kabel abgetrennt werden kann. In diesem Fall darfst du den Stecker erst dann hochhebeln, wenn der Verriegelungshebel offen ist.

Heble den Stecker des I/O-Boards mit dem flachen Ende eines Spudgers aus seiner Buchse auf dem Logic Board heraus.

Schließe beim Zusammenbau zuerst dieses Ende an, da es sich nicht biegsam ist.

Entferne auf die gleiche Weise den I/O-Board-Kabelstecker aus seinem Anschluss auf dem I/O-Board.

Entferne das I/O-Board Kabel vom MacBook Pro.

crwdns2944171:0crwdnd2944171:0crwdnd2944171:0crwdnd2944171:0crwdne2944171:0