crwdns2933423:0crwdne2933423:0

iMac Intel 21.5" 4K Retina-scherm (2017) Vervanging van het koellichaam

crwdns2931529:0crwdnd2931529:0crwdnd2931529:0crwdnd2931529:02crwdnd2931529:0crwdne2931529:0

crwdns2935425:01crwdne2935425:0

crwdns2936315:0crwdne2936315:0
crwdns2936313:0crwdne2936313:0
crwdns2931653:01crwdne2931653:0
iMac Intel 21.5" Retina 4K Display (2017) Heat Sink Replacement: crwdns2935265:00crwdnd2935265:01crwdnd2935265:02crwdne2935265:0 iMac Intel 21.5" Retina 4K Display (2017) Heat Sink Replacement: crwdns2935265:00crwdnd2935265:02crwdnd2935265:02crwdne2935265:0
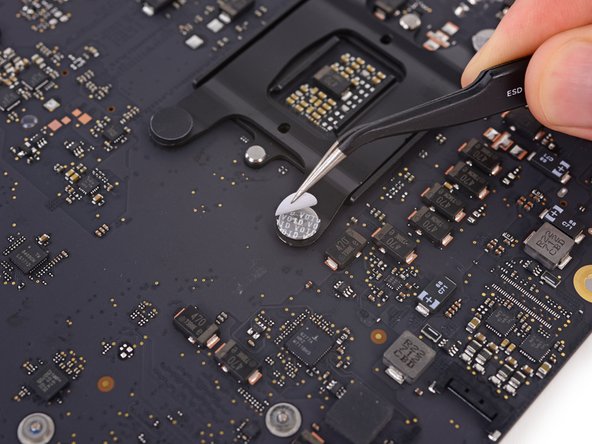
  • Peel off the four black tamper-evident stickers covering the heat sink mounting screws.

  • Remove the four T10 screws that secure the heat sink from the backside of the logic board.

  • During reassembly, tighten these screws one full turn at a time, alternating in a cross pattern. This will gradually increase the clamping pressure evenly across the surface of the CPU. Continue gradually tightening the screws until they're snug and the entire spring plate lays flat against the logic board.

Trek de vier zwarte verzegelingsstickers die over de schroeven van het koellichaam zijn geplakt los.

Verwijder de vier T10-schroeven die het koellichaam bevestigen uit de achterkant van het moederbord.

Draai deze schroeven bij het weer in elkaar zetten van je toestel elke keer maar met 1 volle draai aan, en wissel dit af in een kruisend patroon. Op die manier verdeel je de druk die vrijkomt bij het vastdraaien van de schroeven gelijk over het oppervlak van de CPU. Blijf dit doen tot alle schroeven vastgedraaid zijn en de veerplaat plat op het moederbord ligt.

crwdns2944171:0crwdnd2944171:0crwdnd2944171:0crwdnd2944171:0crwdne2944171:0