crwdns2933423:0crwdne2933423:0

Sostituzione Schermo Microsoft Surface Book

crwdns2931529:0crwdnd2931529:0crwdnd2931529:0crwdnd2931529:02crwdnd2931529:0crwdne2931529:0

crwdns2936315:0crwdne2936315:0
crwdns2936321:0crwdne2936321:0
crwdns2931653:05crwdne2931653:0
Microsoft Surface Book Screen Replacement, Insert an opening pick: crwdns2935265:00crwdnd2935265:01crwdnd2935265:03crwdne2935265:0 Microsoft Surface Book Screen Replacement, Insert an opening pick: crwdns2935265:00crwdnd2935265:02crwdnd2935265:03crwdne2935265:0 Microsoft Surface Book Screen Replacement, Insert an opening pick: crwdns2935265:00crwdnd2935265:03crwdnd2935265:03crwdne2935265:0
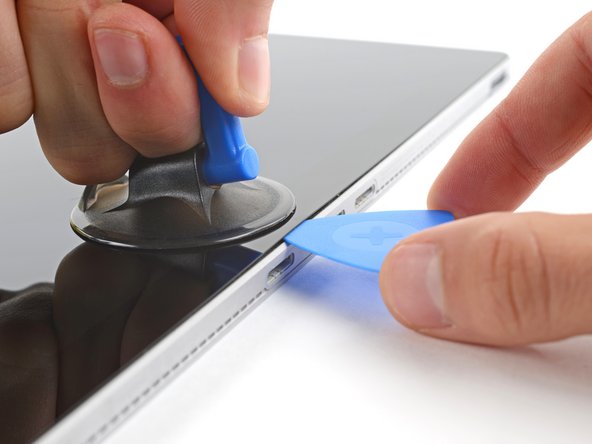
Insert an opening pick
  • The adhesive securing the screen is very strong. This step may take significant force and multiple attempts.

  • Apply a suction handle to the screen, as close to the center of the bottom edge as possible.

  • Pull up on the suction cup with strong, steady force to create a gap between the screen and the frame.

  • If you have trouble creating a gap, apply more heat to further soften the adhesive. Follow the iOpener instructions to avoid overheating.

  • Insert an opening pick into the gap.

L'adesivo che tiene fermo lo schermo è molto forte. Questo passaggio potrebbe richiedere una forza significativa e diversi tentativi.

Applica una maniglia a ventosa allo schermo, il più vicino possibile al centro del bordo inferiore.

Tira verso l'alto sulla ventosa con una forza forte e costante per creare uno spazio tra lo schermo e la cornice.

Se hai difficoltà a creare uno spazio, applica più calore per ammorbidire ulteriormente l'adesivo. Segui le istruzioni dell'iOpener per evitare il surriscaldamento.

Inserisci lo strumento di apertura nello spazio creatosi.

crwdns2944171:0crwdnd2944171:0crwdnd2944171:0crwdnd2944171:0crwdne2944171:0