crwdns2933423:0crwdne2933423:0

Sustitución de la Pantalla del Microsoft Surface Book

crwdns2931529:0crwdnd2931529:0crwdnd2931529:0crwdnd2931529:02crwdnd2931529:0crwdne2931529:0

crwdns2936315:0crwdne2936315:0
crwdns2936331:0crwdne2936331:0
crwdns2931653:05crwdne2931653:0
Microsoft Surface Book Screen Replacement, Insert an opening pick: crwdns2935265:00crwdnd2935265:01crwdnd2935265:03crwdne2935265:0 Microsoft Surface Book Screen Replacement, Insert an opening pick: crwdns2935265:00crwdnd2935265:02crwdnd2935265:03crwdne2935265:0 Microsoft Surface Book Screen Replacement, Insert an opening pick: crwdns2935265:00crwdnd2935265:03crwdnd2935265:03crwdne2935265:0
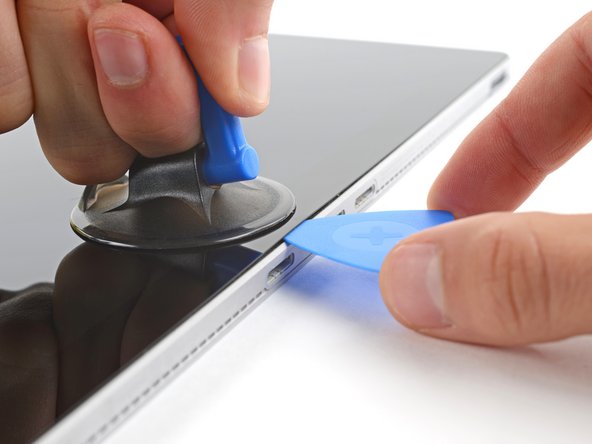
Insert an opening pick
  • The adhesive securing the screen is very strong. This step may take significant force and multiple attempts.

  • Apply a suction handle to the screen, as close to the center of the bottom edge as possible.

  • Pull up on the suction cup with strong, steady force to create a gap between the screen and the frame.

  • If you have trouble creating a gap, apply more heat to further soften the adhesive. Follow the iOpener instructions to avoid overheating.

  • Insert an opening pick into the gap.

El adhesivo que asegura la pantalla es muy fuerte. Este paso podría tomar algo de fuerza y varios intentos.

Aplica una ventosa de succión a la pantalla, tan cerca del centro del borde inferior como sea posible.

Jala hacia arriba en la ventosa de succión, con fuerza estable para crear un hueco entre la pantalla y el marco.

Si tienes problemas creando un hueco, aplica más calor para aflojar el adhesivo. Sigue las instrucciones del iOpener para evitar el sobrecalentamiento.

Inserta una púa de apertura en el hueco.

crwdns2944171:0crwdnd2944171:0crwdnd2944171:0crwdnd2944171:0crwdne2944171:0