crwdns2933423:0crwdne2933423:0

Microsoft Surface Book Display tauschen

crwdns2931529:0crwdnd2931529:0crwdnd2931529:0crwdnd2931529:02crwdnd2931529:0crwdne2931529:0

crwdns2936315:0crwdne2936315:0
crwdns2936319:0crwdne2936319:0
crwdns2931653:05crwdne2931653:0
Microsoft Surface Book Screen Replacement, Insert an opening pick: crwdns2935265:00crwdnd2935265:01crwdnd2935265:03crwdne2935265:0 Microsoft Surface Book Screen Replacement, Insert an opening pick: crwdns2935265:00crwdnd2935265:02crwdnd2935265:03crwdne2935265:0 Microsoft Surface Book Screen Replacement, Insert an opening pick: crwdns2935265:00crwdnd2935265:03crwdnd2935265:03crwdne2935265:0
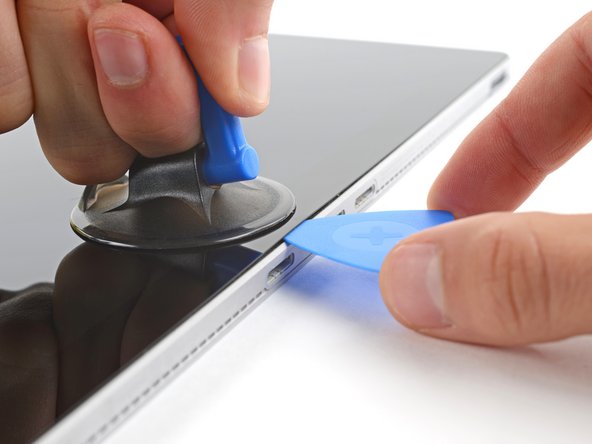
Insert an opening pick
  • The adhesive securing the screen is very strong. This step may take significant force and multiple attempts.

  • Apply a suction handle to the screen, as close to the center of the bottom edge as possible.

  • Pull up on the suction cup with strong, steady force to create a gap between the screen and the frame.

  • If you have trouble creating a gap, apply more heat to further soften the adhesive. Follow the iOpener instructions to avoid overheating.

  • Insert an opening pick into the gap.

Das Display ist sehr stark verklebt. Du brauchst wahrscheinlich viel Kraft und einige Versuche.

Bringe einen Saugheber so nahe wie möglich mittig an der Unterkante an.

Ziehe fest und gleichmäßig am Saugheber, bis ein Spalt zwischen dem Display und dem Rahmen entstanden ist.

Wenn das nicht leicht geht, dann erwärme die Stelle nochmals, um den Kleber noch mehr aufzuweichen. Beachte die iOpener Anleitung und überhitze das Gerät nicht.

Setzen ein Plektrum in den Spalt ein.

crwdns2944171:0crwdnd2944171:0crwdnd2944171:0crwdnd2944171:0crwdne2944171:0