crwdns2933423:0crwdne2933423:0

Casio FX-82ms Tastenaustausch

crwdns2936315:0crwdne2936315:0
crwdns2936319:0crwdne2936319:0
crwdns2931653:04crwdne2931653:0
Casio fx-82MS Button Replacement: crwdns2935265:00crwdnd2935265:01crwdnd2935265:02crwdne2935265:0 Casio fx-82MS Button Replacement: crwdns2935265:00crwdnd2935265:02crwdnd2935265:02crwdne2935265:0
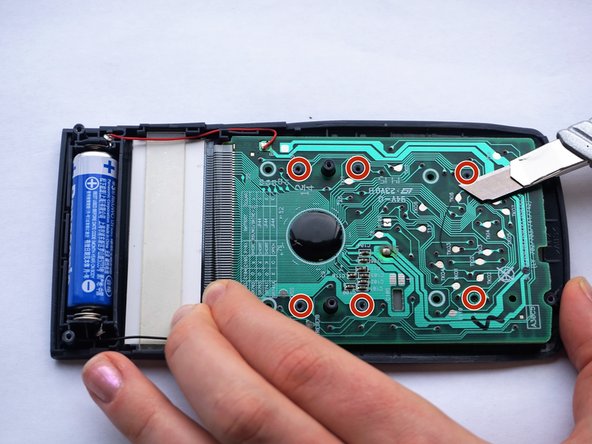
  • Locate the rubber contact points.

  • Solder the rubber contact points, while using the spudger to pry the PCB loose.

  • PCB stands for Printed Circuit Board.

  • Toxic gasses might be created. Hence, do this in a well ventilated room.

  • Start with the lower plugs (left on the photo). Gently pry the PCB loose at the same time.

  • For this step a third person is required for safety. One person uses the solder iron, the other one uses the spudger to pry the PCB loose.

  • If you don't have accessibility to a solder iron, use a utility knife to remove the plugs.

Suche die Kontaktstellen aus Gummi.

Löte an den Kontaktstellen während du mit den Spudger versucht die Platine (PCB) abzuhebeln.

PCB steht für Printed Circuit Board.

Giftige Gase könnten hier entstehen. Führe diese Schritte deshalb in einem gut belüfteten Raum durch.

Beginne mit den unteren Stellen (auf dem Foto links). Hebele die Platine gleichzeitig vorsichtig locker.

Für diesen Schritt wird eine dritte Person aus Sicherheitsgründen benötigt. Eine Person benutzt den Lötkolben, die zweite benutzt den Spudger, um die Platine zu lösen.

Solltest du keinen Zugang zu einem Lötkolben haben, kannst du auch ein Allzweckmesser nehmen, um die Kontaktstecker zu entfernen.

crwdns2944171:0crwdnd2944171:0crwdnd2944171:0crwdnd2944171:0crwdne2944171:0