crwdns2933423:0crwdne2933423:0

Changement haut-parleurs Nintendo 3DS XL 2015

crwdns2931527:0crwdnd2931527:0crwdnd2931527:0crwdnd2931527:0crwdne2931527:0

crwdns2935425:01crwdne2935425:0

crwdns2936315:0crwdne2936315:0
crwdns2936317:0crwdne2936317:0
crwdns2931653:01crwdne2931653:0
Nintendo 3DS XL 2015 Speakers Replacement: crwdns2935265:00crwdnd2935265:01crwdnd2935265:03crwdne2935265:0 Nintendo 3DS XL 2015 Speakers Replacement: crwdns2935265:00crwdnd2935265:02crwdnd2935265:03crwdne2935265:0 Nintendo 3DS XL 2015 Speakers Replacement: crwdns2935265:00crwdnd2935265:03crwdnd2935265:03crwdne2935265:0
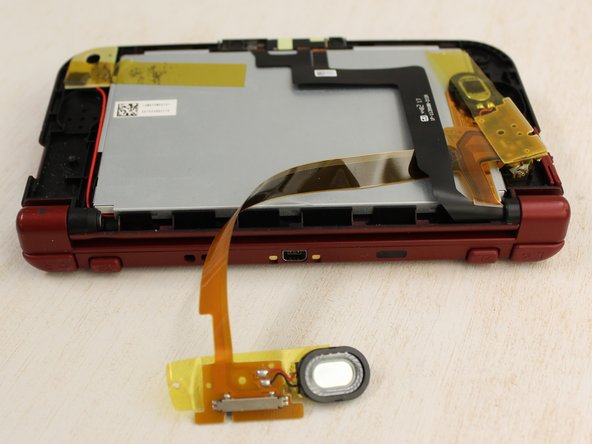
  • The speakers are on the left and right side of the 3DS, and are held down by tape.

  • Before lifting the tape up, the speaker on the right side has two input films. Carefully detach each speaker film from their respective ZIF (zero insertion force) connectors. These are the paper thin ribbons that have orange stripes along them

  • Slowly lift the tape from the speaker.

  • The speakers are soldered onto the circuit board.

Les haut-parleurs se trouvent sur les côtés gauche et droit de la 3DS et sont maintenus par du ruban adhésif.

Avant de soulever la bande, le haut-parleur du côté droit dispose de deux films d'entrée. Détachez soigneusement chaque film des hauts-parleurs de leurs connecteurs ZIF respectifs. Ce sont des rubans fins en papier avec des rayures orange le long d'eux.

Soulevez lentement la bande du haut-parleur.

Les haut-parleurs sont soudés sur le circuit imprimé.

crwdns2944171:0crwdnd2944171:0crwdnd2944171:0crwdnd2944171:0crwdne2944171:0