crwdns2933423:0crwdne2933423:0

MacBook Pro 15" Core 2 Duo Modelos A1226 y A1260 Reemplazar Disipador de Calor

crwdns2931527:0crwdnd2931527:0crwdnd2931527:0crwdnd2931527:0crwdne2931527:0

crwdns2935425:01crwdne2935425:0

crwdns2936315:0crwdne2936315:0
crwdns2936331:0crwdne2936331:0
crwdns2931653:01crwdne2931653:0
MacBook Pro 15" Core 2 Duo Models A1226 and A1260 Heat Sink Replacement: crwdns2935265:00crwdnd2935265:01crwdnd2935265:02crwdne2935265:0 MacBook Pro 15" Core 2 Duo Models A1226 and A1260 Heat Sink Replacement: crwdns2935265:00crwdnd2935265:02crwdnd2935265:02crwdne2935265:0
  • Gently lift the heat sink out of the computer.

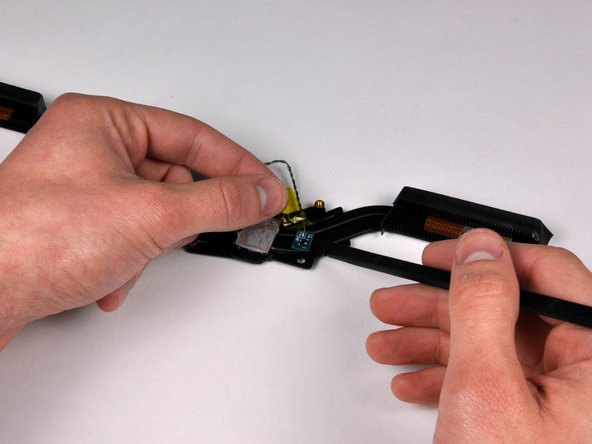
  • Peel back the orange Kapton tape covering the middle thermal sensor.

  • Use a spudger to pry the middle thermal sensor off the heat sink.

  • Heat sink remains.

  • If you need to mount the heat sink back into the laptop, we have a thermal paste guide that makes replacing the thermal compound easy.

Suavemente levanta el disipador de calor hacia fuera de la computadora.

Despega la cinta naranja Kapton que cubre el sensor térmico central.

Usa un spudger para sacar el sensor térmico del medio del disipador de calor.

El disipador de calor permanece.

Si necesitas volver a colocar el disipador de calor en el portátil, tenemos una guía de pasta térmica que facilita el reemplazo del compuesto térmico.

crwdns2944171:0crwdnd2944171:0crwdnd2944171:0crwdnd2944171:0crwdne2944171:0