crwdns2933423:0crwdne2933423:0

Sustitución de la RAM del Toshiba Satellite C55D-A5170

crwdns2935425:05crwdne2935425:0

crwdns2936315:0crwdne2936315:0
crwdns2936331:0crwdne2936331:0
crwdns2931653:05crwdne2931653:0
Toshiba Satellite C55D-A5170 RAM Replacement, Installing the New RAM (Finish): crwdns2935265:00crwdnd2935265:01crwdnd2935265:03crwdne2935265:0 Toshiba Satellite C55D-A5170 RAM Replacement, Installing the New RAM (Finish): crwdns2935265:00crwdnd2935265:02crwdnd2935265:03crwdne2935265:0 Toshiba Satellite C55D-A5170 RAM Replacement, Installing the New RAM (Finish): crwdns2935265:00crwdnd2935265:03crwdnd2935265:03crwdne2935265:0
Installing the New RAM (Finish)
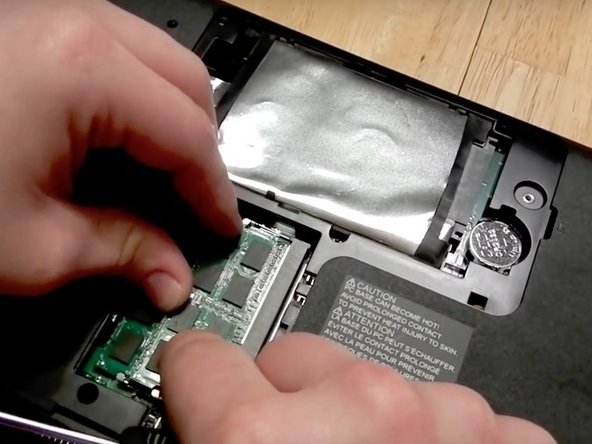
  • Step 5: Insert the new RAM at an angle, and make sure you line the pins of the Chip up with the Pins of the Slot and push it gently but firmly as far in as it will go. Then gently push it down until the tabs lock it in place.

  • Note from the first Bullet point: If you are installing two RAM Chips then you will repeat this process again after you install the first chip.

  • Then put the plastic cover back on and screw the screw in place. Replace Battery back in its place. Then reconnect the power.

  • To make sure your computer is reading all the RAM. Do the following: For Windows XP, Vista and 7 users: From the Desktop or Start Menu, right-click on Computer and select Properties. In the System Properties window, the system will list "Installed memory (RAM)" with the total amount detected.

  • For Windows 8 & 8.1 users you do the following: Step 1:Right Click My Computer, then Click on Properties. Step 2: Click Installed Memory (RAM)

  • For Windows 10 users: Open System Properties. (Right-click the Start menu, select System and then click Change Settings, or use the Control Panel.) 2. In the System Properties dialog box, on the Advanced tab, click the Settings button in the Performance section.

Paso 5: inserta la nueva memoria RAM en ángulo y asegúrate de alinear los pines del chip con los pines de la ranura y empújalo suavemente pero con firmeza tanto como sea posible. Luego empújalo suavemente hacia abajo hasta que las pestañas lo bloqueen en su lugar.

Nota del primer punto: si estás instalando dos chips RAM, repetirás este proceso nuevamente después de instalar el primer chip.

Luego vuelve a colocar la cubierta de plástico y atornille el tornillo en su lugar. Vuelve a colocar la batería en su lugar. Luego vuelve a conectar la alimentación.

Para asegurarte de que tu computadora esté leyendo toda la memoria RAM. Haz lo siguiente: Para usuarios de Windows XP, Vista y 7: Desde el escritorio o el menú Inicio, haz clic con el botón derecho en Equipo y seleccione Propiedades.

En la ventana Propiedades del sistema, el sistema mostrará una lista de "Memoria instalada (RAM)" con la cantidad total detectada.

Para los usuarios de Windows 8 y 8.1, haz lo siguiente: Paso 1: Haz clic derecho en Mi PC, luego haz clic en Propiedades. Paso 2: Haz clic en Memoria instalada (RAM)

Para usuarios de Windows 10: Abre Propiedades del sistema. (Haz clic con el botón derecho en el menú Inicio, selecciona Sistema y luego haz clic en Cambiar configuración o usa el Panel de control). 2. En el cuadro de diálogo Propiedades del sistema, en la pestaña Avanzado, haz clic en el botón Configuración en la sección Rendimiento.

crwdns2944171:0crwdnd2944171:0crwdnd2944171:0crwdnd2944171:0crwdne2944171:0