crwdns2933423:0crwdne2933423:0

Desmontaje del Motorola Droid Bionic

crwdns2935425:016crwdne2935425:0

crwdns2936315:0crwdne2936315:0
crwdns2936331:0crwdne2936331:0
crwdns2931653:016crwdne2931653:0
Motorola Droid Bionic Teardown: crwdns2935265:00crwdnd2935265:01crwdnd2935265:02crwdne2935265:0 Motorola Droid Bionic Teardown: crwdns2935265:00crwdnd2935265:02crwdnd2935265:02crwdne2935265:0
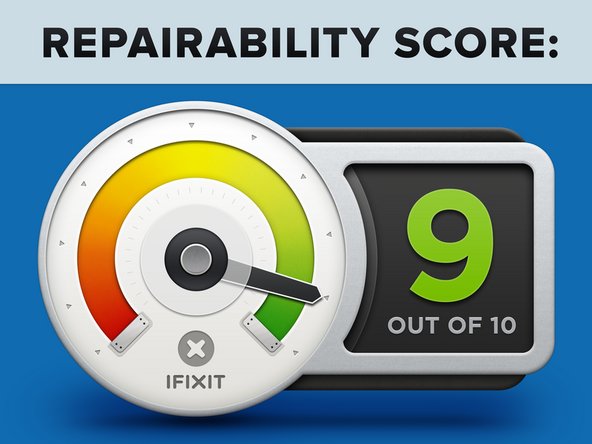
  • Motorola Droid Bionic Repairability Score: 9 out of 10 (10 is easiest to repair).

  • No tools are necessary for changing the SIM and microSD cards.

  • The battery can be removed in seconds.

  • The phone is held together with a limited number of screws and plastic clips. Adhesive is minimally used in its construction.

  • Many components can be replaced individually, and are not located on large, delicate ribbon cables.

  • The LCD is separable from the glass front panel, making them independently replaceable.

  • You must disassemble the entire phone to replace the LCD or front panel.

  • Replacing the rear-facing camera requires removing one of the motherboard's EMI shields.

Puntuación de reparabilidad de Motorola Droid Bionic: 9 de 10 (10 es la más fácil de reparar).

No se necesitan herramientas para cambiar las tarjetas SIM y microSD.

La batería se puede quitar en segundos.

El teléfono se mantiene unido con un número limitado de tornillos y clips de plástico. El adhesivo se utiliza mínimamente en su construcción.

Muchos componentes pueden reemplazarse individualmente y no están ubicados en cables planos grandes y delicados.

La pantalla LCD se puede separar del panel frontal de vidrio, lo que la hace reemplazable independientemente.

Se debe desmontar todo el teléfono para reemplazar la pantalla LCD o el panel frontal.

Reemplazar la cámara trasera requiere quitar uno de los protectores EMI de la placa madre.

crwdns2944171:0crwdnd2944171:0crwdnd2944171:0crwdnd2944171:0crwdne2944171:0