crwdns2933423:0crwdne2933423:0

Remplacement de l'antenne Wi-Fi du PlayStation 3 Super Slim

crwdns2931527:0crwdnd2931527:0crwdnd2931527:0crwdnd2931527:0crwdne2931527:0

crwdns2935425:01crwdne2935425:0

crwdns2936315:0crwdne2936315:0
crwdns2936317:0crwdne2936317:0
crwdns2931653:01crwdne2931653:0
PlayStation 3 Super Slim Wi-Fi Antennas Replacement: crwdns2935265:00crwdnd2935265:01crwdnd2935265:03crwdne2935265:0 PlayStation 3 Super Slim Wi-Fi Antennas Replacement: crwdns2935265:00crwdnd2935265:02crwdnd2935265:03crwdne2935265:0 PlayStation 3 Super Slim Wi-Fi Antennas Replacement: crwdns2935265:00crwdnd2935265:03crwdnd2935265:03crwdne2935265:0
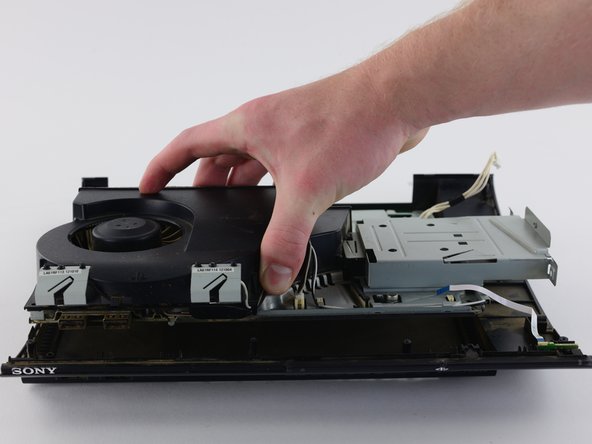
  • Locate the white flex ribbon cable that connects the power button to the motherboard. Pull this cable out from the motherboard end.

  • Remove the five black 8.3mm long screws with a Phillips #1 screwdriver.

  • Remove the two silver 12.8mm long screws with a Phillips #1 screwdriver.

  • Remove the device from the bottom shell casing.

Localisez le câble ruban flexible blanc qui relie le bouton d'alimentation à la carte mère. Retirez ce câble de l'extrémité de la carte mère.

Retirez les cinq vis noires de 8,3 mm de long avec un tournevis cruciforme n ° 1.

Retirez les deux vis argentées de 12,8 mm de long avec un tournevis cruciforme n ° 1.

Retirez l'appareil du boîtier inférieur.

crwdns2944171:0crwdnd2944171:0crwdnd2944171:0crwdnd2944171:0crwdne2944171:0