crwdns2933423:0crwdne2933423:0

Elektronica-vaardigheden 101

crwdns2936315:0crwdne2936315:0
crwdns2936313:0crwdne2936313:0
crwdns2931653:020crwdne2931653:0
Electronics Skills Kit 101: crwdns2935265:00crwdnd2935265:01crwdnd2935265:03crwdne2935265:0 Electronics Skills Kit 101: crwdns2935265:00crwdnd2935265:02crwdnd2935265:03crwdne2935265:0 Electronics Skills Kit 101: crwdns2935265:00crwdnd2935265:03crwdnd2935265:03crwdne2935265:0
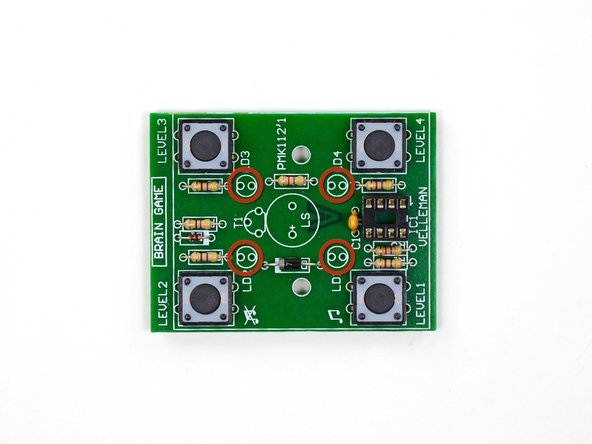
  • The next components to install are the LEDs. Light emitting diodes are used in all sorts of electronics to provide bright, different colored lights.

  • Note that the two leads are different lengths. Since an LED is a diode, it only allows current to travel in one direction, so it is important to install the correct lead in the correct hole.

  • The four LEDs belong in each of the four terminals marked LD1 through LD4.

  • When installing the LEDs, insert the shorter of the two leads into the hole next to the flat part of the printed circle.

De volgende onderdelen die moeten worden geïnstalleerd, zijn de LED's. Lichtgevende diodes worden in allerlei soorten elektronica gebruikt om helder, verschillend gekleurd licht te geven.

Merk op dat de twee aansluitingen van een LED verschillende lengtes hebben. Aangezien een LED een diode is, kan de stroom slechts in één richting lopen, dus het is belangrijk om de juiste draad in het juiste gat te installeren.

De vier LED's horen in elk van de vier gaten die zijn gemarkeerd met LD1 tot en met LD4.

Wanneer je de LED's installeert, steek je de kortste van de twee draden in het gat naast het platte deel van de afgedrukte cirkel.

crwdns2944171:0crwdnd2944171:0crwdnd2944171:0crwdnd2944171:0crwdne2944171:0