crwdns2933423:0crwdne2933423:0

Kit de habilidades electrónicas 101

crwdns2936315:0crwdne2936315:0
crwdns2936331:0crwdne2936331:0
crwdns2931653:020crwdne2931653:0
Electronics Skills Kit 101: crwdns2935265:00crwdnd2935265:01crwdnd2935265:03crwdne2935265:0 Electronics Skills Kit 101: crwdns2935265:00crwdnd2935265:02crwdnd2935265:03crwdne2935265:0 Electronics Skills Kit 101: crwdns2935265:00crwdnd2935265:03crwdnd2935265:03crwdne2935265:0
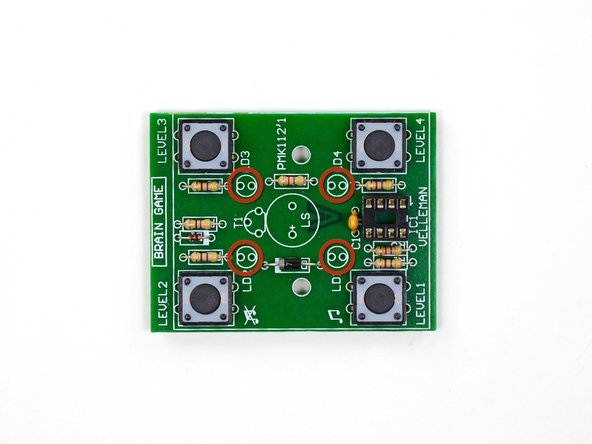
  • The next components to install are the LEDs. Light emitting diodes are used in all sorts of electronics to provide bright, different colored lights.

  • Note that the two leads are different lengths. Since an LED is a diode, it only allows current to travel in one direction, so it is important to install the correct lead in the correct hole.

  • The four LEDs belong in each of the four terminals marked LD1 through LD4.

  • When installing the LEDs, insert the shorter of the two leads into the hole next to the flat part of the printed circle.

Los siguientes componentes a instalar son los LED. Los diodos emisores de luz se utilizan en todo tipo de productos electrónicos para proporcionar luces brillantes de diferentes colores.

Ten en cuenta que los dos cables tienen diferentes longitudes. Dado que un LED es un diodo, solo permite que la corriente viaje en una dirección, por lo que es importante instalar el cable correcto en el orificio correcto.

Los cuatro LED pertenecen a cada uno de los cuatro terminales marcados LD1 a LD4.

Al instalar los LED, inserta el más corto de los dos cables en el orificio junto a la parte plana del círculo impreso.

crwdns2944171:0crwdnd2944171:0crwdnd2944171:0crwdnd2944171:0crwdne2944171:0