crwdns2933423:0crwdne2933423:0

Elektronica-vaardigheden 101

crwdns2936315:0crwdne2936315:0
crwdns2936313:0crwdne2936313:0
crwdns2931653:018crwdne2931653:0
Electronics Skills Kit 101: crwdns2935265:00crwdnd2935265:01crwdnd2935265:03crwdne2935265:0 Electronics Skills Kit 101: crwdns2935265:00crwdnd2935265:02crwdnd2935265:03crwdne2935265:0 Electronics Skills Kit 101: crwdns2935265:00crwdnd2935265:03crwdnd2935265:03crwdne2935265:0
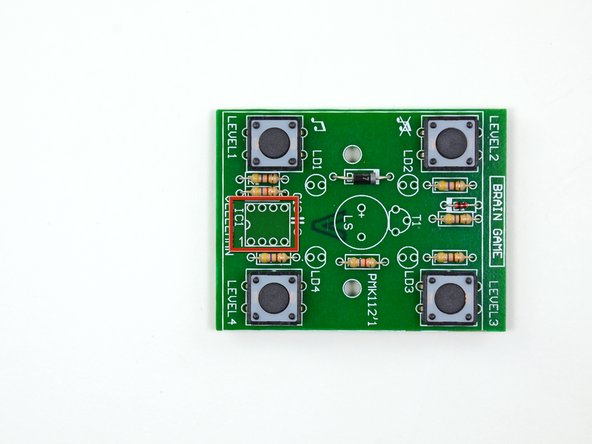
  • Next you will install the IC socket, also known as a CPU socket. IC sockets use a mechanical connection to connect a processor to a printed circuit board. These sockets allows the processor to be easily replaced without the risk of damage associated with soldering processors directly to a circuit board.

  • Stick the eight leads of the IC socket through the holes in the rectangle marked IC1. Make sure that the semi-circle on the top of the socket lines up with the semi-circle printed on the edge of the rectangle on the circuit board.

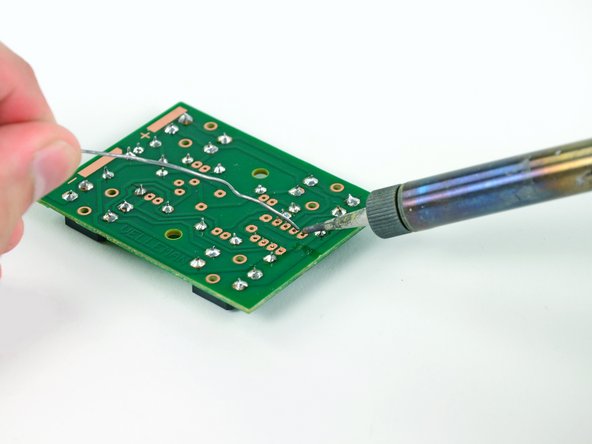
  • Turn the board over and solder the eight leads of the IC socket to the board. Similar to soldering the buttons, there is no need to trim any excess off the leads.

Vervolgens soldeer je het IC-contact, ook wel bekend als het CPU-contact, vast. Deze contact maken gebruik van een mechanische verbinding om processoren op een printplaat aan te sluiten. Zo kunnen processoren eenvoudig geplaatst en vervangen worden en wordt het risico dat bij op de printplaat vastgesoldeerde processoren komt kijken vermeden.

Steek de acht draden van het IC-contact door de gaten van de rechthoek die met IC1 is. Zorg ervoor dat de halve cirkel aan de bovenkant van het contact op één lijn ligt met de halve cirkel die is afgedrukt op de rand van de rechthoek op de printplaat.

Draai de printplaat om en soldeer de acht pootjes van het IC-contact op het koper vast. Net als bij het solderen van de knoppen is het niet nodig om de rest van de draden weg te knippen.

crwdns2944171:0crwdnd2944171:0crwdnd2944171:0crwdnd2944171:0crwdne2944171:0