crwdns2933423:0crwdne2933423:0

Electronics Skills Kit 101

crwdns2936315:0crwdne2936315:0
crwdns2936321:0crwdne2936321:0
crwdns2931653:06crwdne2931653:0
Electronics Skills Kit 101: crwdns2935265:00crwdnd2935265:01crwdnd2935265:03crwdne2935265:0 Electronics Skills Kit 101: crwdns2935265:00crwdnd2935265:02crwdnd2935265:03crwdne2935265:0 Electronics Skills Kit 101: crwdns2935265:00crwdnd2935265:03crwdnd2935265:03crwdne2935265:0
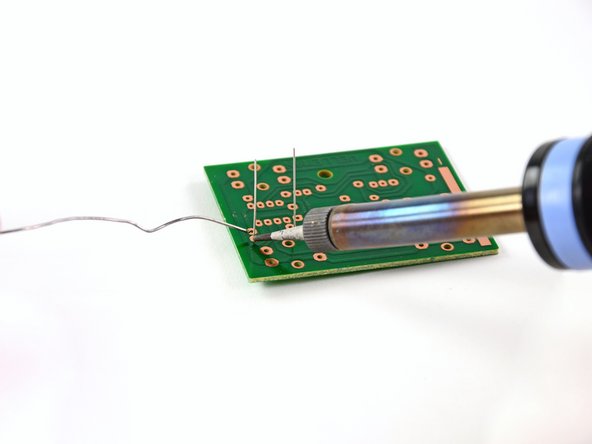
  • Here we are: the moment of truth. It's time to get that solder flowing.

  • Set the tip of the soldering iron on the two parts to be connected. In this case, that's the resistor lead and the copper trace on the circuit board.

  • Touch your solder to the tip of your soldering iron to melt it onto the joint. Don't hold it there for more than a second or two.

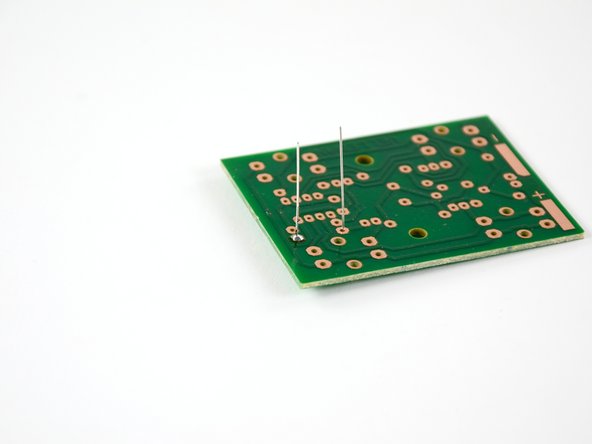
  • Quickly, but not frantically, pull both the soldering iron and the solder away from the joint.

  • Your solder joint should be shiny and conical, and not expand beyond the copper trace.

Eccoci qui: è il momento della verità. È ora di iniziare a saldare.

Appoggia la punta del saldatore sulle due parti da collegare. In questo caso sono la gamba del resistore e la traccia in rame sulla scheda logica.

Appoggia lo stagno sulla punta del tuo saldatore per scioglierlo sul contatto. Non tenerlo appoggiato per più di qualche secondo.

Velocemente, ma non freneticamente, tira via sia il saldatore sia lo stagno dal contatto.

La tua saldatura dovrebbe essere luccicante e a forma conica, e non dovrebbe allargarsi oltre la traccia in rame.

crwdns2944171:0crwdnd2944171:0crwdnd2944171:0crwdnd2944171:0crwdne2944171:0