crwdns2933423:0crwdne2933423:0

Amazon Fire 第5世代 スクリーンとLCDの交換

crwdns2935425:01crwdne2935425:0

crwdns2936315:0crwdne2936315:0
crwdns2936323:0crwdne2936323:0
crwdns2931653:01crwdne2931653:0
Amazon Fire 5th Generation Screen and LCD Replacement: crwdns2935265:00crwdnd2935265:01crwdnd2935265:02crwdne2935265:0 Amazon Fire 5th Generation Screen and LCD Replacement: crwdns2935265:00crwdnd2935265:02crwdnd2935265:02crwdne2935265:0
  • Because heat is required to remove the screen and LCD, it is advisable to remove the battery entirely as well.

  • It is important to be very careful and use little force in this step. Too much force can damage the battery. A damaged battery can lead to an electrical fire or explosion of the battery.

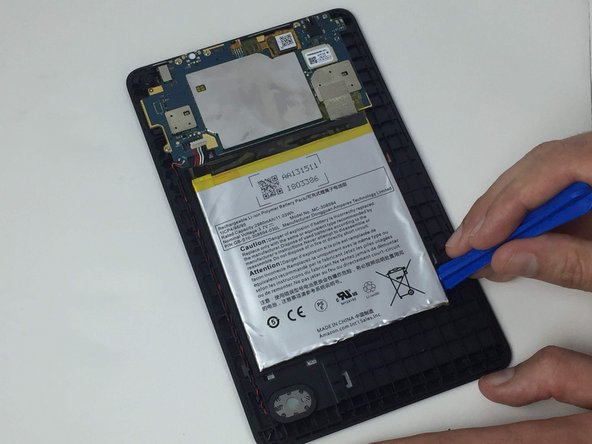
  • Carefully and slowly work the iFixit Opening Tool down the edge of the battery pack. Angle the tool to pry it up.

  • When you have successfully lifted the battery pack up on one side or corner, carefully wedge the iFixit Opening Tool under the pack about 1/2" and work around the rest of the sides.

  • Be careful not to bend the battery pack.

熱を利用して、スクリーンとLCDを外します。バッテリー全体を取り出すことが重要です。

この手順では、力をあまり入れないで作業をすることが非常に重要です。 力をかけすぎると、バッテリーを損傷してしまう可能性があります。 損傷したバッテリーは、バッテリーの電気火災または爆発を引き起こす可能性があります。

開口ツールをバッテリーパックの端の下にゆっくりと差し込みます。ツールを斜めに傾けて、下からこじ開けます。

バッテリーパック片側または角を上に持ち上げたら、開口ツールをパックの下に約1cm程度慎重に押し込み、残りの側面をこじ開けます。

バッテリーパックを曲げないようご注意ください。

crwdns2944171:0crwdnd2944171:0crwdnd2944171:0crwdnd2944171:0crwdne2944171:0