crwdns2933423:0crwdne2933423:0

Sustitución disco duro iPod Classic

crwdns2931529:0crwdnd2931529:0crwdnd2931529:0crwdnd2931529:08crwdnd2931529:0crwdne2931529:0

crwdns2936315:0crwdne2936315:0
crwdns2936331:0crwdne2936331:0
crwdns2931653:012crwdne2931653:0
iPod Classic Hard Drive Replacement: crwdns2935265:00crwdnd2935265:01crwdnd2935265:01crwdne2935265:0
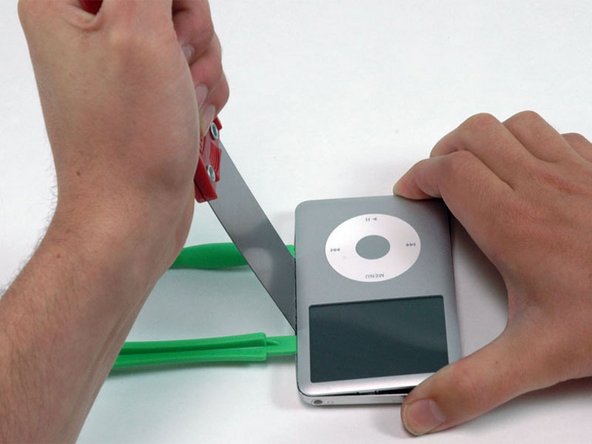
  • At an angle, carefully insert a putty knife about 1/8 inch into the seam between the two opening tools.

  • Again, there are thin metal rails running along the inside of the rear panel, so take great care when inserting the putty knife.

  • Once the putty knife has cleared the lip of the rear panel, angle the putty knife so that it is vertical, and carefully (but firmly) wiggle it straight down into the iPod via the gap between the plastic opening tools.

  • Push with your fingers on the rear panel behind the putty knife to minimize bending. Ever so slightly flex the putty knife to ensure that most of the metal tabs on this side of the iPod are disengaged.

En ángulo, inserta cuidadosamente una espátula de aproximadamente 1/8 de pulgada en la costura entre las dos herramientas de apertura.

Una vez más, hay rieles metálicos delgados que corren a lo largo del interior del panel posterior, así que ten mucho cuidado al insertar la espátula.

Una vez que la espátula haya despejado el borde del panel posterior, inclina la espátula para que quede vertical y con cuidado (pero con firmeza) muévela directamente hacia el iPod a través del espacio entre las herramientas de apertura de plástico.

Empuja con los dedos el panel posterior detrás de la espátula para minimizar la flexión. Flexiona ligeramente la espátula para asegurarte de que la mayoría de las pestañas metálicas de este lado del iPod estén desenganchadas.

crwdns2944171:0crwdnd2944171:0crwdnd2944171:0crwdnd2944171:0crwdne2944171:0