crwdns2933423:0crwdne2933423:0

Assemblare pompa MARCO serie UP

crwdns2936315:0crwdne2936315:0
crwdns2936321:0crwdne2936321:0
crwdns2931653:08crwdne2931653:0
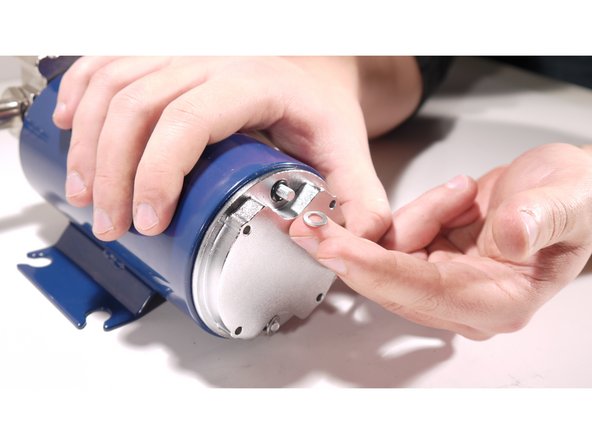
Marco UP Series Electric Pump Assembly, Fix the nuts: crwdns2935265:00crwdnd2935265:01crwdnd2935265:03crwdne2935265:0 Marco UP Series Electric Pump Assembly, Fix the nuts: crwdns2935265:00crwdnd2935265:02crwdnd2935265:03crwdne2935265:0 Marco UP Series Electric Pump Assembly, Fix the nuts: crwdns2935265:00crwdnd2935265:03crwdnd2935265:03crwdne2935265:0
Fix the nuts
  • First insert the o-rings.

  • Then add the washers.

  • Eventually, close slightly with the nuts.

  • Before screwing firmly the nuts, shake a little the assembly or allow a few kicks with a soft mallet on the back of the pump, to adjust the mechanical parts to each other.

  • If you can, test that the motor rotates freely by connecting it to the power supply right now. This is a useful step to do right now, because if the brushes are not correctly assembled, you'll have to disassembly the pump again e start from step 4.

  • Firmly fix the nuts, but be prepared to untighten them as needed if the pump draws too much current.

Inserisci gli O-ring per primi.

Poi aggiungi le rondelle.

Infine, chiudi leggermente i dadi.

Prima di chiudere in modo deciso i dadi, scuoti leggermente ciò che hai assemblato o colpisci leggermente con un martello morbido la calotta della pompa, per permettere ai pezzi di allinearsi.

Se possibile, testa che il motore sia in grado di ruotare liberamente collegandolo alla corrente adesso. Questo passaggio è molto utile da fare ora, perchè se le spazzole non sono state assemblate correttamente, devi smontare tutto e ricomincare dal passaggio 4.

Se il motore ruota correttamente, fissa in modo deciso le viti, ma considera che potresti aver bisogno di svitarle leggermente se la pompa assorbe troppa corrente.

crwdns2944171:0crwdnd2944171:0crwdnd2944171:0crwdnd2944171:0crwdne2944171:0