crwdns2933423:0crwdne2933423:0

Desmontaje del Fairphone 2

crwdns2936315:0crwdne2936315:0
crwdns2936331:0crwdne2936331:0
crwdns2931653:07crwdne2931653:0
Fairphone 2 Teardown: crwdns2935265:00crwdnd2935265:01crwdnd2935265:02crwdne2935265:0 Fairphone 2 Teardown: crwdns2935265:00crwdnd2935265:02crwdnd2935265:02crwdne2935265:0
  • And with that, we're done with the first level of user repairs. The Fairphone is designed to be easily separated into modular components, but what if you want to fix an individual module?

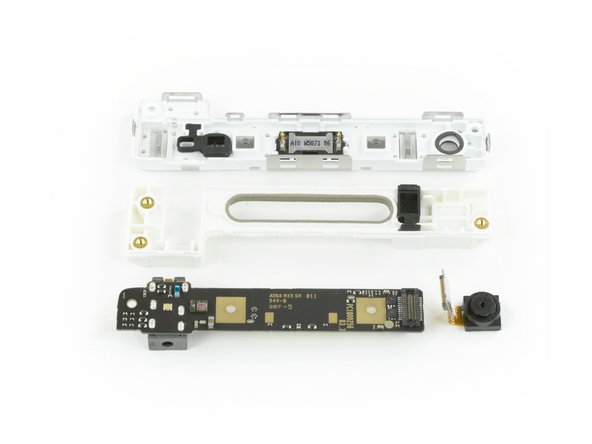
  • The modules are held together with Torx T5 screws—presumably to deter the casual user from delving too deep—but are still easy to open up.

  • We start with the top module: the front-facing camera pops right off thanks to a simple flex cable connector.

  • Spring contacts power the earpiece speaker, making for easy replacement of that as well.

  • The headphone jack, the final component, is soldered to the board. Fortunately, nothing major remains, so a replacement board should be pretty cheap.

Y con eso, finalizamos nuestro primer nivel de reparaciones de usuario. El Fairphone está diseñado para que se separe fácilmente en componentes modulares. ¿Pero qué pasa si quieres arreglar un módulo individual?

Estos módulos están sujetados entre sí con tornillos Torx T5—presumiblemente para evitar que el usuario casual se meta más adentro—pero aun siguen siendo fáciles de abrir.

Comenzamos con el módulo superior: la cámara frontal sale gracias a un simple conector de cable flexible.

Los contactos de muelle alimentan el altavoz auricular haciéndolo fácil de reemplazar también.

La toma de auriculares, el componente final, está soldada a la placa. Afortunadamente, no queda nada mayor, así que una placa de reemplazo debería ser bastante asequible.

crwdns2944171:0crwdnd2944171:0crwdnd2944171:0crwdnd2944171:0crwdne2944171:0