crwdns2933423:0crwdne2933423:0

Démontage du Fairphone 2

crwdns2936315:0crwdne2936315:0
crwdns2936317:0crwdne2936317:0
crwdns2931653:04crwdne2931653:0
Fairphone 2 Teardown: crwdns2935265:00crwdnd2935265:01crwdnd2935265:03crwdne2935265:0 Fairphone 2 Teardown: crwdns2935265:00crwdnd2935265:02crwdnd2935265:03crwdne2935265:0 Fairphone 2 Teardown: crwdns2935265:00crwdnd2935265:03crwdnd2935265:03crwdne2935265:0
  • The lack of visible screws had us a little worried, but not for long thanks to these handily-labeled clips.

  • Removing the display assembly is simply a matter of flipping the switches and sliding the panel out.

  • For those keeping score thus far, removing the front panel keeps us at a grand total of zero tools required.

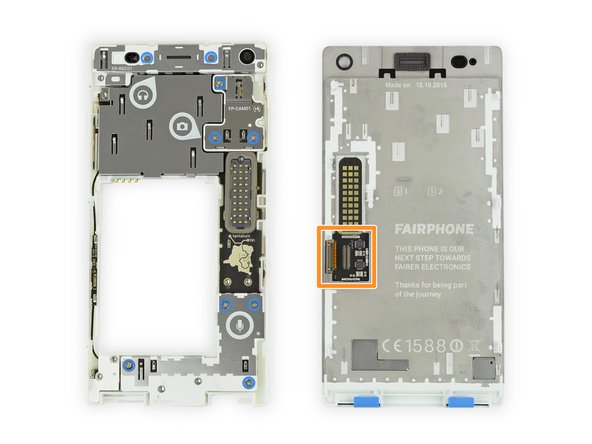
  • On the midframe we find an array of pogo pins, their counter parts are on the back of the display assembly.

  • Immediately below the contact pads on the display assembly we take off the metal shield and see where the display connects to the breakout board.

  • Fairphone modularized off-the-shelf components using breakout boards like these to foster compatibility.

L'absence de vis nous a un peu déconcertés au départ, mais notre inquiétude a vite été dissipée par ces clips bien pensés.

Pour retirer l'unité d'écran, il suffit d'appuyer sur les attaches et de faire sortir le panneau.

Pour ceux qui comptabilisent : pour retirer le panneau frontal, nous avons utilisé un total de zéro outil.

Sur le châssis, nous trouvons une rangée de connecteurs Pogo pin. Leur pendant est placé à l'arrière de l'unité d'écran.

Juste sous le connecteur de l'unité d'écran, nous retirons la plaque de protection en métal et découvrons comment l'écran est connecté au circuit imprimé.

Fairphone a modularisé les composants standard en intégrant des circuits imprimés de ce genre pour accroître la compatibilité.

crwdns2944171:0crwdnd2944171:0crwdnd2944171:0crwdnd2944171:0crwdne2944171:0